Creating Unified APIs on Truto
Overview
Truto allows you to create Unified APIs that simplify how different applications interact. This guide will walk you through creating a Unified API for a CRM system using Salesforce as the integration example.
Step 1: Add a New Unified API
1.1. Go to the Catalog
Log in to Truto:
- Navigate to your Truto dashboard.
Navigate to Catalog:
- On the top-right, click on the
Catalogsection.
- On the top-right, click on the
Create a New Unified API:
- Click the
Create unified APIbutton. 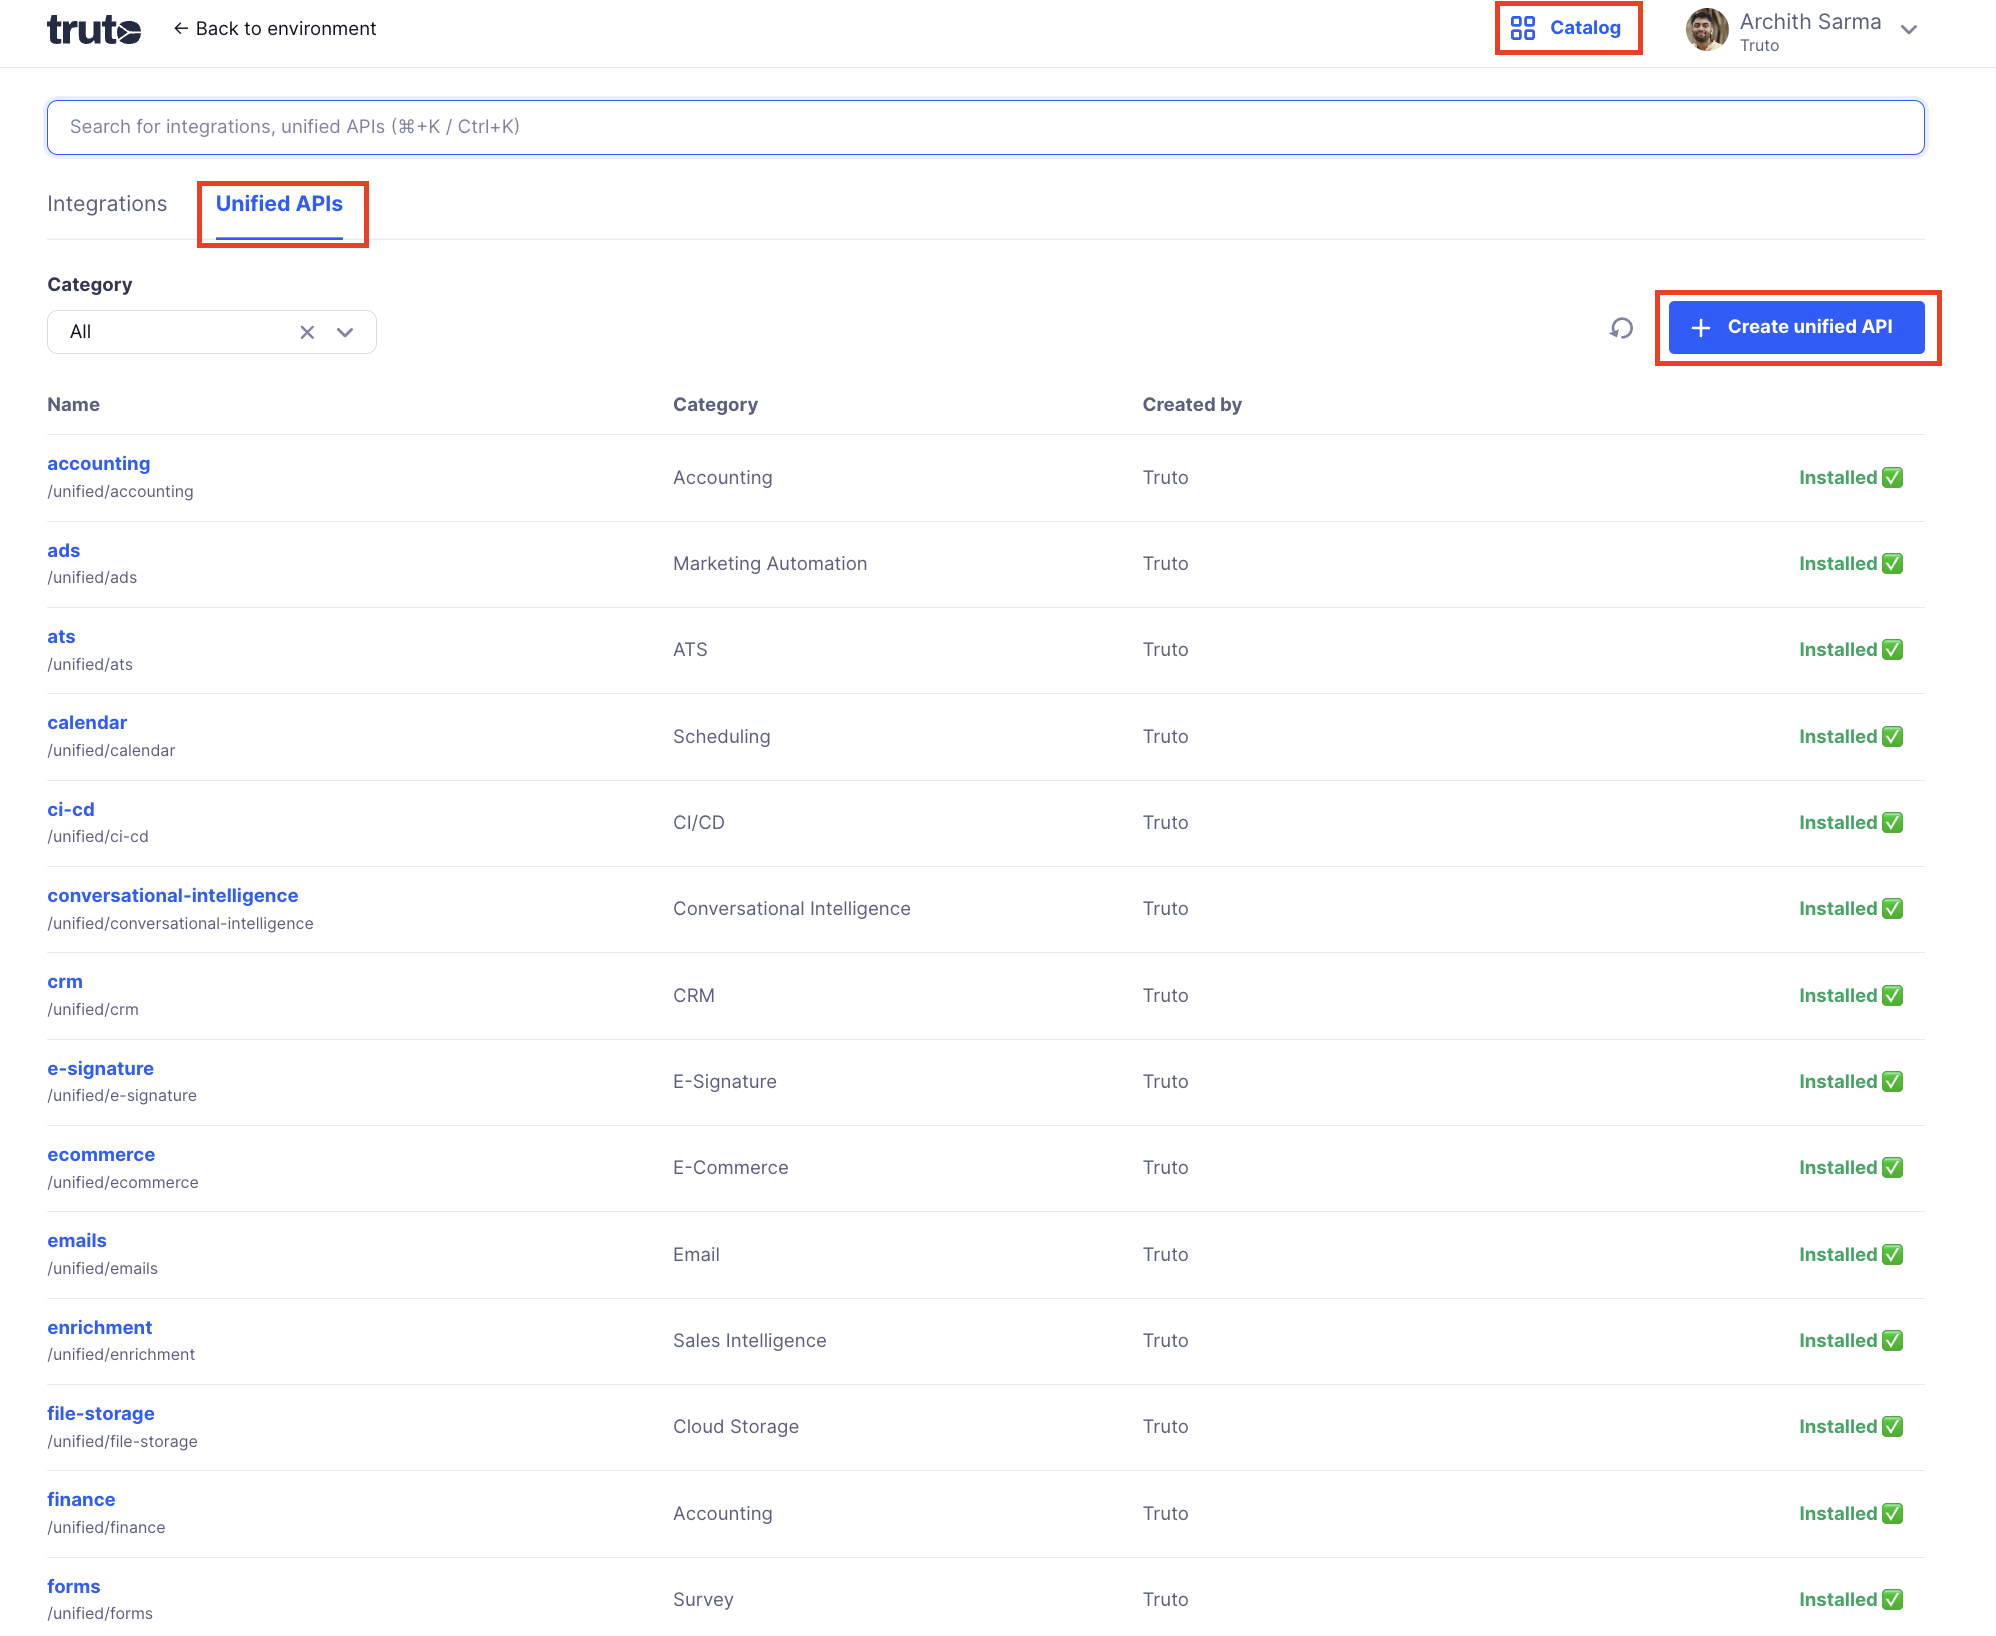
- Click the
1.2. Fill in API Details
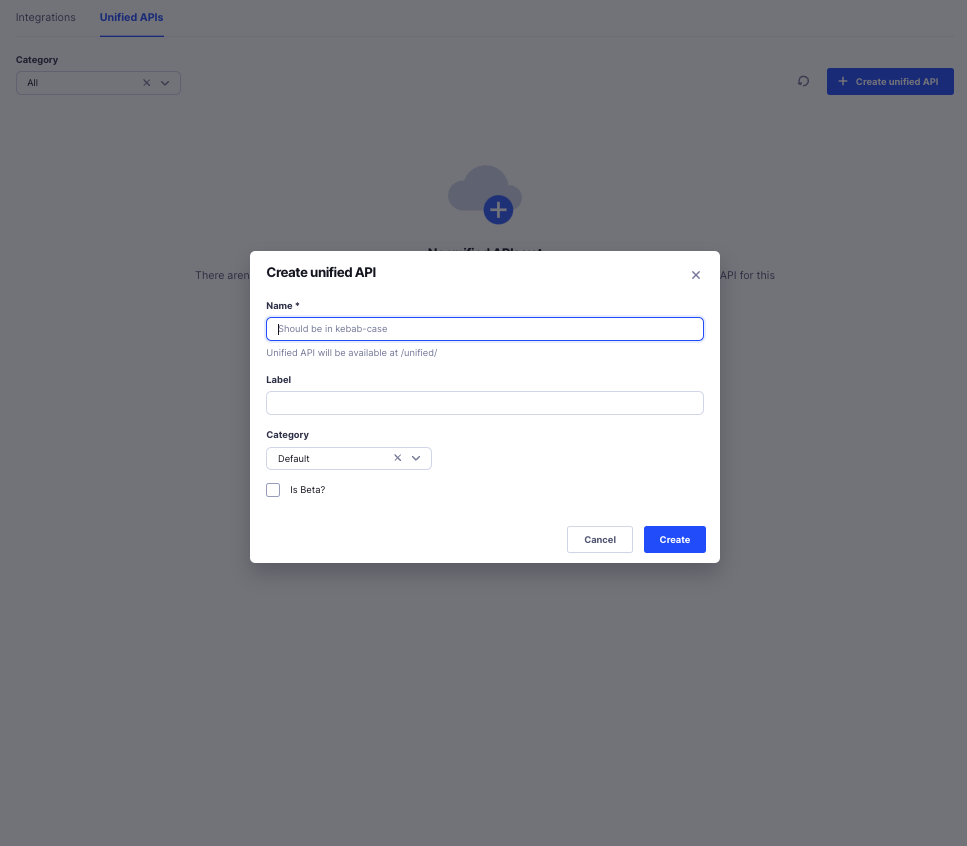
A popup will appear for you to enter basic information about your new API.
Name: Use lowercase letters with hyphens (kebab-case).
Example:crm
This sets the API path to/unified/crm.Label: A friendly name for your API.
Example:Unified CRM APICategory: Helps organize your API.
Example:CRMIs Beta?: Check this box if your API is still being tested.
1.3. Create the API
- After filling in all details, click the
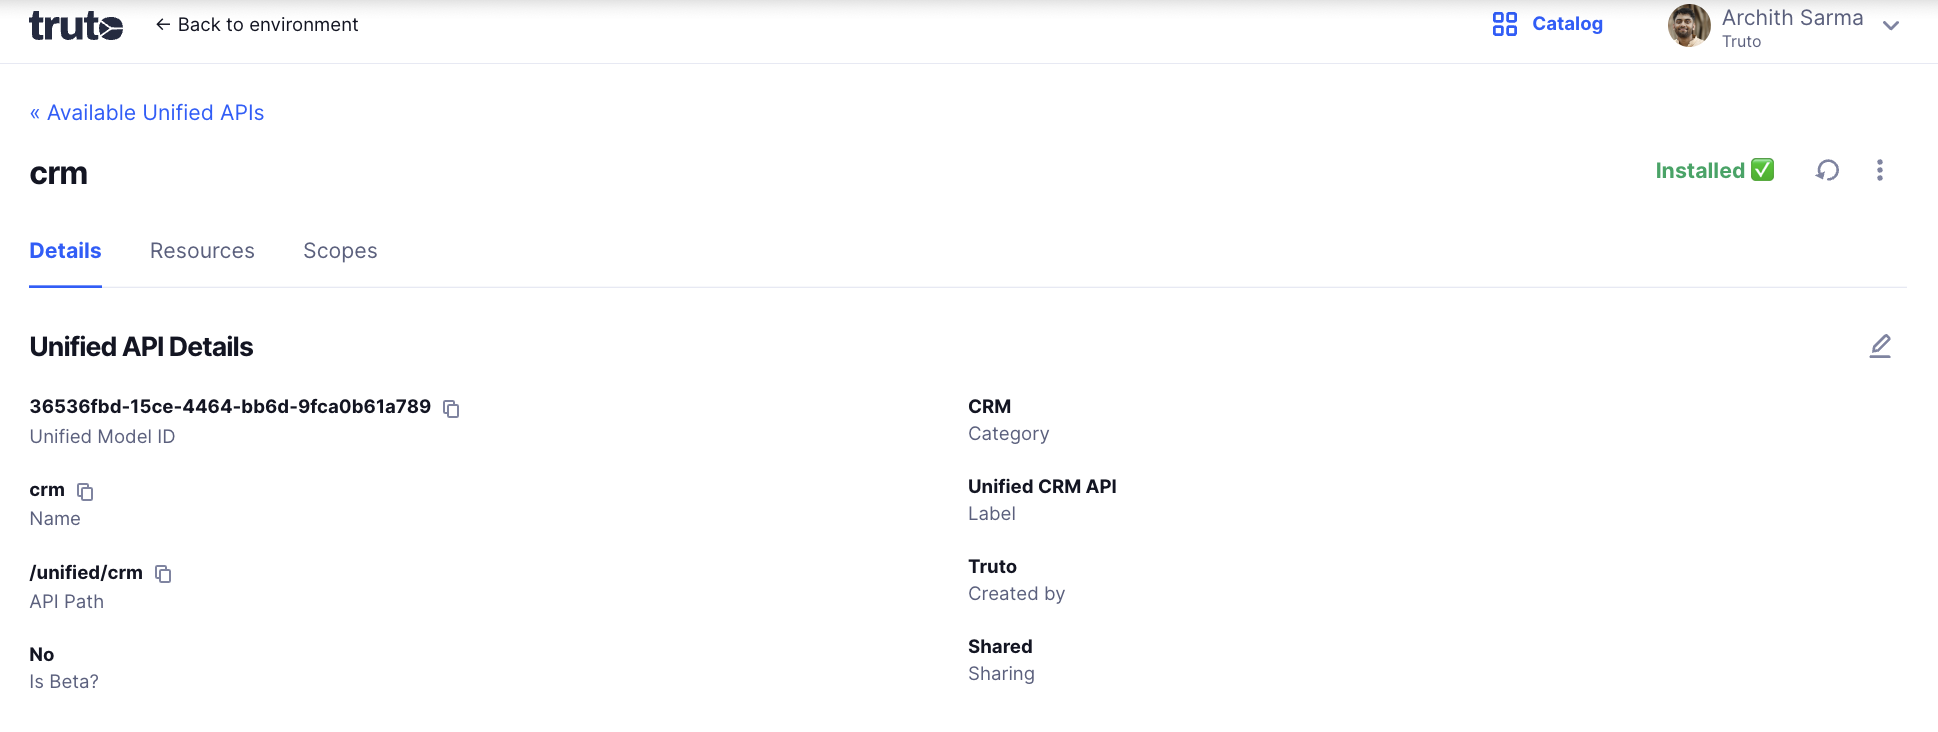
Createbutton. - You'll be redirected to the
Unified APIpage, displaying your newly created API.
Step 2: Add a Resource
A resource represents a specific part of your API, like "accounts" in a CRM system.
2.1. Add a Resource
Go to Resources:
- Within your Unified API page, click on the
Resourcestab.
- Within your Unified API page, click on the
Add New Resource:
- Click the
Add Resourcebutton.

- Click the
Enter Resource Name:
- Use lowercase letters with underscores (snake_case).
Example:accounts
- Use lowercase letters with underscores (snake_case).
Create the Resource:
- Click the
Addbutton to finalize.
- Click the
2.2. Configure Resource Schema
The schema defines the structure of the response data your Unified API will handle. This is used only for documentation purposes and isn't used in validation.
Edit Schema:
- In the
Resourcestab, select your newly addedaccountsresource. - Click on the
Schematab. - Click the edit (pencil) icon to modify the schema.

- In the
Define the Schema:
- Fields: Specify each piece of data your API will manage.
- Types: Indicate the type of data (e.g., string, integer).
- Descriptions: Provide a brief explanation for each field.
You can add the schema using the Form or in JSON.
Save the Schema:
- After entering all fields, click the
Savebutton.
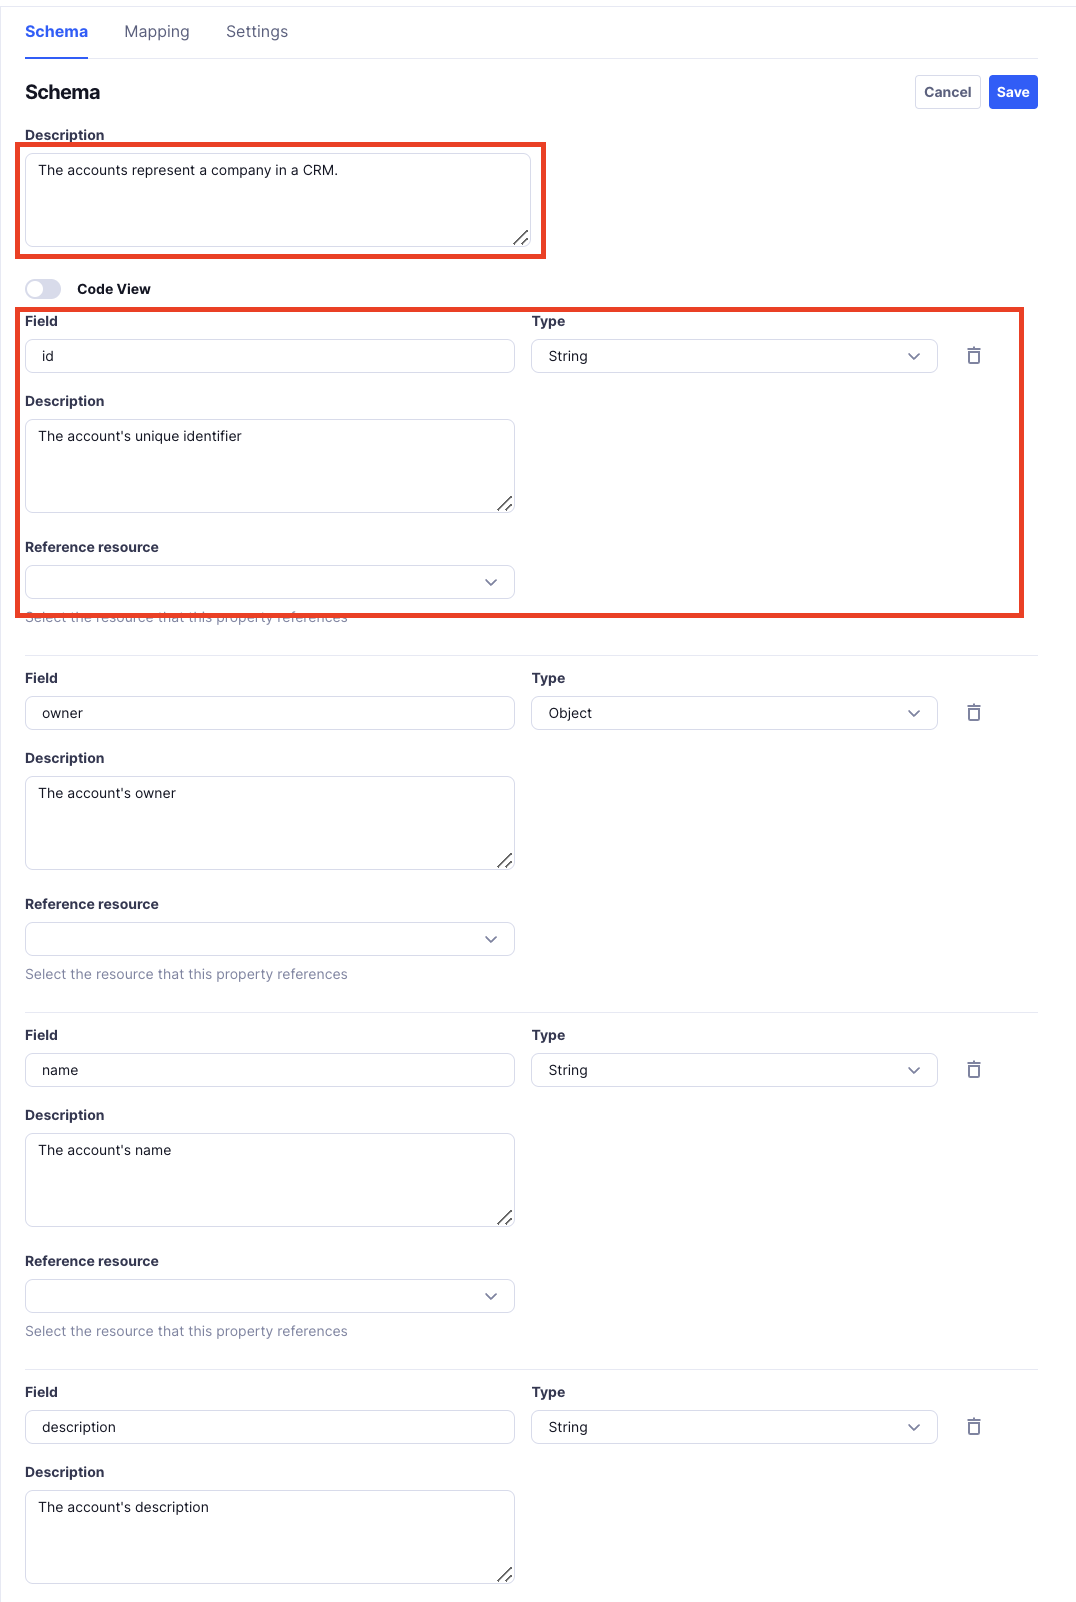
Note: This is how the schema will look like in
JSONjson{ "type": "object", "properties": { "id": { "type": "string", "description": "The account's unique identifier", "required": true }, "owner": { "type": "object", "description": "The account's owner", "properties": { "id": { "type": "string", "description": "The owner's unique identifier" } } }, "name": { "type": "string", "description": "The account's name" }, "website": { "type": "string", "description": "The account's website" } // Add other fields as needed } }- After entering all fields, click the
Step 3: Add Methods and Configure Mapping
The next step is to add a method, which is how the interaction happens with Salesforce
3.1. Add a Method
Add Method:
- Within the
accountsresource, click theMappingtab. - Click the
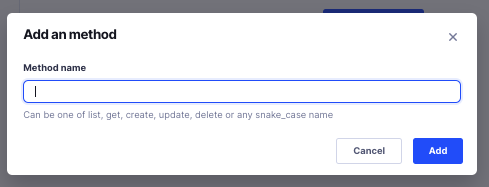
Add methodbutton. - Enter the method name in snake_case (e.g.,
list).- Supported Methods:
list,get,create,update,delete, etc.
- Supported Methods:
- Within the
Save the Method:
- Click the
Savebutton. - This will open the Mapping screen.
- Click the
3.2. Configure Mapping Screen
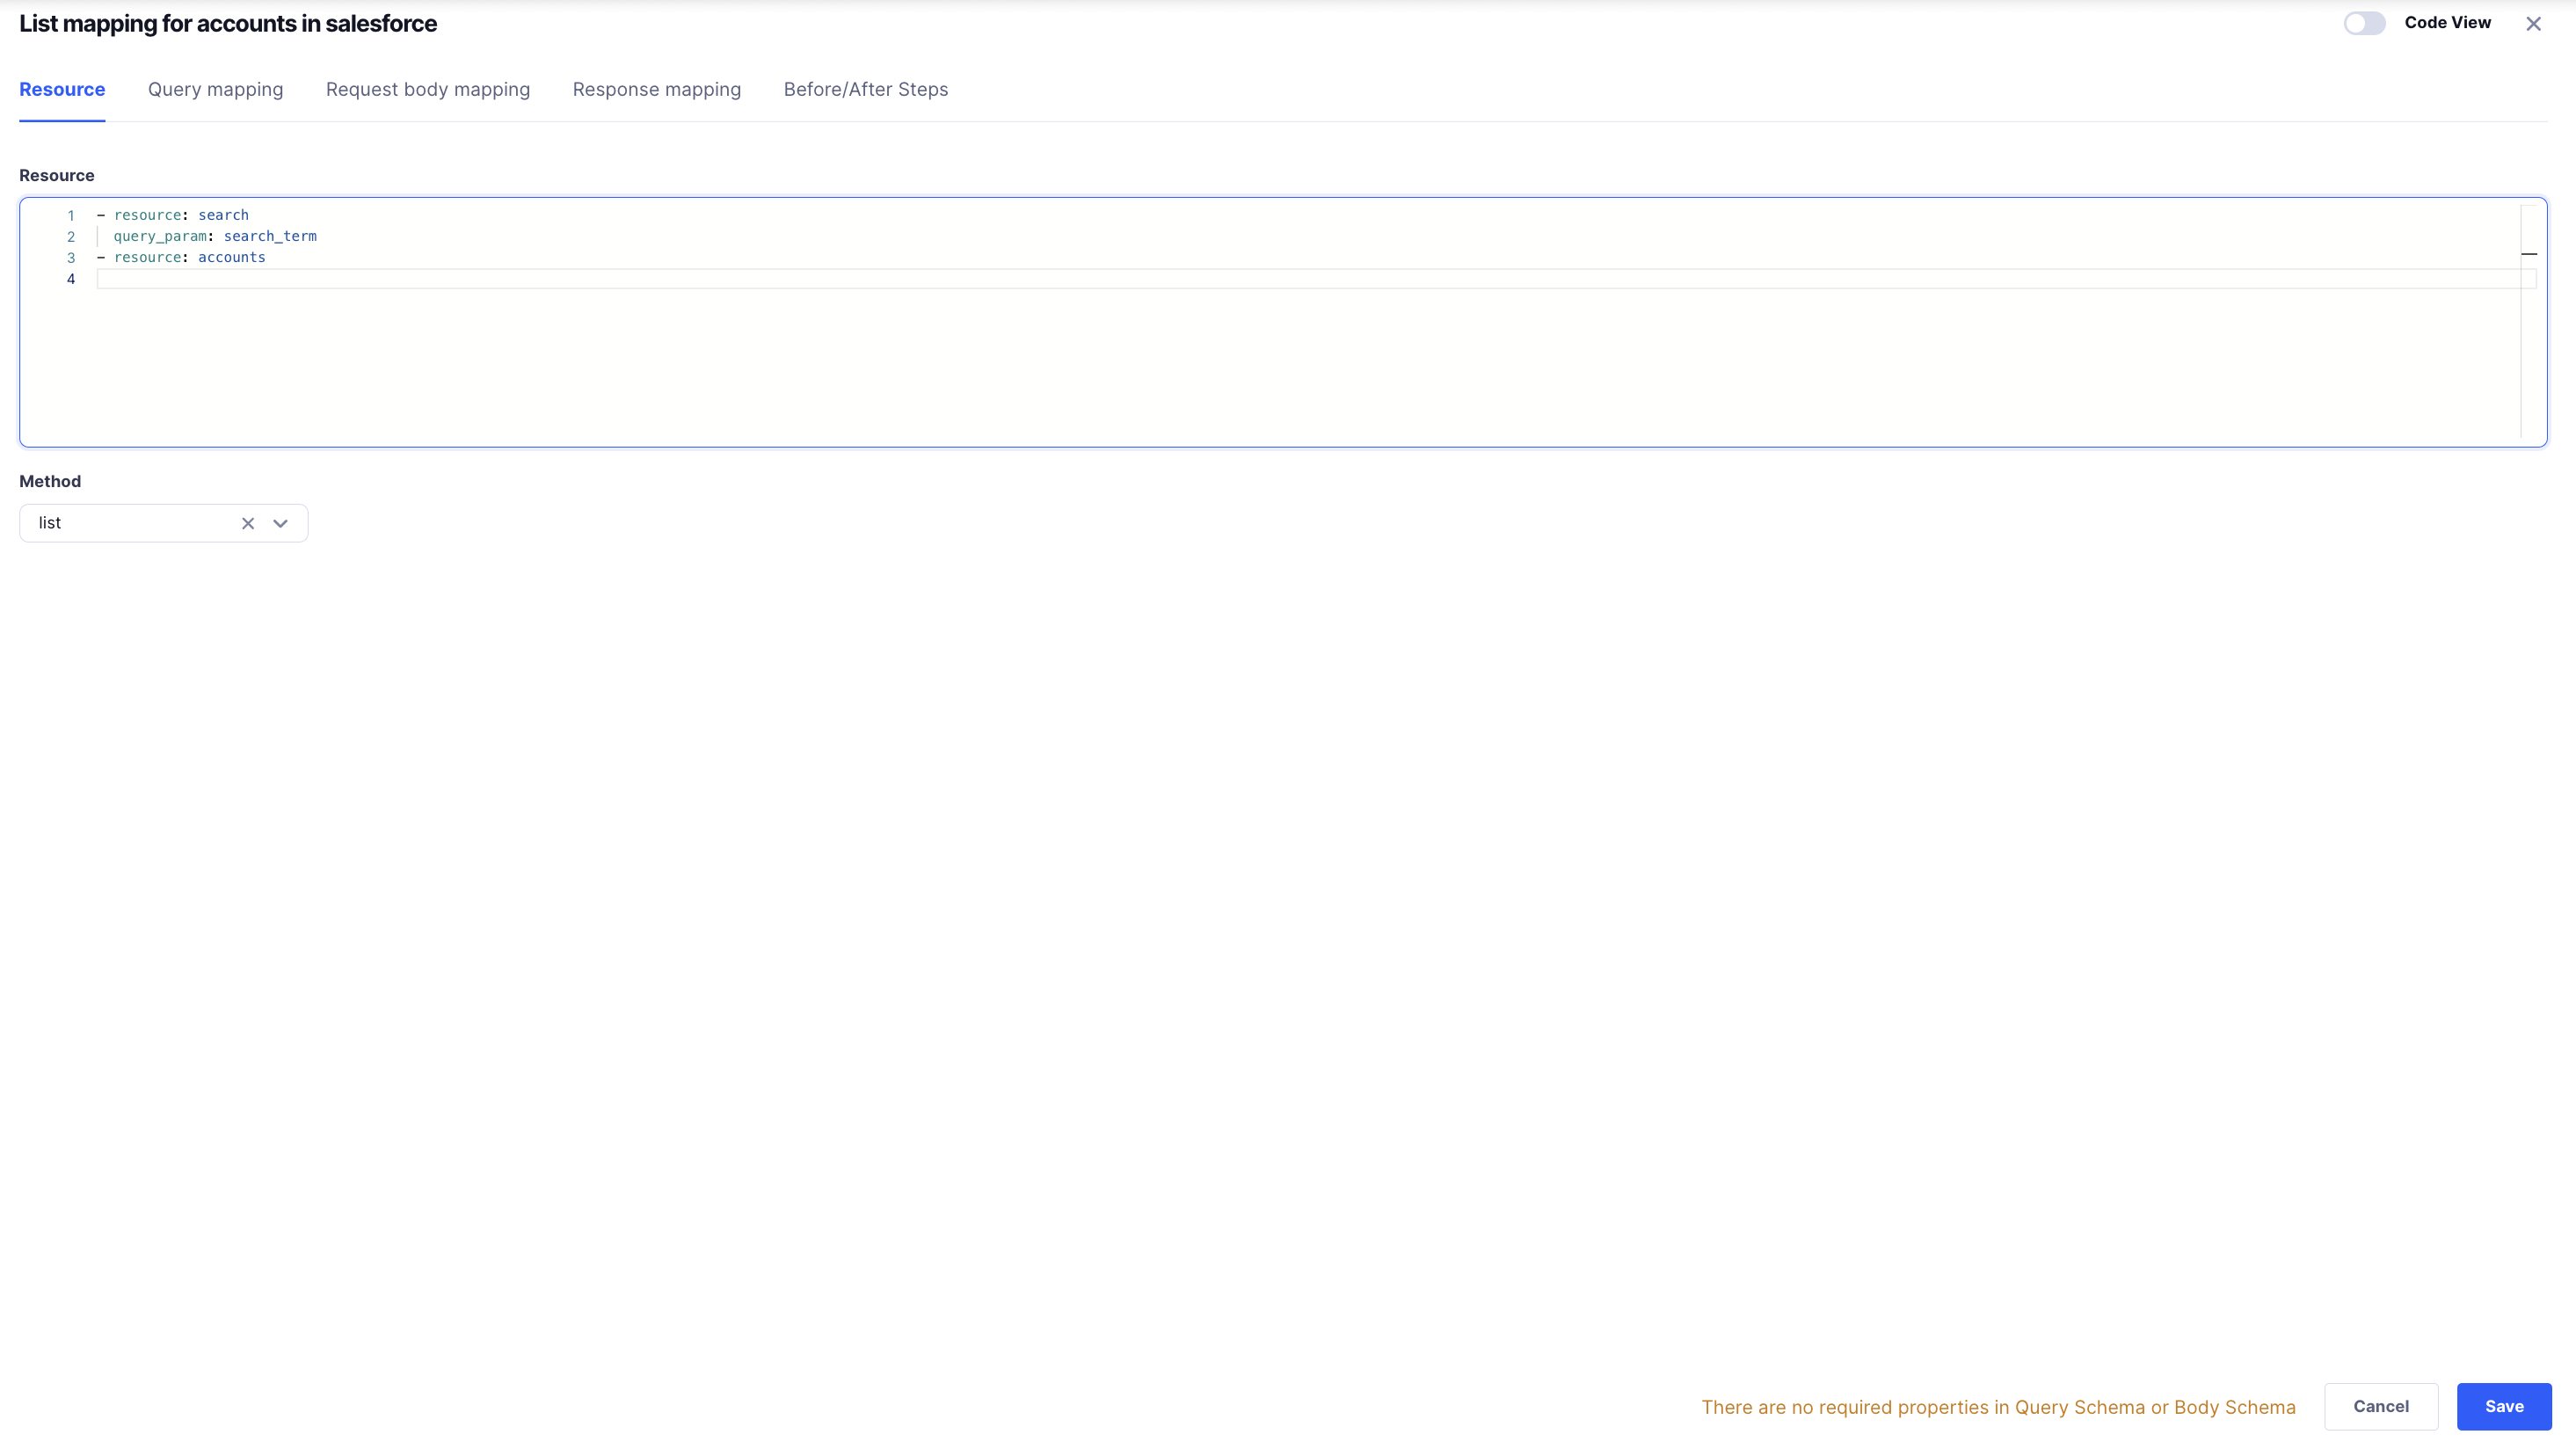
As soon as the Method above is saved, this screens opens up.
Note: These resources and their corresponding methods come from the Integrations (in this case, Salesforce).
Select Resource and Method:
- Resource: Choose
accounts. - Method: Select the method you added earlier (e.g.,
list).
- Resource: Choose
Step 4. Define Query Mapping
Translates query parameters in the Unified API call into the query supported by the underlying API.
This step is generally optional. Use it when you want to pass custom Query Params to the underlying API that are different from what you are passing in the request.
Go to Query Mapping:
- Click on the
Query Mappingtab.
- Click on the
Query Schema:
The Query Schema specifies what should be in the Query Parameters. Since the schema is defined in Resource Schema, you can just specify the fields from the schema that will be used in the Query and
required,type,descriptionwill be automatically used from the Resource Schema. The Query Schema is specified inYAML.yamlname: {} owner: {} city: {} state: {} country: {} created_at: {} updated_at: {} last_activity_at: {} website: {} industry: {} number_of_employees: {} fields: {} custom_fields: {} search_term: {}Example:
A sample query input demonstrating how users can interact with the API.
json{ "query": { "search_term": "Archith", "name": "Archith's", "website": "truto", "include_custom_fields": ["field_1"], "fields": ["fields"] } }Mapping Logic:
Translates the Unified API's query parameters into a Salesforce-compatible SOQL query.
javascript( $whereClause := query ? $convertQueryToSql( $merge([ query .{ "created_at": created_at, "updated_at": updated_at, "last_activity_at": last_activity_at, "name": name ? { "LIKE": "%" & name & "%" }, "owner": owner.id, "city": city ? { "LIKE": "%" & city & "%" }, "state": state ? { "LIKE": "%" & state & "%" }, "country": country ? { "LIKE": "%" & country & "%" }, "website": website.eq ? website.eq : website ? { "LIKE": "%" & website & "%" }, "industry": industry ? { "LIKE": "%" & industry & "%" }, "number_of_employees": number_of_employees }, $sift(query.custom_fields, function($v, $k) { $k ~> /__c$/i }) ]), [ "created_at", "updated_at", "last_activity_at", "name", "owner", "city", "state", "country", "website", "industry", "number_of_employees", $keys(query.custom_fields) ], { "created_at": "CreatedDate", "updated_at": "LastModifiedDate", "last_activity_at": "LastActivityDate", "name": "Name", "owner": "OwnerId", "city": "BillingCity", "state": "BillingState", "country": "BillingCountry", "website": "Website", "industry": "Industry", "number_of_employees": "NumberOfEmployees" }, $merge([ { "created_at": "date", "updated_at": "date", "last_activity_at": "date|yyyy-LL-dd", "name": "string", "owner": "string", "city": "string", "state": "string", "country": "string", "website": "string", "industry": "string", "number_of_employees": "number" }, $keys(query.custom_fields).{ $: "string" } ]), { "LIKE": "LIKE" }, { "noQuotesForDate": true, "escapeSingleQuotes": true } ); $searchTermWhereClause := $whereClause ? " WHERE " & $whereClause; $searchTermCustomFields := $firstNonEmpty(query.include_custom_fields, query.fields) ? ", " & $join($firstNonEmpty(query.include_custom_fields, query.fields), ","); { "q": query.search_term ? "FIND {" & query.search_term & "} RETURNING Account(Id, OwnerId, Name, Description, Industry, NumberOfEmployees, Website, BillingStreet, BillingCity, BillingState, BillingPostalCode, BillingCountry, ShippingStreet, ShippingCity, ShippingState, ShippingPostalCode, ShippingCountry, Phone, Fax, LastActivityDate, CreatedDate, LastModifiedDate" & $searchTermCustomFields & $searchTermWhereClause & ")", "where": $whereClause ? "WHERE " & $whereClause, "include_custom_fields": $firstNonEmpty(query.include_custom_fields, query.fields) ? ", " & $join($firstNonEmpty(query.include_custom_fields, query.fields), ",") } )Mapped (Result):
An example of how the above mapping logic transforms the input into a Salesforce-compatible query.
json{ "q": "FIND {Archith} RETURNING Account(Id, OwnerId, Name, Description, Industry, NumberOfEmployees, Website, BillingStreet, BillingCity, BillingState, BillingPostalCode, BillingCountry, ShippingStreet, ShippingCity, ShippingState, ShippingPostalCode, ShippingCountry, Phone, Fax, LastActivityDate, CreatedDate, LastModifiedDate, field_1 WHERE Name LIKE '%Archith\\'s%' AND Website LIKE '%truto%')", "where": "WHERE Name LIKE '%Archith\\'s%' AND Website LIKE '%truto%'", "include_custom_fields": ", field_1" }
Step 5: Add Response Mapping
After configuring how queries are handled, define how responses from the underlying API are transformed to fit your Unified API's structure.
4.1. Configure Response Mapping
Go to Response Mapping:
- Click on the
Response Mappingtab.
- Click on the
Response Schema:
This defines the structure of the data your API will return to users. This is specified in
YAMLand autopopulated from the Resource Schema defined above.yamltype: object properties: id: type: string description: The account's unique identifier required: true owner: type: object description: The account's owner properties: id: type: string description: The owner's unique identifier name: type: string description: The account's name description: type: string description: The account's description industry: type: string description: The account's industry website: type: string description: The account's website number_of_employees: type: integer description: The account's number of employees addresses: type: array items: type: object properties: id: type: string description: The unique identifier of the address street_1: type: string description: Line 1 of the street address street_2: type: string description: Line 2 of the street address city: type: string description: The city state: type: string description: The state postal_code: type: string description: The postal code country: type: string description: The country type: type: string description: The address type phone_numbers: type: array items: type: object properties: id: type: string description: The unique identifier of the phone number number: type: string description: The phone number extension: type: string description: The extension of the phone number type: type: string description: The phone number type urls: type: array items: type: object properties: url: type: string description: The account's URL type: type: string description: The account's URL type description: The account's urls tags: type: array items: type: object properties: id: type: string description: The tag's unique identifier name: type: string description: The tag's name description: The contact's tags custom_fields: type: object description: All the custom fields present on the account additionalProperties: true last_activity_at: type: string description: The date and time of the account's last activity format: date-time updated_at: type: string description: The date and time of the account's last update format: date-time created_at: type: string description: The date and time of the account's creation format: date-timeProvide an Example Response:
Provide an example raw API response from
Salesforceso that you can verify your mappingjson{ "response": { "attributes": { "type": "Account", "url": "/services/data/v57.0/sobjects/Account/0012w000024KwDeAAK" }, "truto__Custom_Alternate_Email__c": "Archith@truto.dev", "Id": "0012w000024KwDeAAK", "IsDeleted": false, "MasterRecordId": null, "Name": "Truto-Archith-Test", "Type": null, "ParentId": null, "BillingStreet": "5", "BillingCity": "BNGLR", "BillingState": "KA", "BillingPostalCode": "560066", "BillingCountry": "INDIA", "BillingLatitude": null, "BillingLongitude": null, "BillingGeocodeAccuracy": null, "BillingAddress": { "city": "BNGLR", "country": "INDIA", "geocodeAccuracy": null, "latitude": null, "longitude": null, "postalCode": "560066", "state": "KA", "street": "5" }, "ShippingStreet": "sdf", "ShippingCity": "sf", "ShippingState": "fsfs", "ShippingPostalCode": "fsfssf", "ShippingCountry": "sffsnull", "ShippingLatitude": null, "ShippingLongitude": null, "ShippingGeocodeAccuracy": null, "ShippingAddress": { "city": "sf", "country": "sffsnull", "geocodeAccuracy": null, "latitude": null, "longitude": null, "postalCode": "fsfssf", "state": "fsfs", "street": "sdf" }, "Phone": "89845552321", "Fax": "5754545585544", "AccountNumber": null, "Website": "hi-triuto.one", "PhotoUrl": "/services/images/photo/0012w000024KwDeAAK", "Sic": null, "Industry": "Automation", "AnnualRevenue": null, "NumberOfEmployees": 2, "Ownership": null, "TickerSymbol": null, "Description": "Test", "Rating": null, "Site": null, "OwnerId": "0052w00000CkYXHAA3", "CreatedDate": "2024-01-09T06:07:11.000+0000", "CreatedById": "0052w00000CkYXHAA3", "LastModifiedDate": "2024-08-29T06:53:52.000+0000", "LastModifiedById": "0052w00000CkYXHAA3", "SystemModstamp": "2024-08-29T06:53:52.000+0000", "LastActivityDate": "2024-05-01", "LastViewedDate": "2024-08-29T06:53:52.000+0000", "LastReferencedDate": "2024-08-29T06:53:52.000+0000", "Jigsaw": null, "JigsawCompanyId": null, "CleanStatus": "Pending", "AccountSource": null, "DunsNumber": null, "Tradestyle": null, "NaicsCode": null, "NaicsDesc": null, "YearStarted": null, "SicDesc": null, "DandbCompanyId": null, "OperatingHoursId": null } }Define the Mapping Logic:
Transforms the raw Salesforce response into the structure defined by your Unified API's response schema.
jsonresponse .{ "id": Id, "owner": { "id": OwnerId }, "name": Name, "description": Description, "industry": Industry, "number_of_employees": NumberOfEmployees, "website": Website, "addresses": [ { "street_1": BillingStreet, "city": BillingCity, "state": BillingState, "postal_code": BillingPostalCode, "country": BillingCountry, "type": "billing" }, { "street_1": ShippingStreet, "city": ShippingCity, "state": ShippingState, "postal_code": ShippingPostalCode, "country": ShippingCountry, "type": "shipping" } ], "phone_numbers": [ { "number": Phone, "type": "phone" }, { "number": Fax, "type": "fax" } ], "last_activity_at": LastActivityDate, "created_at": CreatedDate, "updated_at": LastModifiedDate, "custom_fields": $sift($, function($v, $k) { $k ~> /__c$/i and $boolean($v) }) }Explanation:
- id: Maps Salesforce's
Idto your API'sid. - owner: Extracts
OwnerIdfrom Salesforce and nests it underowner.id. - addresses: Combines billing and shipping addresses into a single array, distinguishing them by type.
- phone_numbers: Includes both
PhoneandFaxnumbers with their respective types. - custom_fields: Filters and includes only custom fields from Salesforce that end with
__cand have valid values.
- id: Maps Salesforce's
Check the Mapped (Result):
This is the result of your
Response Exampleabove transformed through theResponse Mapping. Use it to verify that the mapping is correct.json{ "id": "0012w000024KwDeAAK", "owner": { "id": "0052w00000CkYXHAA3" }, "name": "Truto-Archith-Test", "description": "Test", "industry": "Automation", "number_of_employees": 2, "website": "hi-triuto.one", "addresses": [ { "street_1": "5", "city": "BNGLR", "state": "KA", "postal_code": "560066", "country": "INDIA", "type": "billing" }, { "street_1": "sdf", "city": "sf", "state": "fsfs", "postal_code": "fsfssf", "country": "sffsnull", "type": "shipping" } ], "phone_numbers": [ { "number": "89845552321", "type": "phone" }, { "number": "5754545585544", "type": "fax" } ], "last_activity_at": "2024-05-01", "created_at": "2024-01-09T06:07:11.000+0000", "updated_at": "2024-08-29T06:53:52.000+0000", "custom_fields": { "truto__Custom_Alternate_Email__c": "Archith@truto.dev" } }
Once done, save your mapping by clicking on Save. This will save your Unified API mapping for the resource. You can test the Unified API created after connecting an Integrated Accounts.
Static Mapping
Sometimes, an API endpoint always returns the same, unchanging data (like a predefined list of options or a fixed configuration). In such cases, instead of making unnecessary API calls to fetch the same static data every time, you can use Static Mapping.
Static Mapping allows you to configure a response directly in the Unified API, so the response is sent without actually making any API calls. This is especially useful for list or get endpoints where the data doesn't change often or at all - you can enable Static Mapping for these methods.
How to Enable Static Mapping
Navigate to the Response Mapping Tab
- Go to the resource you're working on (e.g.,
/list-optionsor/configurations). - Open the Response Mapping section for that resource.
- Go to the resource you're working on (e.g.,
Enable Static Mapping
- Look for the Static Mapping toggle.
- Turn it on to activate static mapping for this resource.
Define the Static Response
- Once enabled, you can define the static response that will be returned every time this endpoint is called.
- Example:json
{
  "options": [
    { "id": 1, "name": "Option A" },
    { "id": 2, "name": "Option B" },
    { "id": 3, "name": "Option C" }
  ]
}
Once enabled, it should look like :
- Save Your Configuration
- Save your changes, and the Unified API will now return the static response whenever this endpoint is called.
When to Use Static Mapping?
- List or Get Endpoints: For endpoints that return predefined or rarely changing data, such as dropdown options or fixed settings.
- No Backend Dependency: If you don't want the response to rely on a API call.
- Faster Responses: Reduces latency since no actual API request is made.
Error Mapping
In case the underlying API returns an error, you can define a custom mapping to standardize the error structure for your Unified API consumers.
Configure Error Mapping
Go to Error Mapping:
- Click on the Error tab.
Error Example (JSON):
json{ "message": "Something went wrong", "errorCode": 4001 }
Error Mapping
Error mapping should return an object that includes the following:
- Error Message (
message): The main error message describing what went wrong. - Metadata (
metadata): Optional additional details about the error, such as timestamps, request IDs, or other context. - Status (
status): Optional HTTP status code associated with the error, e.g., 400 for a bad request or 500 for an internal server error.
Example:
{
  "error": "ValidationError",
  "message": "Invalid input provided",
  "status": 422,
  "metadata": {
    "field": "email",
    "errorCode": "INVALID_EMAIL_FORMAT",
    "timestamp": "2025-01-24T12:34:56Z"
  }
}
View Available Bindings
Use platform-specific bindings to reference error details, status codes, etc.
Mapped Error (Result)
Applying your mapping to the example error might produce the following result:
{
  "message": "Invalid input provided",
  "metadata": {
    "field": "email",
    "errorCode": "INVALID_EMAIL_FORMAT"
  }
}
Request Header Mapping
You can define how your Unified API injects or transforms headers before sending them to the underlying API.
Configure Request Header Mapping
Go to Request Header:
- Click on the Request Header tab.
Request Header Example (JSON):
json{ "x-truto-header": "abc123", "x-truto-custom-header": "myValue" }This is an example of the headers you may want to send.
Request Header Mapping
The mapping should return an object where the key-values contain the header name and the value.
Example JSONata mapping:
jsonata{ "header": x-truto-header "customHeader": x-truto-custom-header }View available bindings: Use platform-specific bindings to reference dynamic values if needed.
Beautify JSONata (optional): Prettifies the expression for easier readability.
Mapped Header (Result)
After applying your JSONata mapping, you’ll see a preview of what headers will be sent. For example:
{
  "header": "abc123",
  "customHeader" : "myValue"
}
Response Header Mapping
You can define how headers returned by the underlying API are transformed or exposed back to the consumer of the Unified API.
Configure Response Header Mapping
Go to Response Header:
- Click on the Response Header tab.
Response Header Example (JSON):
json{ "some-internal-header": "some-value", "some-other-header": "sessionid=123456" }
Response Header Mapping
The mapping should return an object where the key-values contain the header name and the value.
Example JSONata mapping:
jsonata{ "x-truto-header": some-internal-header }Modify the returned header names or filter them as needed.
Mapped Header (Result)
For instance, if your mapping logic only passes through certain headers:
{
  "x-truto-header": "some-value"
}
You’ll see the final headers that will be returned to the client in this preview.

Before Steps
Before Steps are actions that run before the main request is made by the Unified API. Think of Before Steps as a way to prepare your request with extra data, replace missing fields, or add logic to handle specific conditions.
How to Set Up Before Steps
- Choose the Type of Step
There are three types of Before Steps you can configure:- Request: Fetch additional data.
- State: Store the data for later use in
Before Steps. - Replace Data: Replace the data of the Before Steps in the request with a
Statedefined.
Detailed Step Types
1. Unified API (Fetch Additional Data)
Use this step to call another Unified API resource and fetch additional data before the Unified API call.
When to Use It:
If your request requires data from another resource, like fetching interview details before querying candidates.Setup:
Name: Enter a name for the step.
Example:Fetch Interview DetailsRun Conditionally: Enable this to only run the step when needed.
Run If (Optional): Add a JSONata expression to decide whether the step should run.
Example:jsonata$exists(query.interview_id)This step will run only if
interview_idexists in the query.Is JSONata Expression?: Enable this to specify a
JSONataexpression for theRequest. You should specify the following attributes in theJSONataexpression :resource- The name of the resource to callmethod- The method which can be a get, list, create, update, deletetype- The type of the request which is,UnifiedorProxy.
You can also use the available Before/After JSONata Bindings to send, access, and modify
body,queryoridvalues.
Alternatively, you can select the following options :
- Request Type: Select the
UnifiedorProxyAPI. - Resource to Fetch: Select the resource (e.g.,
interviews). - Method to Call: Choose the method (e.g.,
getorlist). - Enter ID (if needed): Provide the ID for the resource to fetch. Used in
getmethods. - Query Parameters: Add any parameters needed in JSON format.
Example:json{ "include_details": true } - Request Body (if applicable): Specify the body in JSON format.
2. State
Use this to store the data for later use in Before Steps.
- Setup:
- Name: Enter a name for the step.
Example:Set Default Priority - Run Conditionally: Enable this to only run the step when needed.
- Run If (JSONata): Provide a JSONata expression that returns
trueorfalseto determine whether the step should run.
Example:jsonataThis step will run only if the$not($exists(query.priority))priorityfield is missing.
- Name: Enter a name for the step.
3. Replace Data
Use this step to replace the data of the Before Steps in the request with a state you defined.
- Setup:
- Name: Enter a name for the step.
- Run Conditionally: Enable this to only run the step when needed.
- Run If (JSONata): Provide a JSONata expression that returns
trueorfalseto determine whether the step should run. - State Name: Specify the name of the
statedefined above to replace.
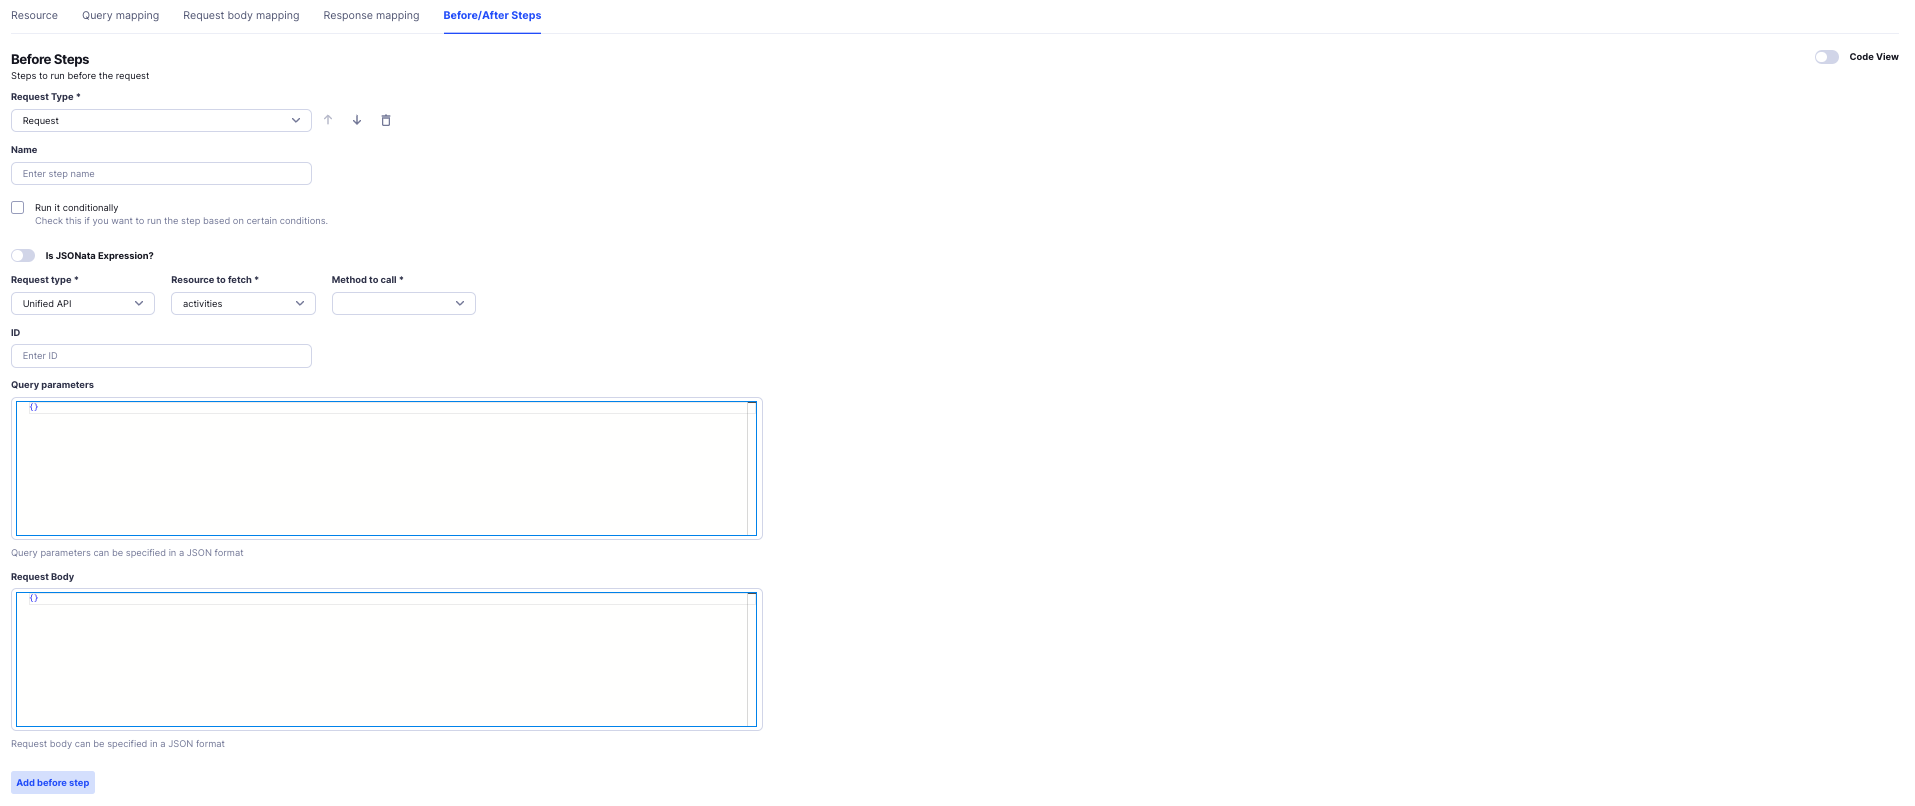
The Before Steps screen looks like -
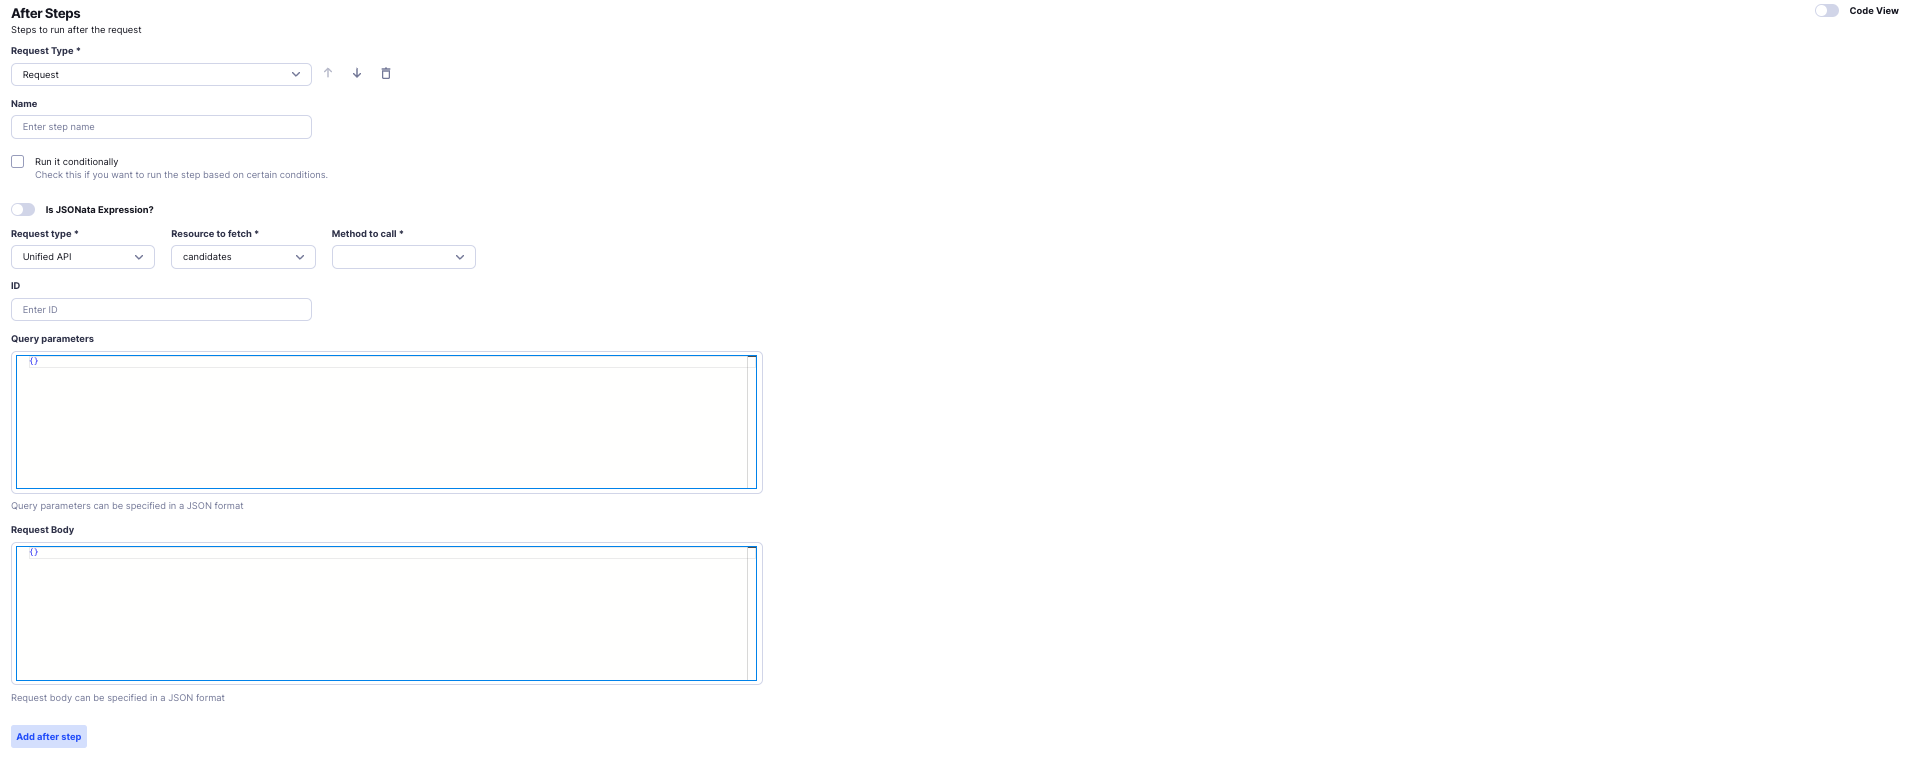
After Steps
After Steps are actions that run after the main request is made by the Unified API. Think of After Steps as a way to modify your request with extra data, replace missing fields, or add logic to handle specific conditions before returning the data to the user.
How to Set Up After Steps
- Choose the Type of Step
There are three types of After Steps you can configure:- Request: Fetch additional data.
- State: Store the data for later use in
After Steps. - Replace Data: Replace placeholders or incomplete fields in the request with predefined values.
Detailed Step Types
1. Unified API (Fetch Additional Data)
Use this step to call another Unified API resource and fetch additional data after the Unified API call.
When to Use It:
Say, for example, in aPATCHrequest, if the underlying API only returns theidof the updated resource, you can use after steps to fetch the complete details. After the PATCH request is processed, an after step can make a GET call to retrieve the full resource data and return the complete response to the userSetup:
Name: Enter a name for the step.
Example:Fetch Interview DetailsRun Conditionally: Enable this to only run the step when needed.
Run If (Optional): Add a JSONata expression to decide whether the step should run.
Is JSONata Expression?: Enable this to specify a
JSONataexpression for theRequest. You should specify the following attributes in theJSONataexpression :resource- The name of the resource to callmethod- The method which can be a get, list, create, update, deletetype- The type of the request which is,UnifiedorProxy
You can also use the available Before/After JSONata Bindings to send, access, and modify
body,queryoridvalues.
Alternatively, you can select the following options :
- Resource to Fetch: Select the resource (e.g.,
interviews). - Method to Call: Choose the method (e.g.,
getorlist). - Enter ID (if needed): Provide the ID for the resource to fetch. Used in
getmethods. - Query Parameters: Add any parameters needed in JSON format.
Example:json{ "include_details": true } - Request Body (if applicable): Specify the body in JSON format.
2. State
Use this to store the data for later use
- Setup:
- Name: Enter a name for the step.
Example:Set Default Priority - Run Conditionally: Enable this to only run the step when needed.
- Run If (JSONata): Provide a JSONata expression that returns
trueorfalseto determine whether the step should run.
Example:jsonataThis step will run only if the$not($exists(query.priority))priorityfield is missing.
- Name: Enter a name for the step.
3. Replace Data
Use this step to replace the data of the After Steps in the request with a state you defined.
- Setup:
- Name: Enter a name for the step.
- Run Conditionally: Enable this to only run the step when needed.
- Run If (JSONata): Provide a JSONata expression that returns
trueorfalseto determine whether the step should run. - State Name: Specify the name of the
statedefined above.
The After Steps screen looks like -
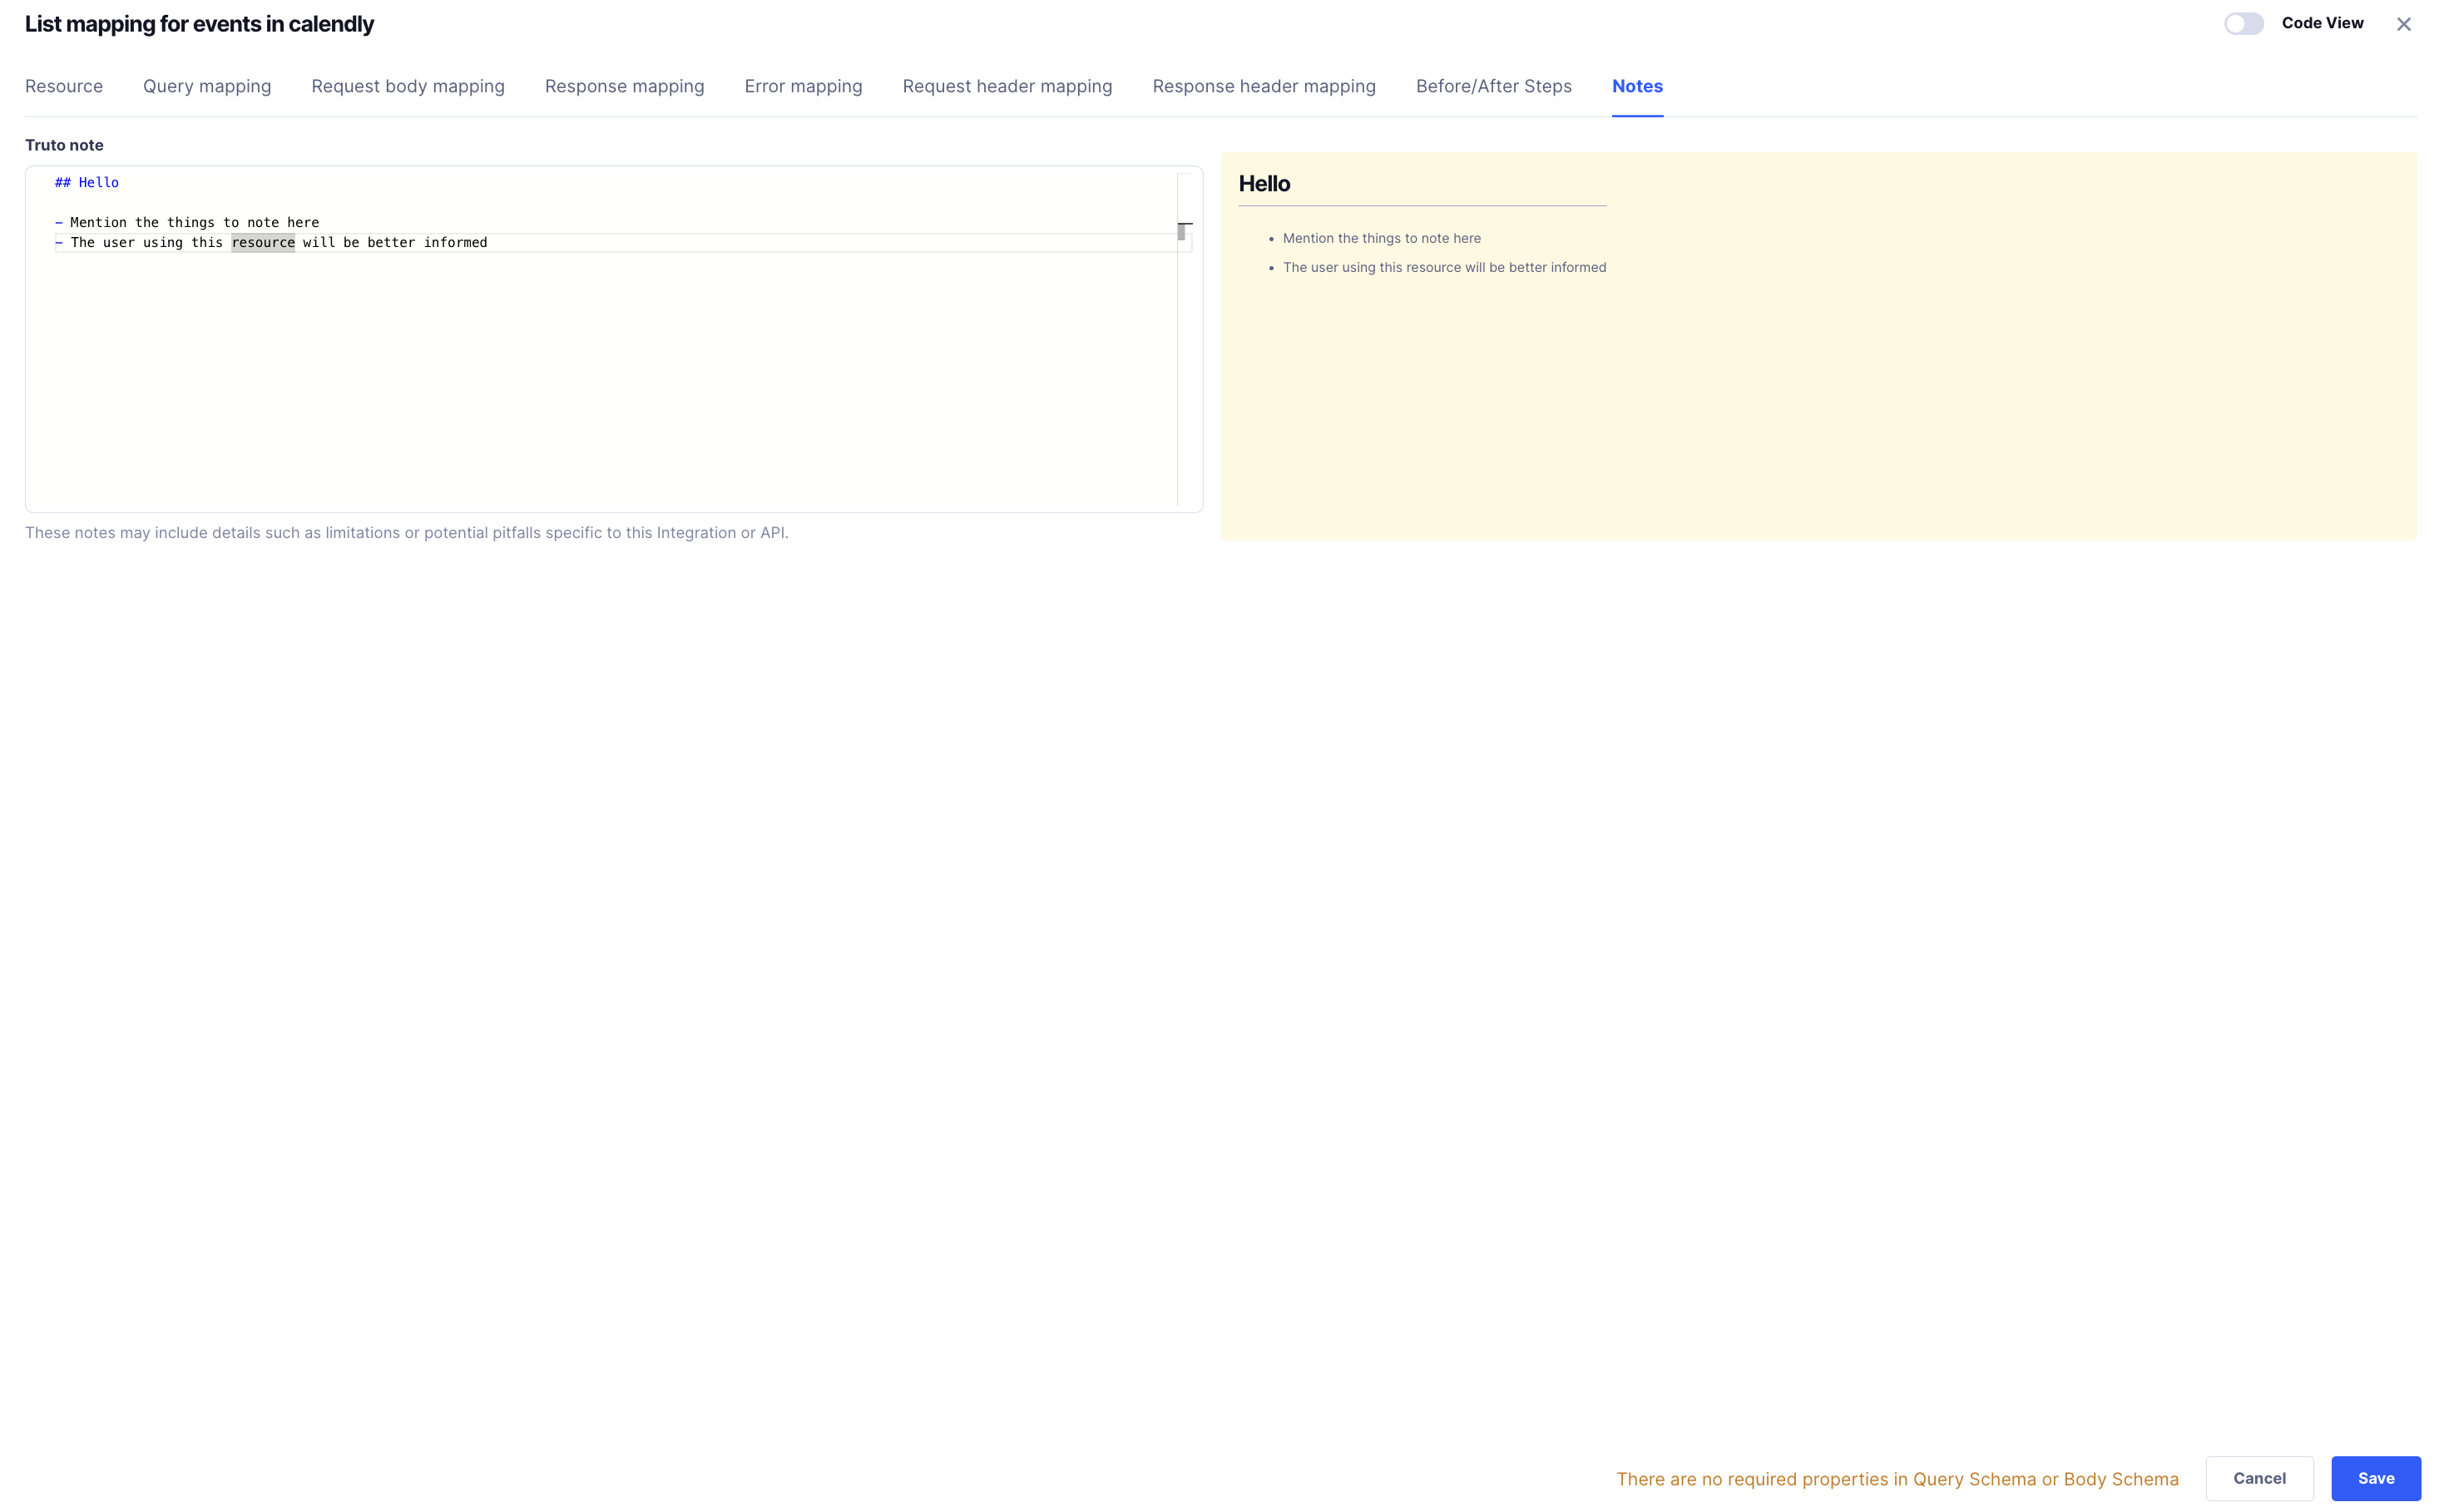
Truto Notes
This section is a space where the Truto team jots down important details, limitations, and potential pitfalls specific to this resource in our Unified Model. You can also add details here to note important details.
What You Can Write Here
Key Characteristics:
Describe what makes this resource unique or any quirks it might have. This helps set expectations and provides context.Usage Tips:
Share simple tips and best practices on how to use this resource effectively. For example, mention common pitfalls or suggest smoother ways to handle certain tasks.Limitations:
Point out any known limitations or constraints. If the underlying API has restrictions that affect this resource, note them here in plain language.Troubleshooting Advice:
Offer friendly guidance on what to do if things don't work as expected. This can include hints on where to look for errors or how to fix common issues.Reminders and Warnings:
Add any reminders or gentle warnings that can help users avoid mistakes or understand important considerations when interacting with the resource.General Observations:
Write down observations or thoughts that might be useful for anyone working with or maintaining this resource in the future.
