Creating Integrations on Truto
Overview
Truto allows you to install pre-built integrations or create custom ones tailored to your needs. This step-by-step guide will walk you through creating an integration on Truto, using Salesforce as an example to make it easy to follow.
Adding a New Integration
Navigate to the Catalog
Start by going to theCatalogsection and clicking theCreate Integrationbutton.
Open the Create Integration Page
Clicking the button takes you to theCreate Integrationpage where you’ll configure all details.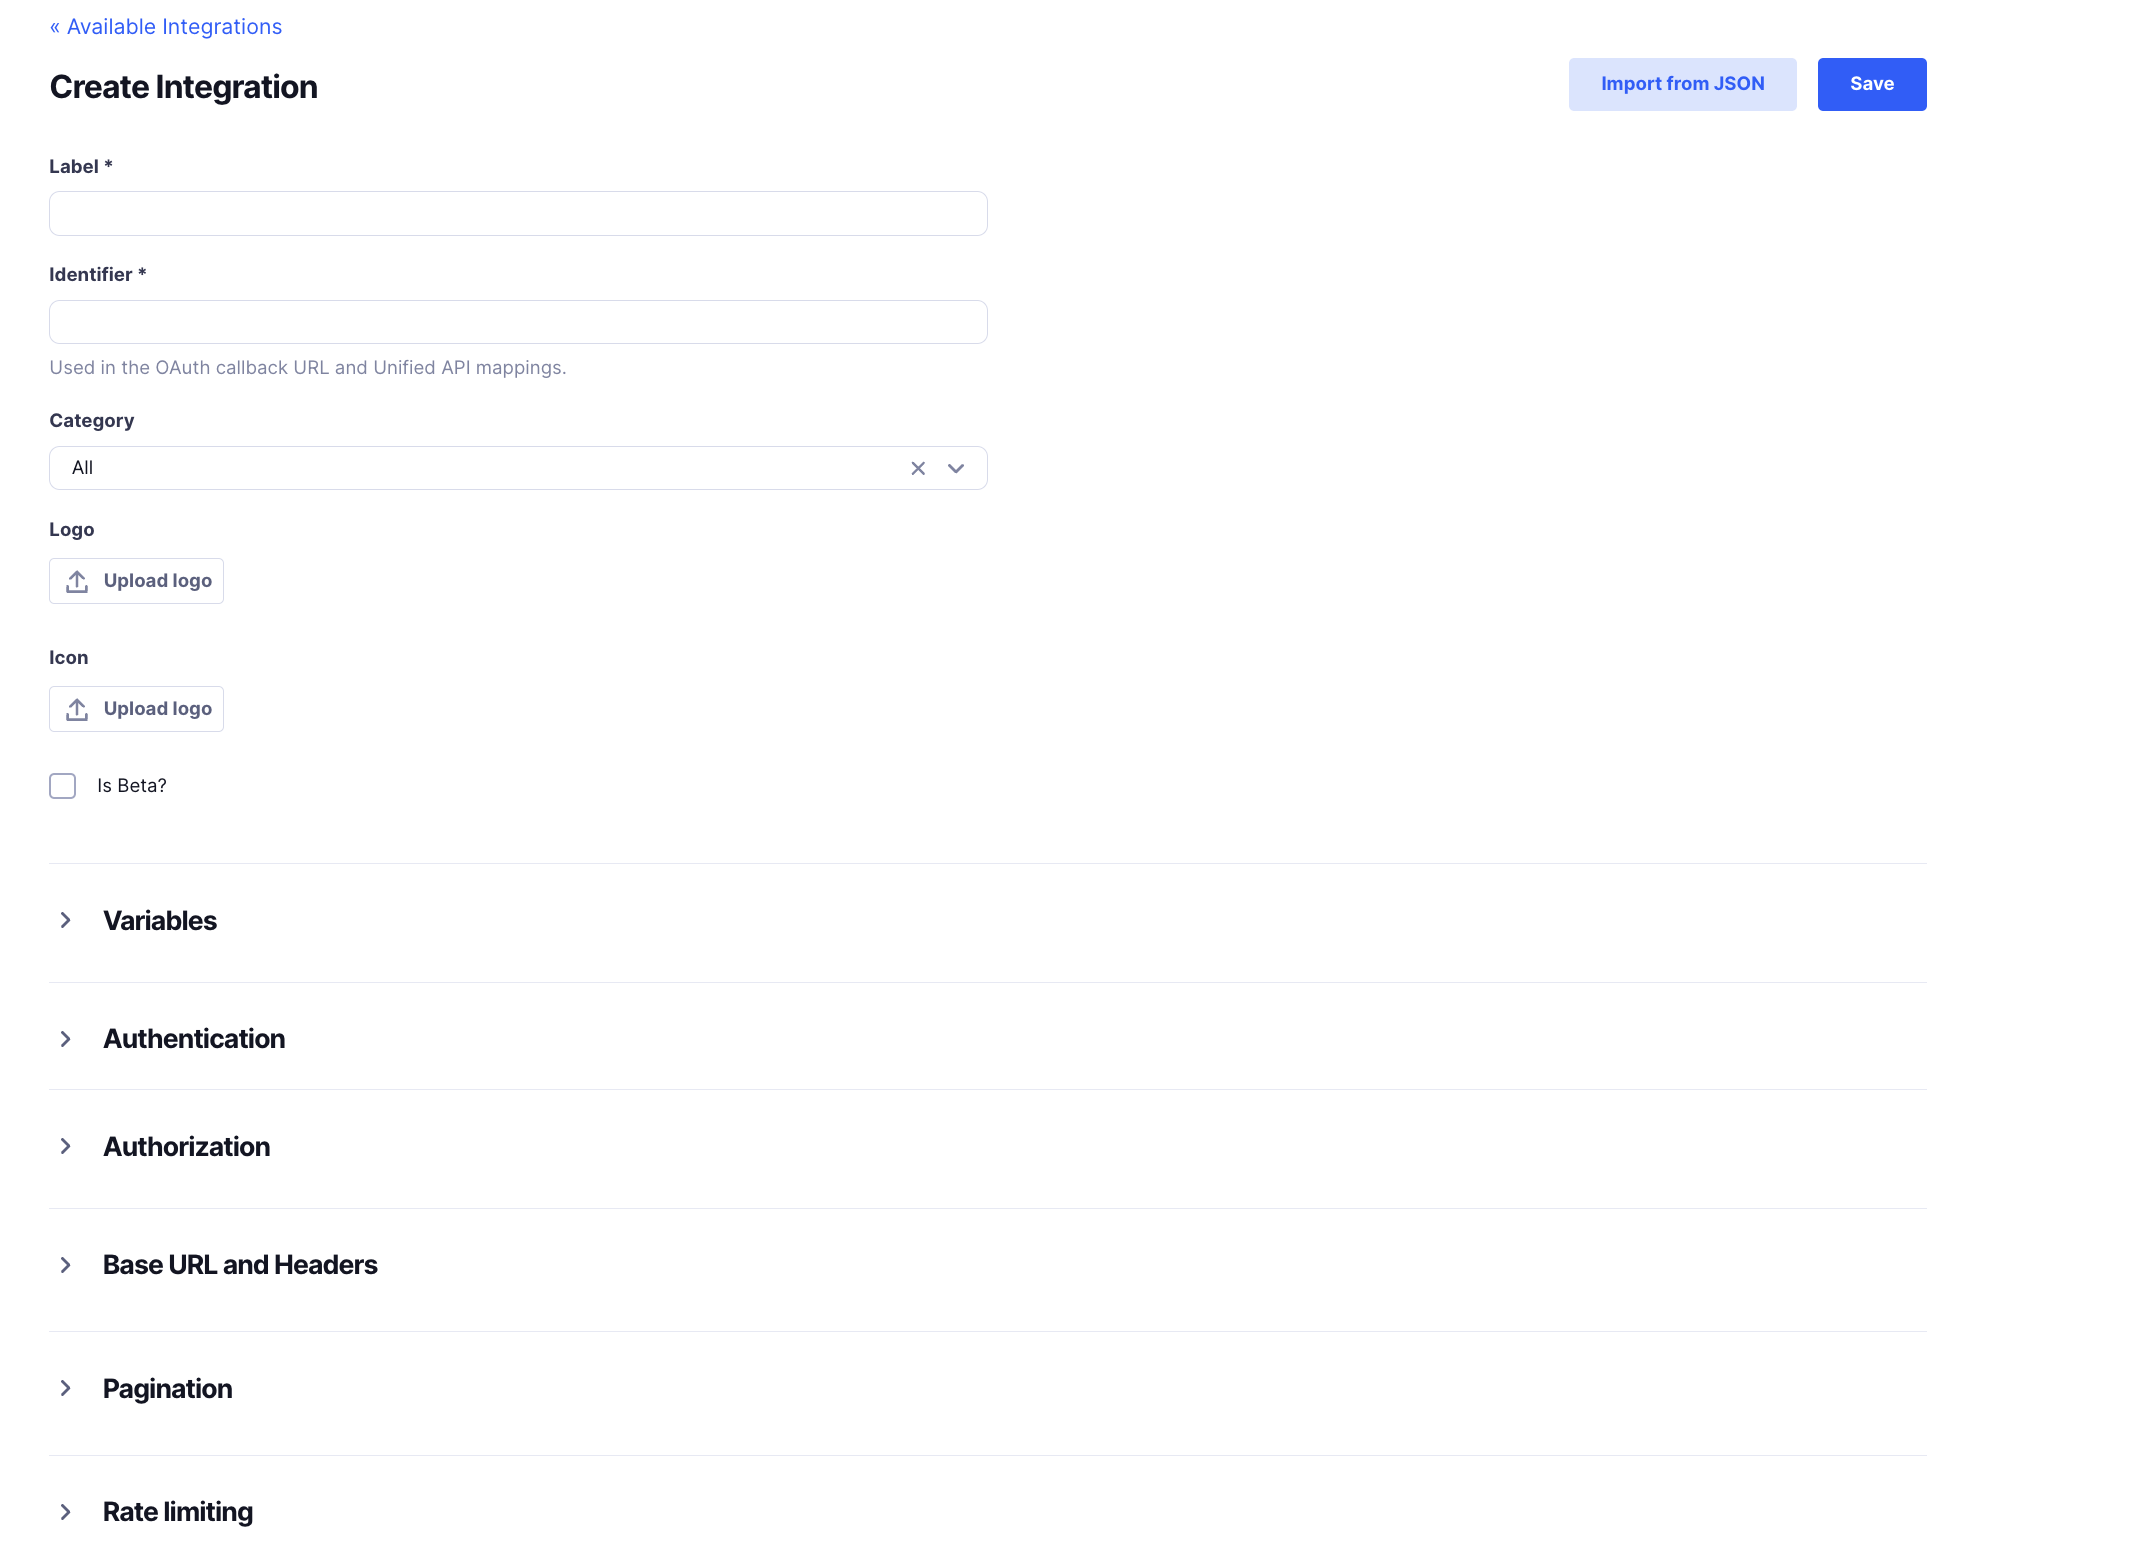
Step-by-Step Integration Creation
Step 1: Adding Basic Details
In the Basic Details section, you'll enter foundational information about the integration.
Crucial Fields:
- Label: The name of your integration. This will be visible in the catalog (e.g., “Salesforce”).
- Identifier: A unique code that makes your integration different from others and helps with OAuth callbacks. This will be used in the OAuth callbacks, Link SDK, Unified Model Mapping.
Optional Fields:
- Category: Categorize your integration to make it easy to find.
- Logo & Icon: These help visually represent the integration. This is used in the Truto Connection UI.
- Is Beta?: Check this if the integration is still in testing.
For our Salesforce example, these details might look like this: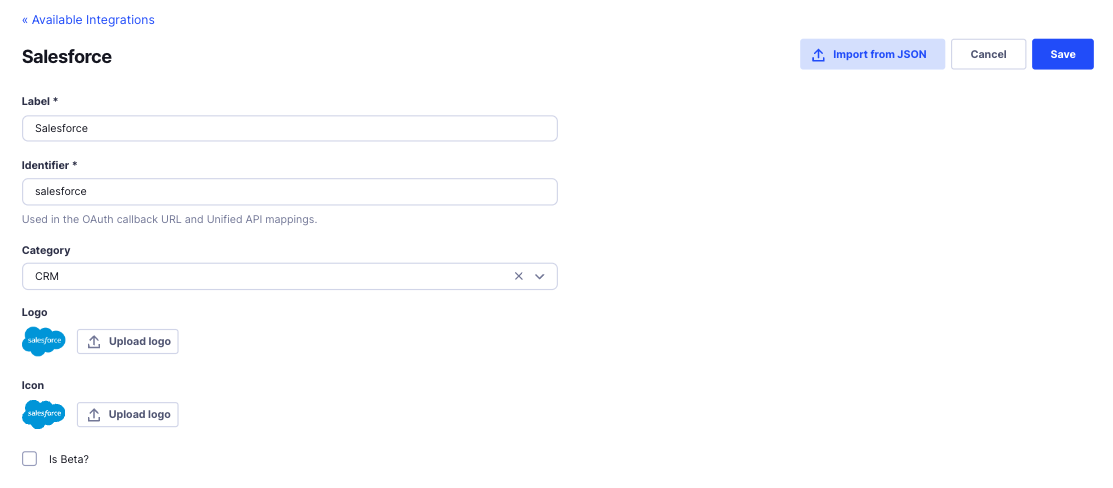
Step 2: Configuring Authentication and Variables
Authentication is how you securely connect your integration to an external service like Salesforce. Depending on the authentication type you choose, the Variables section adjusts to collect the necessary inputs.
Authentication Options
OAuth 2.0 Authorization:
- What it is: Users log in through the external service to grant access.
- Why use it: Secure and easy to manage; it’s the recommended way.
API Key Authentication:
- What it is: Users provide an API key, similar to a password.
- Why use it: Simple but less secure compared to OAuth.
Keka OAuth Authentication:
- What it is: A specific OAuth type used only for Keka integrations.
OAuth 2.0 Client Credentials Flow:
- What it is: A server-to-server way to authenticate, used when users don't need to log in.
- Why use it: Ideal for backend services.
Salesforce Example: OAuth 2.0 Authorization
For Salesforce, OAuth 2.0 Authorization is used. Here’s what the configuration looks like: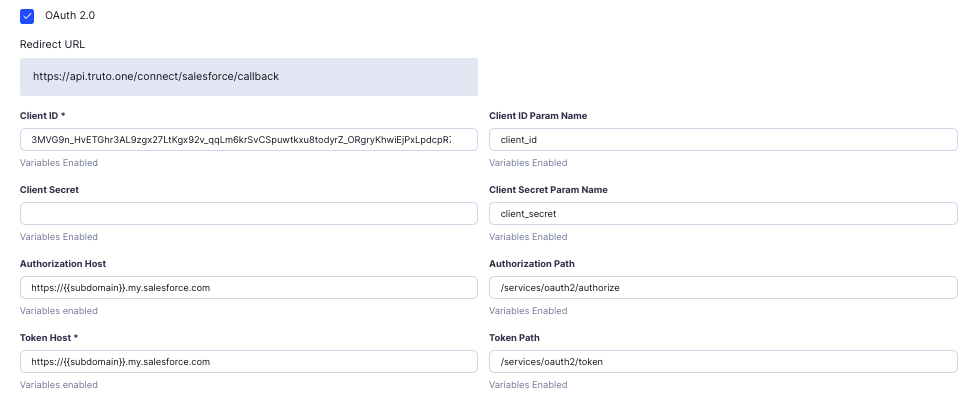 .
.
Also, refer to our blog on Creating an OAuth App on Salesforce
- Redirect URL: This URL tells Salesforce where to send users after logging in (
https://api.truto.one/connect/salesforce/callback). You must add this to your Salesforce OAuth app settings. - Client ID and Client Secret: Think of these as the “username” and “password” for Salesforce. You get these values when you create the OAuth app in Salesforce.
- Authorization Host and Path: These are provided by Salesforce and indicate where users log in to give you access.
- Token Host and Path: This URL is used to get the access token that allows you to make API calls on behalf of the user. These are provided by Salesforce in their documentation.
Read more on Authentication
Variables Section
Variables let you add specific information needed for your integration, like a subdomain or client_id. This makes the integration reusable for each user. This section gets enabled after an authentication is selected.
For instance, if Salesforce uses a unique subdomain for each customer, you can use a variable (subdomain) in the Base URL instead of hardcoding it. This way, every customer can provide their own subdomain when they connect their Salesforce account.

For Salesforce, we use a variable called subdomain: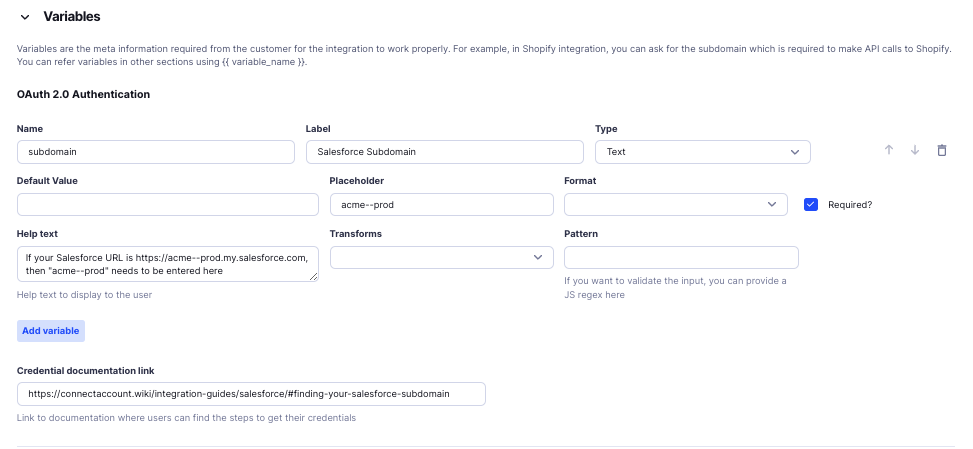
Read more on Variables
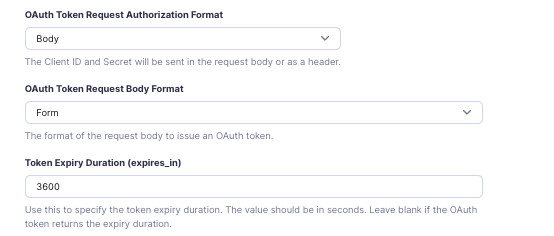
Token Details
Towards the end of the Authentication section, fill in additional token details based on Salesforce’s documentation.
Step 3: Authorization Options
With Salesforce, the Bearer Token is used to authorize every API request. Essentially, the access token needs to be added to each request like this:
Authorization: Bearer {{access_token}}Truto automatically includes this token to make sure that Salesforce knows you’re authorized to access the data. Select the format as mentioned in the documentation. Here’s how it looks:
Read more on Authorization
Step 4: Configuring Base URL and Headers
The Base URL and Headers sections define how API requests will be sent to Salesforce (or any other system).
Base URL
The Base URL is like the home address for all API calls. For Salesforce, it looks like this:
https://{{subdomain}}.my.salesforce.com- Subdomain: This variable (
subdomain) is provided by the user during account connection and makes sure that each request reaches the correct Salesforce environment.
Headers
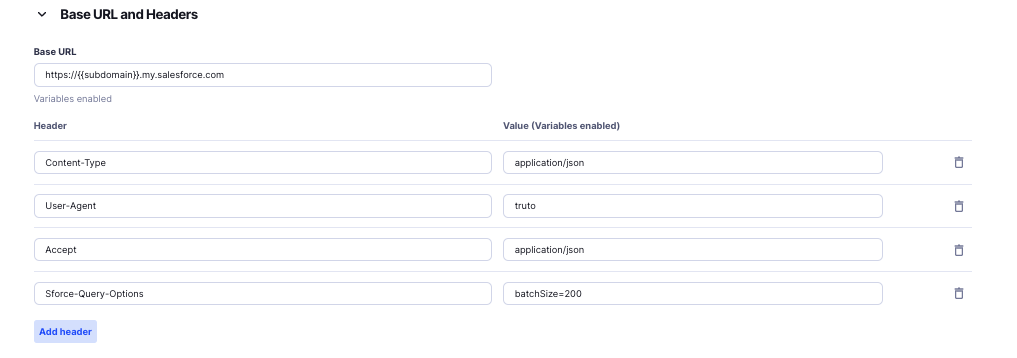
Read more on Base URL and Headers
Step 5: Configuring Query Parameters
The Query Parameters section lets you add specific key-value pairs to your API request URLs. These parameters help customize what data you’re getting from the API. Click on the format supported and add the query parameters.
For example, you could add:
filter: To filter the results (e.g., get only active accounts).sort: To sort the data in a particular order.limit: To limit the number of records returned.
These parameters make the API requests more specific and useful.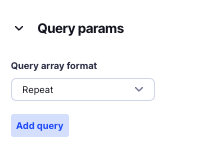
Note: These query parameters are included in every API request unless you set different ones for a specific resource in the Resources section.
Read more on Query Parameters
Step 6: Configuring Pagination
Some APIs limit how much data they return in a single response. Pagination allows you to get all the data in smaller chunks or pages.
Salesforce Example for Pagination
For Salesforce, you set up pagination by defining:
- Cursor Path: Salesforce uses
nextRecordsUrlto show where the next page of data is. - Is Cursor Link: This is checked because
nextRecordsUrlis a full link. - Use Path from Cursor Link: Salesforce provides a link, so Truto uses that path for the next request.
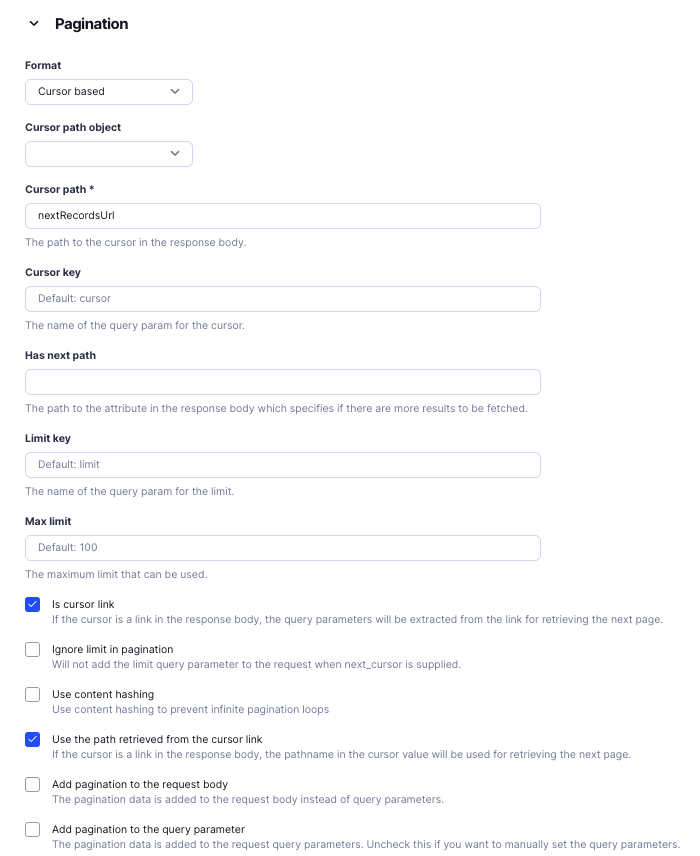
This setup makes sure that your integration can handle large amounts of data in manageable pages.
Read more on Pagination
Step 7: Configuring Rate Limiting
APIs often limit how many requests you can make within a given timeframe. Rate Limiting lets you handle these limits without getting blocked by the API.
Truto’s Default Values
Truto automatically handles rate limits if the response status code is 429 (Too Many Requests). Truto also looks for a Retry-After header to determine how long to wait before retrying. You can configure this with JSONata expressions, but Truto’s default settings work well for most cases.
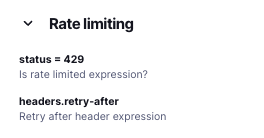
This ensures that your integration stays compliant with the API’s rate limits, preventing disruptions.
Read more on Rate Limiting
Step 8: Setting Up Resources
The Resources section is where you define the core data you want to work with, like accounts. You also specify what operations you can perform on this data, such as listing accounts, retrieving a single account, creating, or updating an account. You can add multiple resources in an Integration.
Truto uses the CRUD model (Create, Read, Update, Delete) to define resources - which means that we try convert the underlying product's API into CRUD APIs.
Key Elements of Resources:
- Resource Name: This is the type of data you’re working with (e.g.,
accounts). - Method (Operations): Define actions such as:
- List: Fetch all records (
GET /services/data/v57.0/query). - Retrieve: Get a single record by ID (
GET /services/data/v57.0/sobjects/Account/). - Create: Add a new record (
POST /services/data/v57.0/sobjects/Account). - Update: Modify an existing record (
PATCH /services/data/v57.0/sobjects/Account/).
- List: Fetch all records (
- Path: The API endpoint for each method. For Salesforce, it might be something like
/services/data/v57.0/query. The SOQL endpoint is called for the list method and for other methods, the REST APIs are called. - Response Path: Salesforce returns account data inside an object called
records. This path helps Truto understand where to find the list of accounts in the response. - Query Parameters: Add any queries that help you refine or filter your data. These Query Parameters are included in every API request. If you add Query Parameters for a specific resource, they will be combined with the global ones defined in the
Query Parameters.
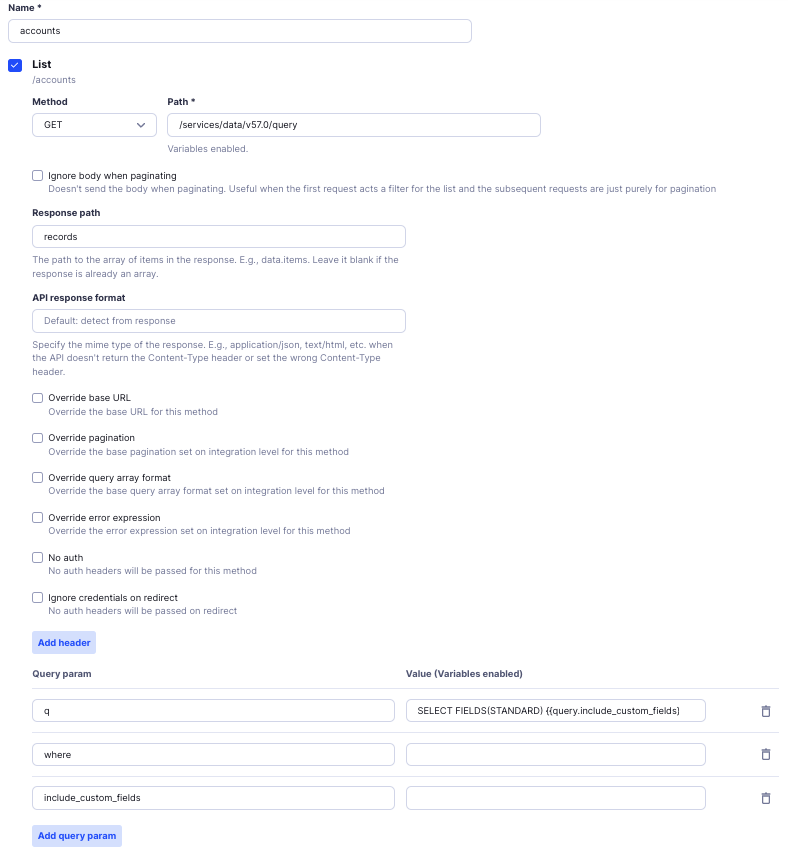
This setup ensures your integration knows what data to interact with and what actions to perform on it.
Read more on Resources here
Step 9: Setting Up Actions
Actions are automated tasks that run after an account is connected. Think of them as pre-set instructions your integration follows.
General Steps for Actions:
- Get Context: Gather information
- Transform: Use this information to make changes or add context (e.g., format the subdomain into a label). Use a JSOnata transformation expression.
- Update Context: Save this transformed information for use across the integration.
For Salesforce, after connecting a user’s account:
- Get Context: Retrieve the Salesforce subdomain that the user provides.
- Transform: Create a label for the integrated account, using the subdomain.
- Update Context: Save this label for later use.
These steps make sure the integration runs smoothly and users can easily identify their connected accounts.
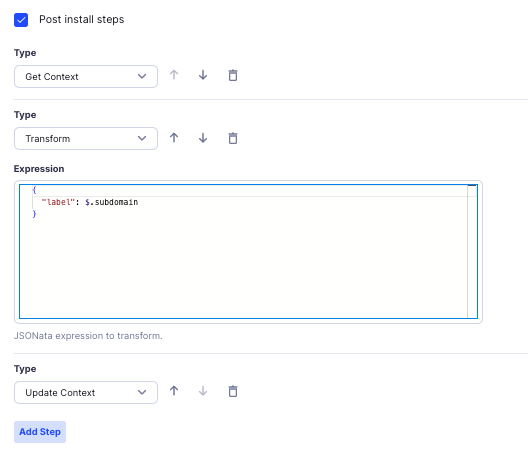
Once the Integrated Account is connected for a user, this is how the label shows up in the Integrated Account -

Read more on Actions here
If you need further assistance, refer to the Configuration References for additional guidance.

