Configuration References
Welcome to the Truto Integrations References! This section will help you understand each section in Integrations in Truto. We'll explain everything you need to know, with examples wherever needed and easy-to-understand descriptions.
Authentication
The Authentication section is all about how your integration securely connects to other systems like Salesforce, Shopify, or Keka. Each type of authentication needs different settings. Let’s look at the different authentication methods, their fields, and how to configure them.
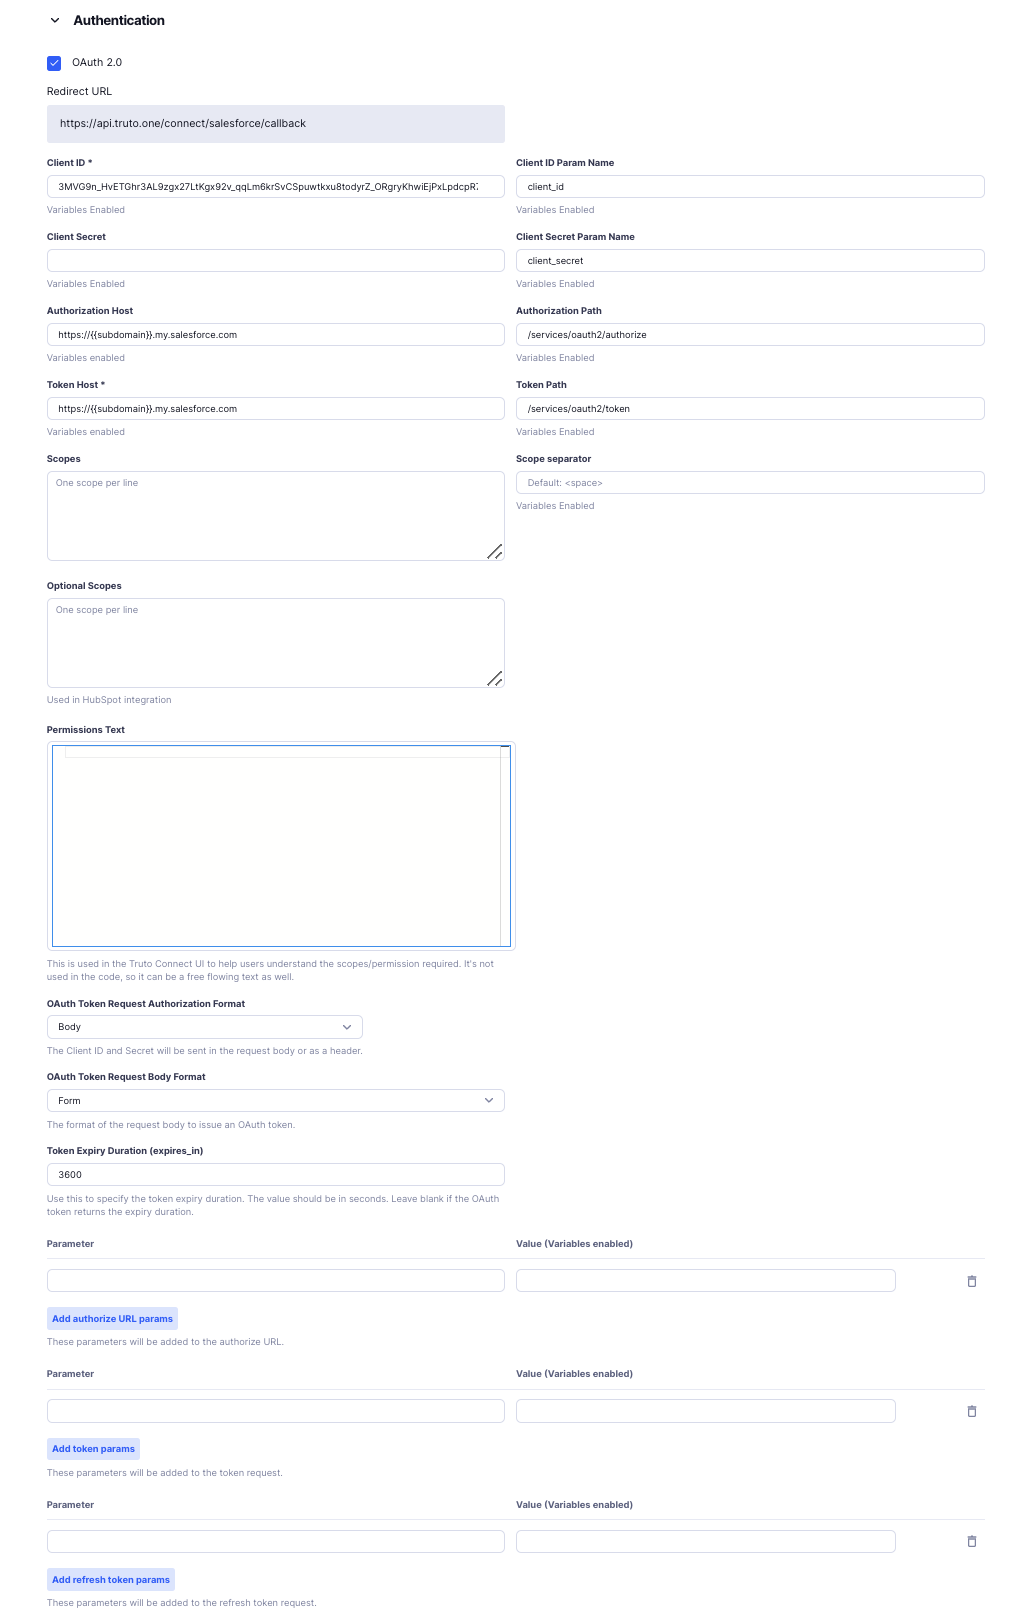
1. OAuth 2.0 Authorization
OAuth 2.0 is a popular and secure way to log in using a third-party service. Truto recommends using this method wherever possible.
OAuth 2.0 Fields and Settings
Redirect URL:
- What It Is: The webpage users go to after they log in.
- Example:
https://api.truto.one/connect/salesforce/callback - Note: You must register this URL with the service you’re connecting to.
Client ID & Client Secret:
- Client ID Param Name:
- What It Is: Identifies the OAuth client.
- Default:
client_id
- Client Secret Param Name:
- What It Is: Authenticates the OAuth client.
- Default:
client_secret
- Client ID Param Name:
Authorization Host & Path: Check the Authorizaation Host in the product documentation and enter it here as in the example.
- Authorization Host:
- Example:
https://truto.my.salesforce.com
- Example:
- Authorization Path:
- Default:
/services/oauth2/authorize
- Default:
- Authorization Host:
Token Host & Path: Check the Token Host in the product documentation and enter it here as in the example.
- Token Host:
- Example:
https://truto.my.salesforce.com
- Example:
- Token Path:
- Default:
/services/oauth2/token
- Default:
- Token Host:
Scopes:
- What It Is: Permissions you request during login.
- Format: List one permission per line (e.g., read, write).
- Separator: A space by default.
Permissions Text:
- What It Is: A friendly description of the permissions you’re asking for. You can use HTML or Markdown to make it look nice.
- Example:markdown
**Access Required:** - View and manage your Salesforce data. - Send updates to Salesforce on your behalf. - Why It’s Important: Helps users understand what they’re agreeing to.
OAuth Token Request Authorization Format:
- Options: Header or Body or Query
OAuth Token Request Body Format:
- Options:
Form,JSON,Query. Usually, it’s a form.
- Options:
Token Expiry Duration:
- What It Is: How long the token lasts, in seconds (e.g.,
3600).
- What It Is: How long the token lasts, in seconds (e.g.,
Example: Salesforce OAuth 2.0 Setup
- Redirect URL:
https://api.truto.one/connect/salesforce/callback - Authorization Host:
https://{{subdomain}}.my.salesforce.com
2. API Key Authentication
API Key Authentication is a simple way to verify by using an API key in every request.
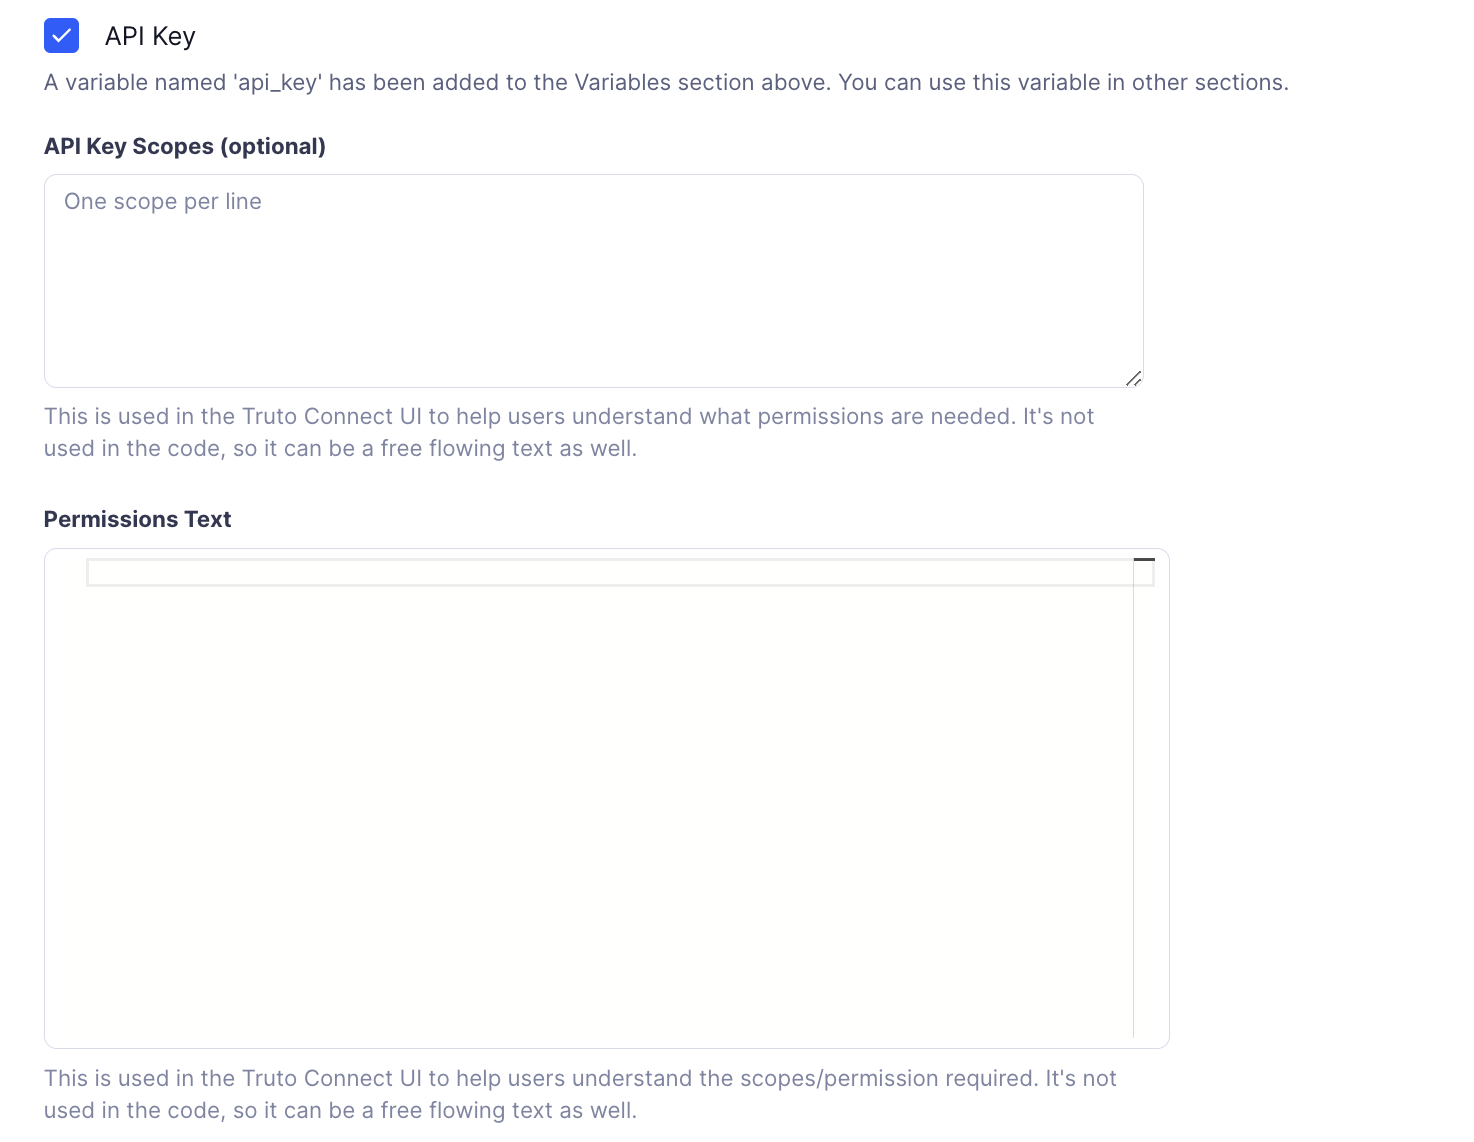
Scopes:
- What It Is: Permissions you request during login.
- Format: List one permission per line (e.g., read, write).
- Separator: A space by default.
Permissions Text:
- What It Is: A friendly description of the permissions you’re asking for. You can use HTML or Markdown to make it look nice.
- Example:markdown
**Access Required:**
- View and manage your 15five data.
API Key Variables and Setup
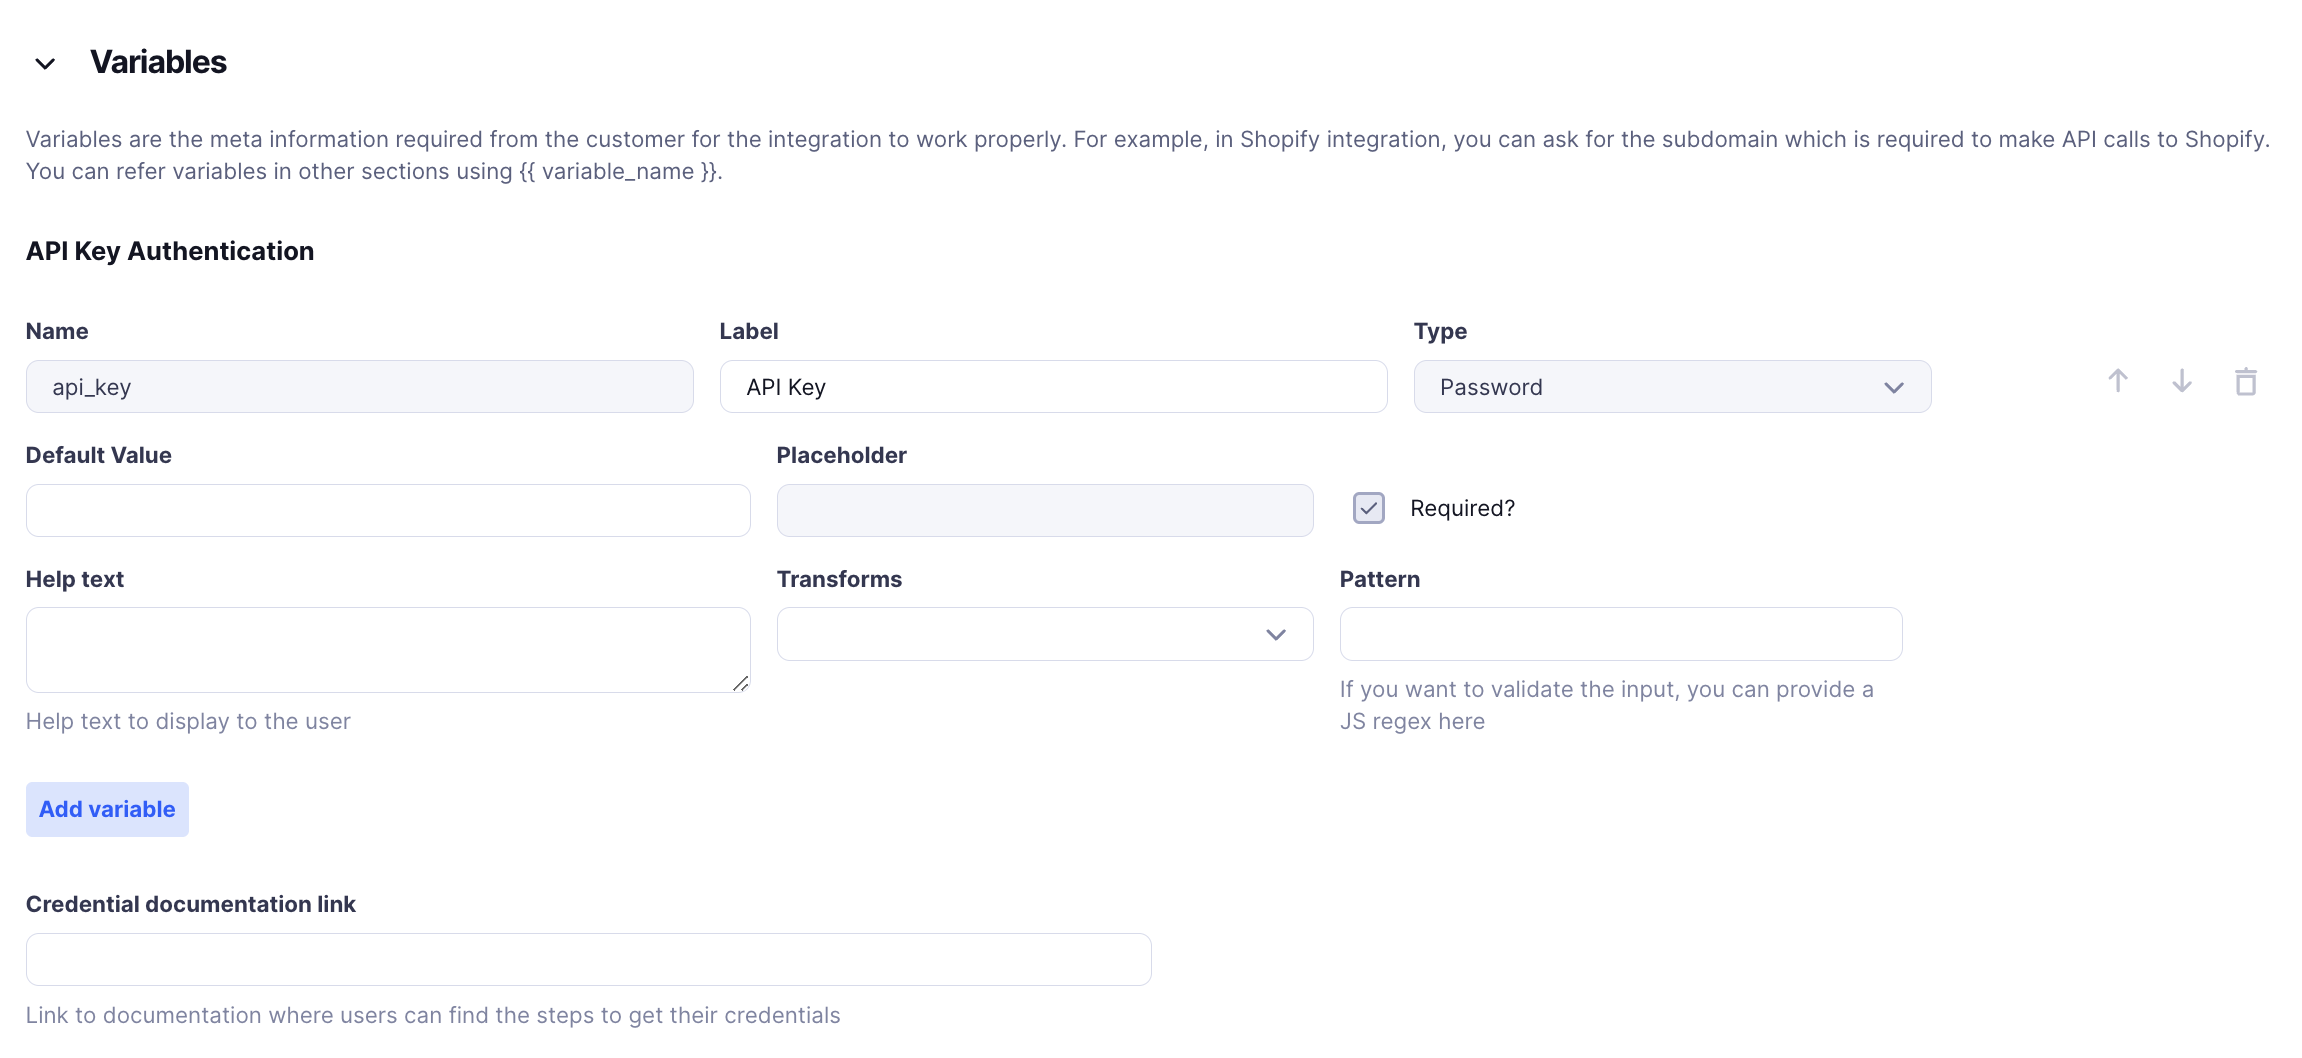
For API Key Authentication, you need the api_key variable. This will get added automatically in the Variables section.
Required Fields for API Key Variables:
Name:
- Value:
api_key(this is how Truto identifies it internally).
- Value:
Label:
- Value:
API Key(the label).
- Value:
Type:
- Password (hides the key for security).
Default Value:
- Usually left blank. Add any default values.
Help Text:
- Example: "The API Key provided by your service provider. This is required to authenticate your API requests."
Transforms:
- Optional changes you can apply to the key. The values are
None,lowercase,UPPERCASE,SHA256
- Optional changes you can apply to the key. The values are
Pattern:
- A regular expression to validate the key.
- Example:
^AK-(API key must start withAK-).
Credential Documentation Link:
- What It Is: A link to help users find or create their API key.
- Example:
"https://docs.example.com/api-keys"
Permissions Text:
- What It Is: Explains what the API key can do.
- Example:markdown
**This API key will grant access to your Shopify store's data and settings.**
Example Usage of API Key
In Shopify integration:
- API Key is used in headers:
Authorization: Bearer {{api_key}}
3. OAuth 2.0 Client Credentials Flow
OAuth 2.0 Client Credentials Flow is another way to use OAuth 2.0. Check the documentation of the product you're integrating to decide on whether to use this.
OAuth 2.0 Client Credentials Fields and Settings
Token Host & Path:
- Token Host:
- What It Is: The URL where tokens are issued.
- Example:
https://login.salesforce.com
- Token Path:
- Default:
/oauth/token
- Default:
- Token Host:
OAuth Token Request Authorization Format:
- Options: Header or Body or Query
- What It Means: Decides where to send the Client ID and Client Secret.
OAuth Token Request Body Format:
- What It Is: The format of the request body when asking for a token. Usually Form. Other values include JSON, Query.
Add Token Params:
- What It Is: Extra parameters needed by the API.
- Use: Add as needed by the provider.
Permissions Text:
- What It Is: Explains what access the integration will have.
- Example:markdown
**Permissions Required:**
- Full read access to your Salesforce accounts.
- Ability to create and modify records as needed.

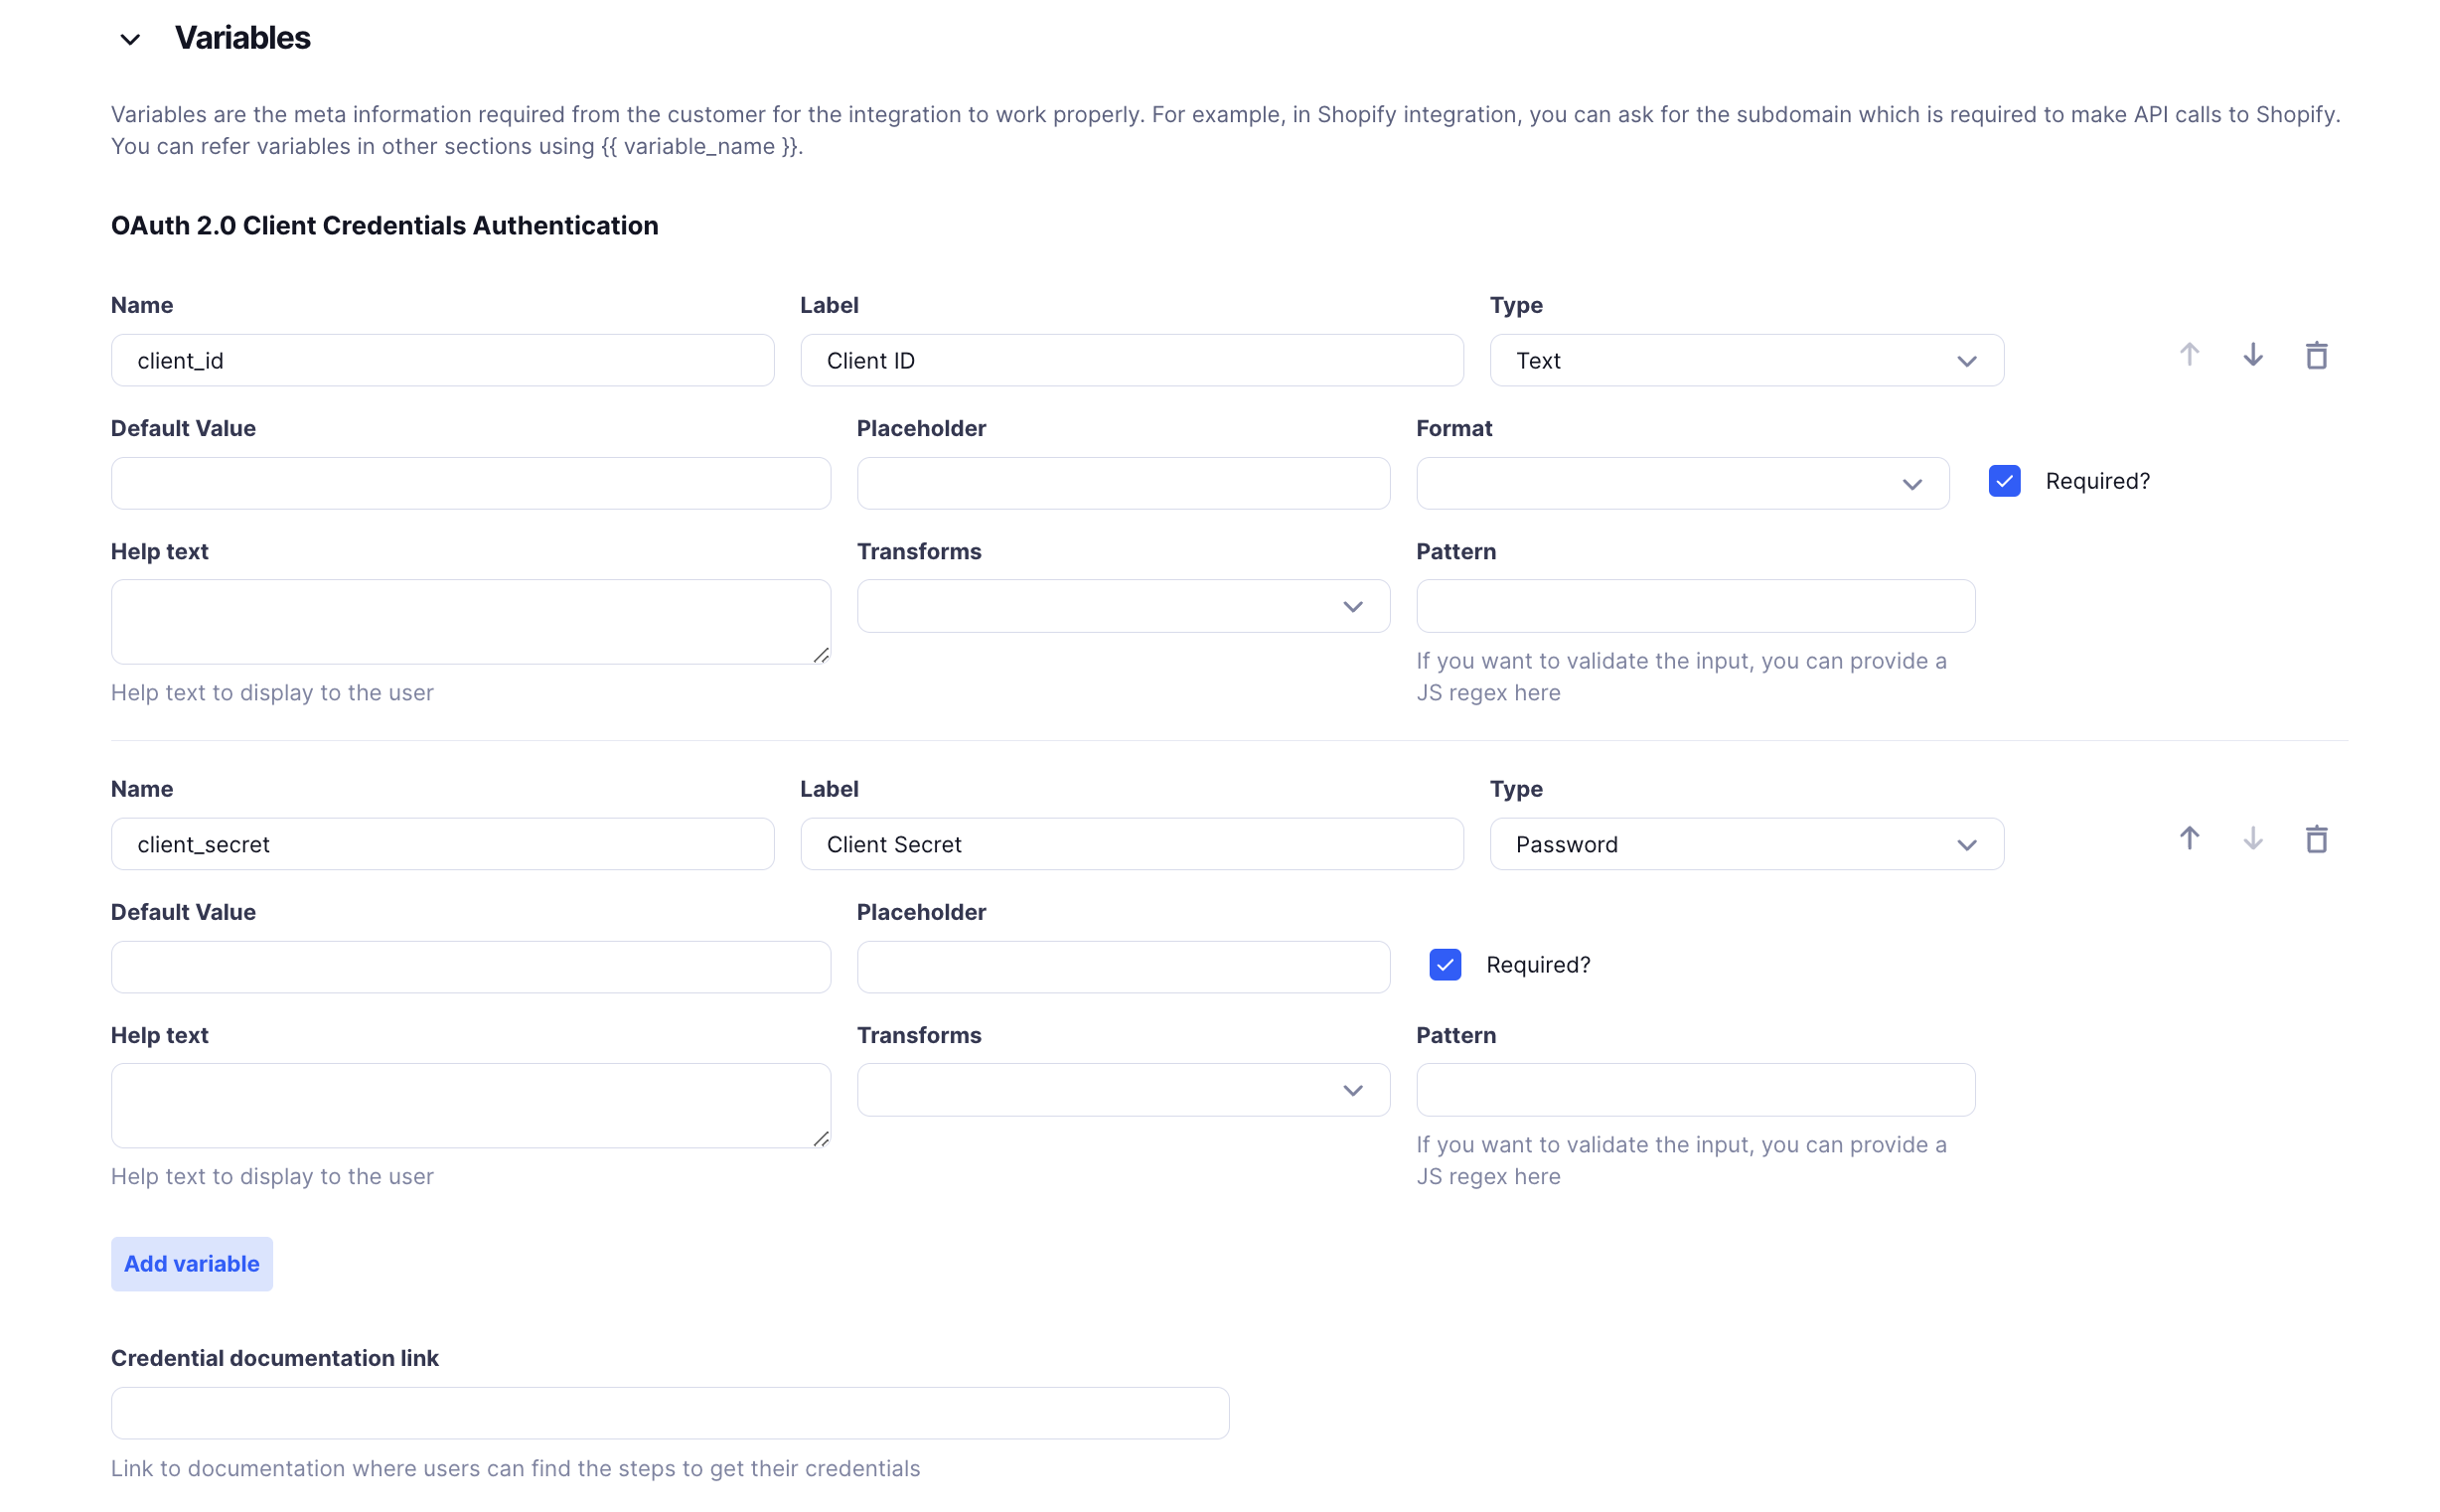
Optional Fields for OAuth 2.0 Client Credentials Variables:
Client ID:
- Name:
client_id - Label:
Client ID - Type: Text
- Placeholder: "Enter Client ID provided by Keka"
- Required?: Yes
- Help Text: "Client ID provided by the service"
- Name:
Client Secret:
- Name:
client_secret - Label:
Client Secret - Type: Password
- Placeholder: "Enter Client Secret."
- Required?: Yes
- Help Text: "The secret key provided by for authenticating requests."
- Name:
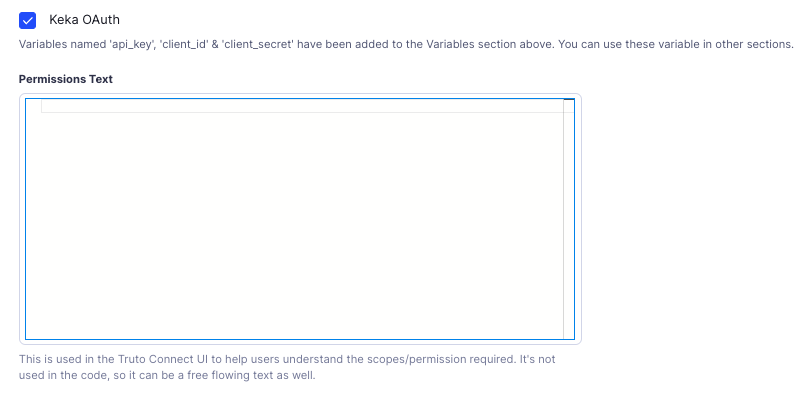
The variables look like:
4. Keka OAuth Authentication
Keka OAuth is specifically for Keka, a platform for HR and payroll services. It needs several pieces of information to work.
Keka OAuth Variables Setup
In the Variables section for Keka OAuth, you need to enter multiple details to authenticate with Keka.
Required Fields for Keka OAuth Variables:
Client ID:
- Name:
client_id - Label:
Client ID - Type: Text
- Placeholder: "Enter Client ID provided by Keka"
- Required?: Yes
- Help Text: "Client ID provided by Keka, used to identify your app."
- Name:
Client Secret:
- Name:
client_secret - Label:
Client Secret - Type: Password
- Placeholder: "Enter Client Secret."
- Required?: Yes
- Help Text: "The secret key provided by Keka for authenticating requests."
- Name:
API Key:
- Name:
api_key - Label:
API Key - Type: Password
- Placeholder: "Enter API key."
- Required?: Yes
- Help Text: "API key provided by Keka to authenticate API calls."
- Name:
- Permissions Text:
- What It Is: Explains what access is given when connecting Keka.
- Example:markdown
**Permissions Required**: Access to HR and payroll data for your employees to synchronize with other services.
Example Usage in Keka Integration
All three fields are required for Keka OAuth. Users must enter them correctly to connect smoothly.
Variables
Variables help make your integration flexible by allowing you to collect specific information from users, like API keys or subdomains. This makes your integration adaptable for different users and situations. Click Add Variable to create a new field. Note that an option from Authentication section has to be selected to be able to use variables.
Key Points About Variables
- Reusable: Different users can use the same integration with their own unique information.
- Customization: Store unique details like API keys, subdomains, or client credentials.
Common Examples of Variables:
Subdomain:
- Usage: Used in the Base URL.
- Example:
https://{{subdomain}}.myshopify.com
API Key:
- Usage: Used in Headers.
- Example:
Authorization: Bearer {{api_key}}
Fields in Variables Setup:
Name: Unique identifier for the variable.
Label: What users see.
Type: Text, Password, Single Select.
Default Value: Optional starting value.
Placeholder: Hints for users on what to enter.
Required?: If checked, users must fill it out.
Help Text: Explains what the variable is for.
Pattern: Regex to validate the input.
Credential Documentation Link:
- What It Is: Link to help users generate or find their credentials.
- Example:
"https://docs.example.com/generate-api-keys"
Permissions Text:
- What It Is: Explains what access the integration is requesting.
- Format: Markdown or HTML for clarity.

Authorization
The Authorization section sets up how your integration proves it’s allowed to access data every time it makes a request to an external system. This is different from Authentication, which is about logging in initially. Authorization ensures each request has the right permissions.
Authorization Types and How to Set Them Up
This section offers different ways to manage authorized requests to external APIs. Each method has specific settings to configure how your integration behaves.
1. Bearer Auth
Bearer Authentication is a simple way to authorize requests by including a token in the request headers. This token is usually an access token you got during the OAuth login process.
Bearer Auth Fields and Settings
Format:
- Choose Bearer Auth as the authorization method.
Bearer Token:
- What It Is: The token used to authorize the request.
- Example:
{{oauth.token.access_token}}- This dynamically uses the access token from the OAuth flow.
Example Usage:
When integrating with Salesforce, use the Bearer Token for each API request:
- The Bearer Token is stored as:
{{oauth.token.access_token}}
2. Basic Auth
Basic Authentication requires a username and password to access an API. These credentials are sent in the request headers in an encoded format.
Basic Auth Fields and Settings
Format:
- Choose Basic Auth as the authorization method.
Username:
- What It Is: The username for the external system.
- Usage: Use variables to allow users to input their own username.
Password:
- What It Is: The password for the external system.
- Usage: Use variables to store the password securely.
3. Custom Header Authorization
Custom Header Authorization lets you create your own authorization logic, which is useful if the API you’re connecting to doesn’t use standard methods like OAuth or API Keys.
Custom Header Fields and Settings
Format:
- Choose Custom Header as the authorization method.
Use JSONata:
- What It Is: Use JSONata expressions to set custom headers based on the request.
- How It Works: Write a JSONata expression to define how headers should be set.
Custom Header Expression:
- What It Is: A JSONata expression that sets custom headers.
- Available Data:
url: The full URL of the request.requestOptions: The request details, including headers and body.context: Information stored in the account’s context.
- What It Must Return: An object with
urlandrequestOptionsproperties.
Example of JSONata Expression for Custom Header:
If an API needs a special signature in the header based on the URL and a secret key, you can use:
{
  "url": url,
  "requestOptions": {
    "headers": {
      "X-Custom-Signature": $hashSHA256(requestOptions.headers.Authorization & context.secret)
    }
  }
}- Explanation:
$hashSHA256: A function to create a hash using the Authorization header and a secret from the context.requestOptions: Updates the request with a new header (X-Custom-Signature).
Base URL and Headers
The Base URL and Headers section is essential for telling your integration where to send requests and what information to include in those requests.
Base URL
The Base URL is the main address for all API requests. Every API call you make will start with this URL.
Base URL:
- What It Is: The main URL of the external API.
- Variables Enabled: Use variables to make it dynamic based on user settings.
- Example:
https://{{subdomain}}.api.example.comsubdomainis a variable from the user, allowing different users to connect to their own API endpoints.
Use Case: Easily connect to different instances of a service (e.g., different Salesforce accounts with unique subdomains).
Headers
Headers are pieces of information sent with each API request, like content type or authorization tokens. They help the API understand how to process your request.
Fields for Headers
Header Name:
- What It Is: The name of the header (e.g.,
Authorization,Content-Type).
- What It Is: The name of the header (e.g.,
Value:
- What It Is: The value for the header, which can be static or use variables.
- Example:
Authorization:"Bearer {{access_token}}"`- Uses the OAuth token.
Content-Type:"application/json"- Indicates the data format.
Add Header:
- What It Is: Add multiple headers as needed.
- Use Case: Include headers like
User-AgentorAccept-Languagefor more customized requests.
Example Usage: Base URL and Headers
If you’re connecting to Salesforce to get customer data, here’s how you might set it up:
Base URL:
https://{{subdomain}}.my.salesforce.comsubdomaincomes from the user, ensuring requests go to the correct Salesforce account.
Headers:
Authorization:
- Value:
"Bearer {{access_token}}"`- Authorizes each request to Salesforce.
Content-Type:
- Value:
"application/json" - Specifies that you’re sending JSON data.
- Value:
User-Agent:
- Value:
"truto" - Identifies your integration for logging or debugging.
- Value:
Sforce-Query-Options (Optional for Salesforce):
- Value:
"batchSize=200" - Optimizes data retrieval by limiting the number of records per request.
- Value:
Here’s a visual of the Base URL and Headers setup: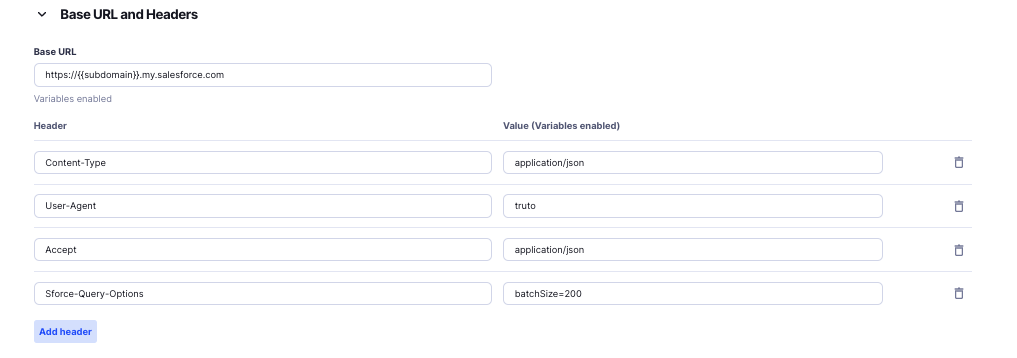
Query Parameters
Query Parameters are used to refine or filter the data retrieved from external APIs. They are appended to the API request URL and help in specifying exactly what data you need. Understanding how to properly format and add query parameters is essential for effective data retrieval and integration performance.
Query Array Format
When dealing with array data in query parameters, the Query Array Format determines how multiple values are represented in the URL. Truto supports the following array formats:
1. Comma
Description: Elements in the array are separated by commas within a single query parameter.
Example:
https://api.example.com/items?colors=red,green,blueUsage: Use this format when the external API expects array values to be comma-separated.
2. Brackets
Description: Each element in the array is specified with empty brackets [] after the parameter name.
Example:
https://api.example.com/items?colors[]=red&colors[]=green&colors[]=blueUsage: Use this format when the external API expects array values to be listed with brackets, allowing the server to recognize them as separate elements.
3. Index
Description: Each element in the array is specified with an index inside the brackets [] after the parameter name.
Example:
https://api.example.com/items?colors[0]=red&colors[1]=green&colors[2]=blueUsage: Use this format when the external API requires indexed array parameters, which can be useful for maintaining the order of elements.
4. Repeat
Description: The same query parameter name is repeated for each element in the array.
Example:
https://api.example.com/items?colors=red&colors=green&colors=blueUsage: Use this format when the external API expects multiple instances of the same query parameter to represent array values.
Adding Query Parameters
To add query parameters to your integration requests in Truto, follow these guidelines:
Identify Required Parameters: Determine which query parameters are needed based on the external API’s documentation.
Choose the Appropriate Array Format: Select one of the supported Query Array Formats (Comma, Brackets, Index, Repeat) that aligns with the external API’s requirements.
Configure the Parameters:
- Key: The name of the query parameter (e.g.,
colors). - Value(s): The data you want to send (e.g.,
red,green,blue). - Format: Select the array format (Comma, Brackets, Index, Repeat).
- Key: The name of the query parameter (e.g.,
Add to Integration Settings:
- Navigate to the Query Parameters section of your integration.
- Enter the key and values.
- Specify the chosen Query Array Format.
Example Scenario:
Suppose you are integrating with an API that retrieves products based on selected colors and expects the colors to be provided using the Brackets format.
- Desired Colors:
red,green,blue - API Expectation:
colors[]=red&colors[]=green&colors[]=blue
Configuration in Truto:
- Key:
colors - Values:
red,green,blue - Format:
Brackets
Resulting Query URL:
https://api.example.com/products?colors[]=red&colors[]=green&colors[]=blue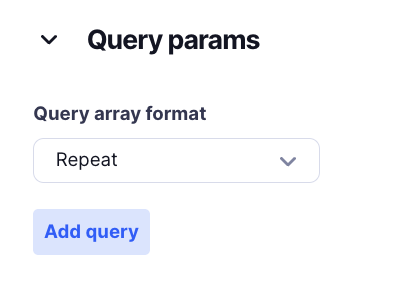
Pagination
The Pagination section helps your integration handle large amounts of data by breaking it into smaller, manageable chunks. This prevents overwhelming the server and avoids hitting rate limits.
Types of Pagination Methods
Different APIs use different ways to paginate data. Truto supports several methods to match these APIs.
No Pagination
- Description: Choose this if the API sends all data at once and doesn’t need pagination.
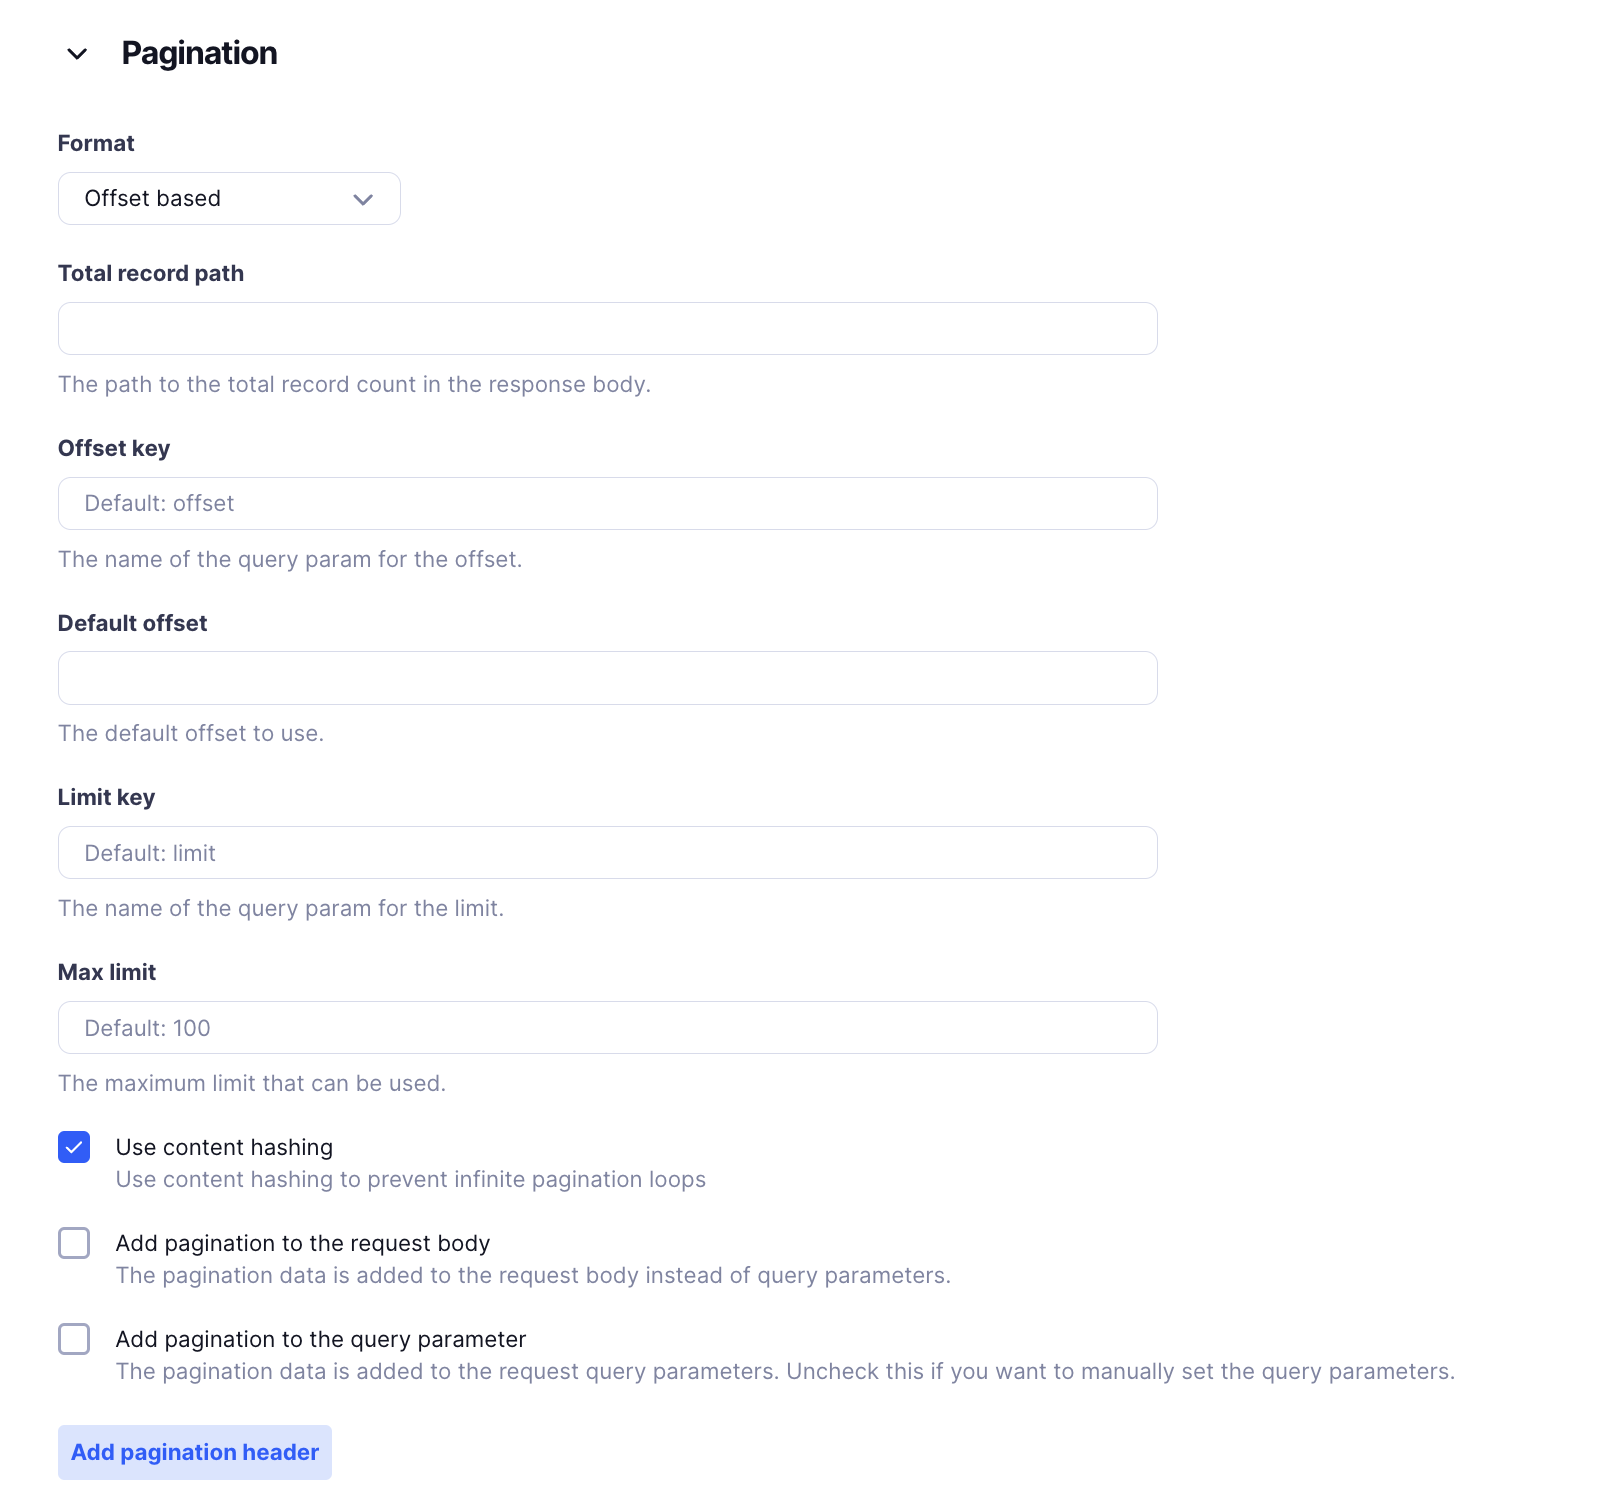
Offset-Based Pagination
Offset-Based Pagination is used when the API sends data in chunks based on a starting point (offset).
Fields and Settings:
Format: Offset Based
Total Record Path:
- What It Is: The path in the response where the total number of records is found.
- Example:
$.total_records
Offset Key:
- Default:
offset - What It Is: The query parameter name for the starting point.
- Default:
Default Offset:
- What It Is: The starting value for the offset.
Limit Key:
- Default:
limit - What It Is: The query parameter name for the number of items to fetch.
- Default:
Max Limit:
- Default:
100 - What It Is: The maximum number of items per request.
- Default:
Use Content Hashing:
- What It Is: Prevents endless loops by comparing content between requests.
Add Pagination to Query Parameter:
- Options: Add pagination details to the request body or as query parameters. Click in
Add Pagination Headerwith their Value.
- Options: Add pagination details to the request body or as query parameters. Click in
Add Pagination Header:
- What It Is: Define custom headers for pagination.
Example Use Case for Offset-Based Pagination:
Used when APIs need you to specify where to start (offset) and how many records to get (limit).
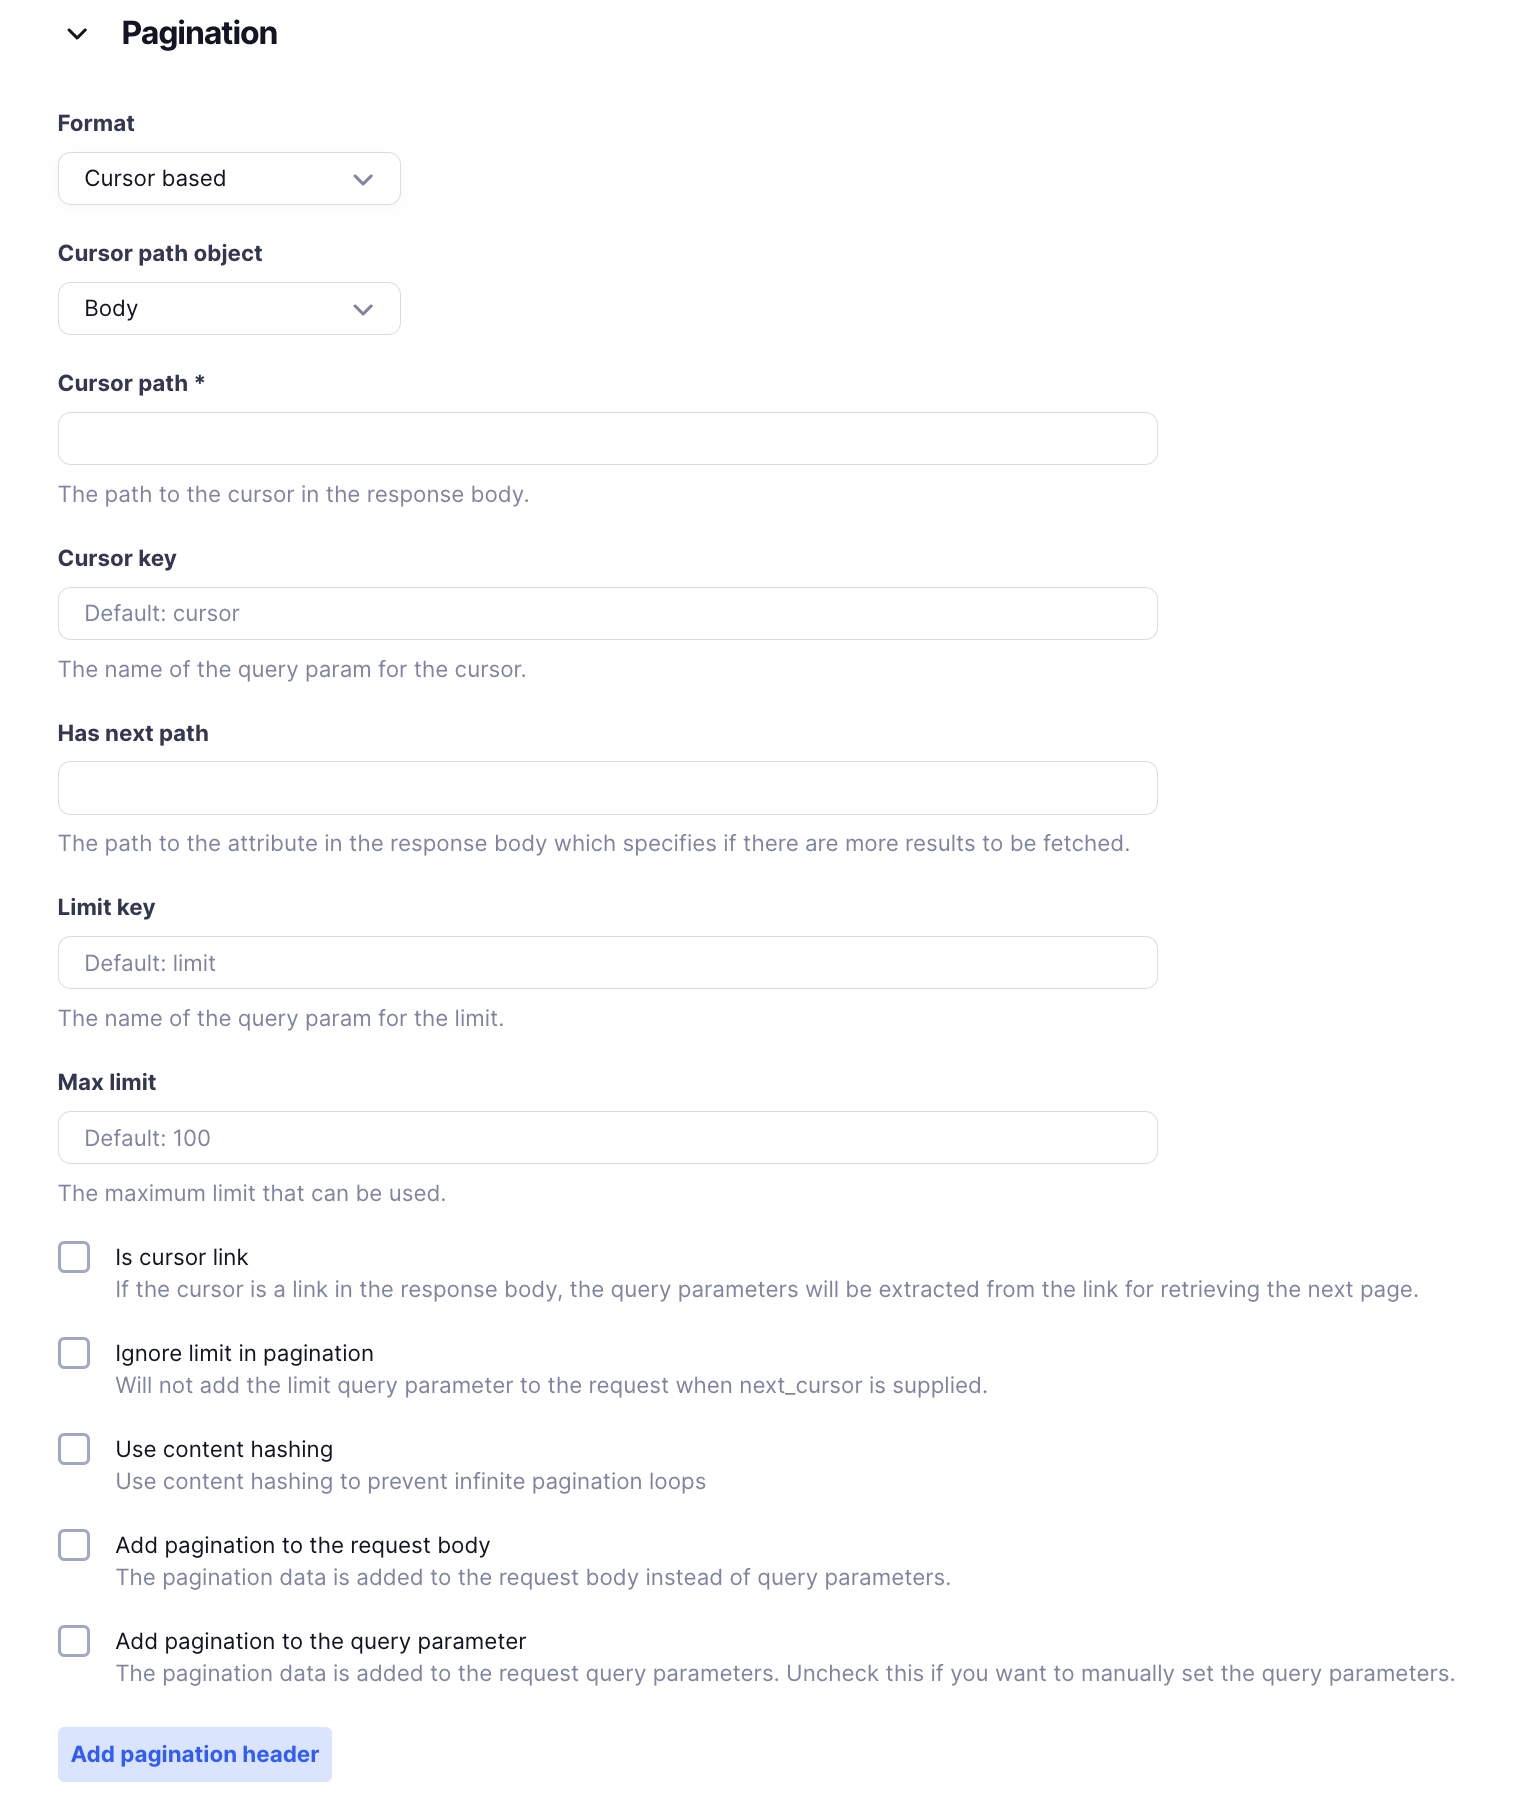
Cursor-Based Pagination
Cursor-Based Pagination is best for APIs that provide a unique pointer (cursor) to the next set of results.
Fields and Settings:
Format: Cursor Based
Cursor Path Object:
- What It Is: Where the cursor is found in the response.
Cursor Path:
- Required: Yes
- What It Is: The path to the cursor in the response.
Cursor Key:
- Default:
cursor - What It Is: The query parameter name for the cursor.
- Default:
Has Next Path:
- What It Is: Path in the response that shows if more results are available.
Limit Key:
- Default:
limit
- Default:
Max Limit:
- Default:
100
- Default:
Is Cursor Link:
- What It Is: If the cursor is a full URL, use it to get the next page.
Ignore Limit in Pagination:
- What It Is: Don’t add the limit parameter if next_cursor is used.
Use Content Hashing:
- Prevents endless loops by comparing content.
Add Pagination to Request Body or Query Parameter:
- Same as Offset-Based.
Page-Based Pagination
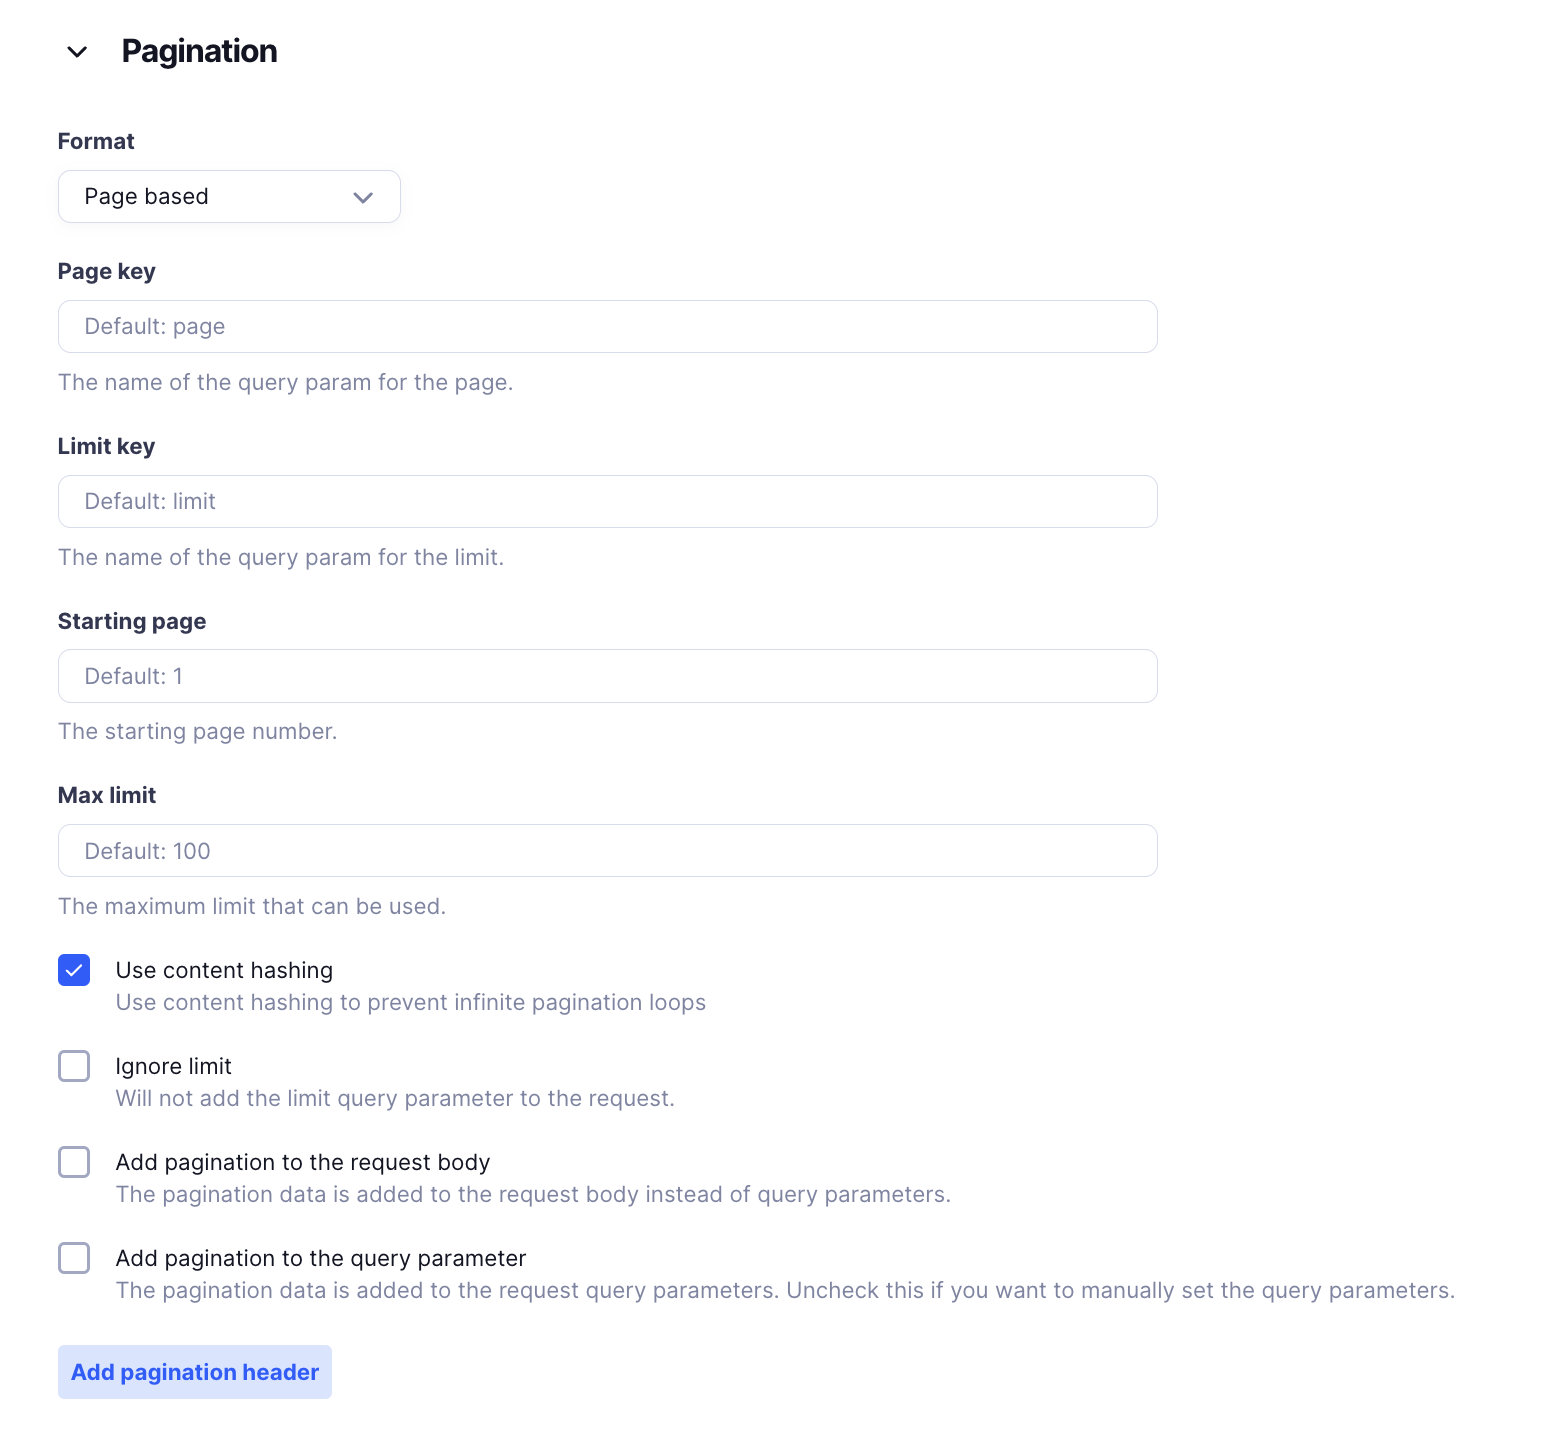
Page-Based Pagination splits data into pages, each accessed by a page number.
Fields and Settings:
Format: Page Based
Page Key:
- Default:
page - What It Is: The query parameter name for the page number.
- Default:
Limit Key:
- Default:
limit - What It Is: Number of items per page.
- Default:
Starting Page:
- Default:
1 - What It Is: The first page number to start from.
- Default:
Max Limit:
- Default:
100
- Default:
Use Content Hashing:
- Prevents endless loops by comparing content.
Ignore Limit:
- What It Is: Don’t add the limit parameter to the request.
Add Pagination to Request Body or Query Parameter:
- Same as Offset-Based.
Example Use Case for Page-Based Pagination:
Used when APIs require a page number and limit to fetch specific pages of data.
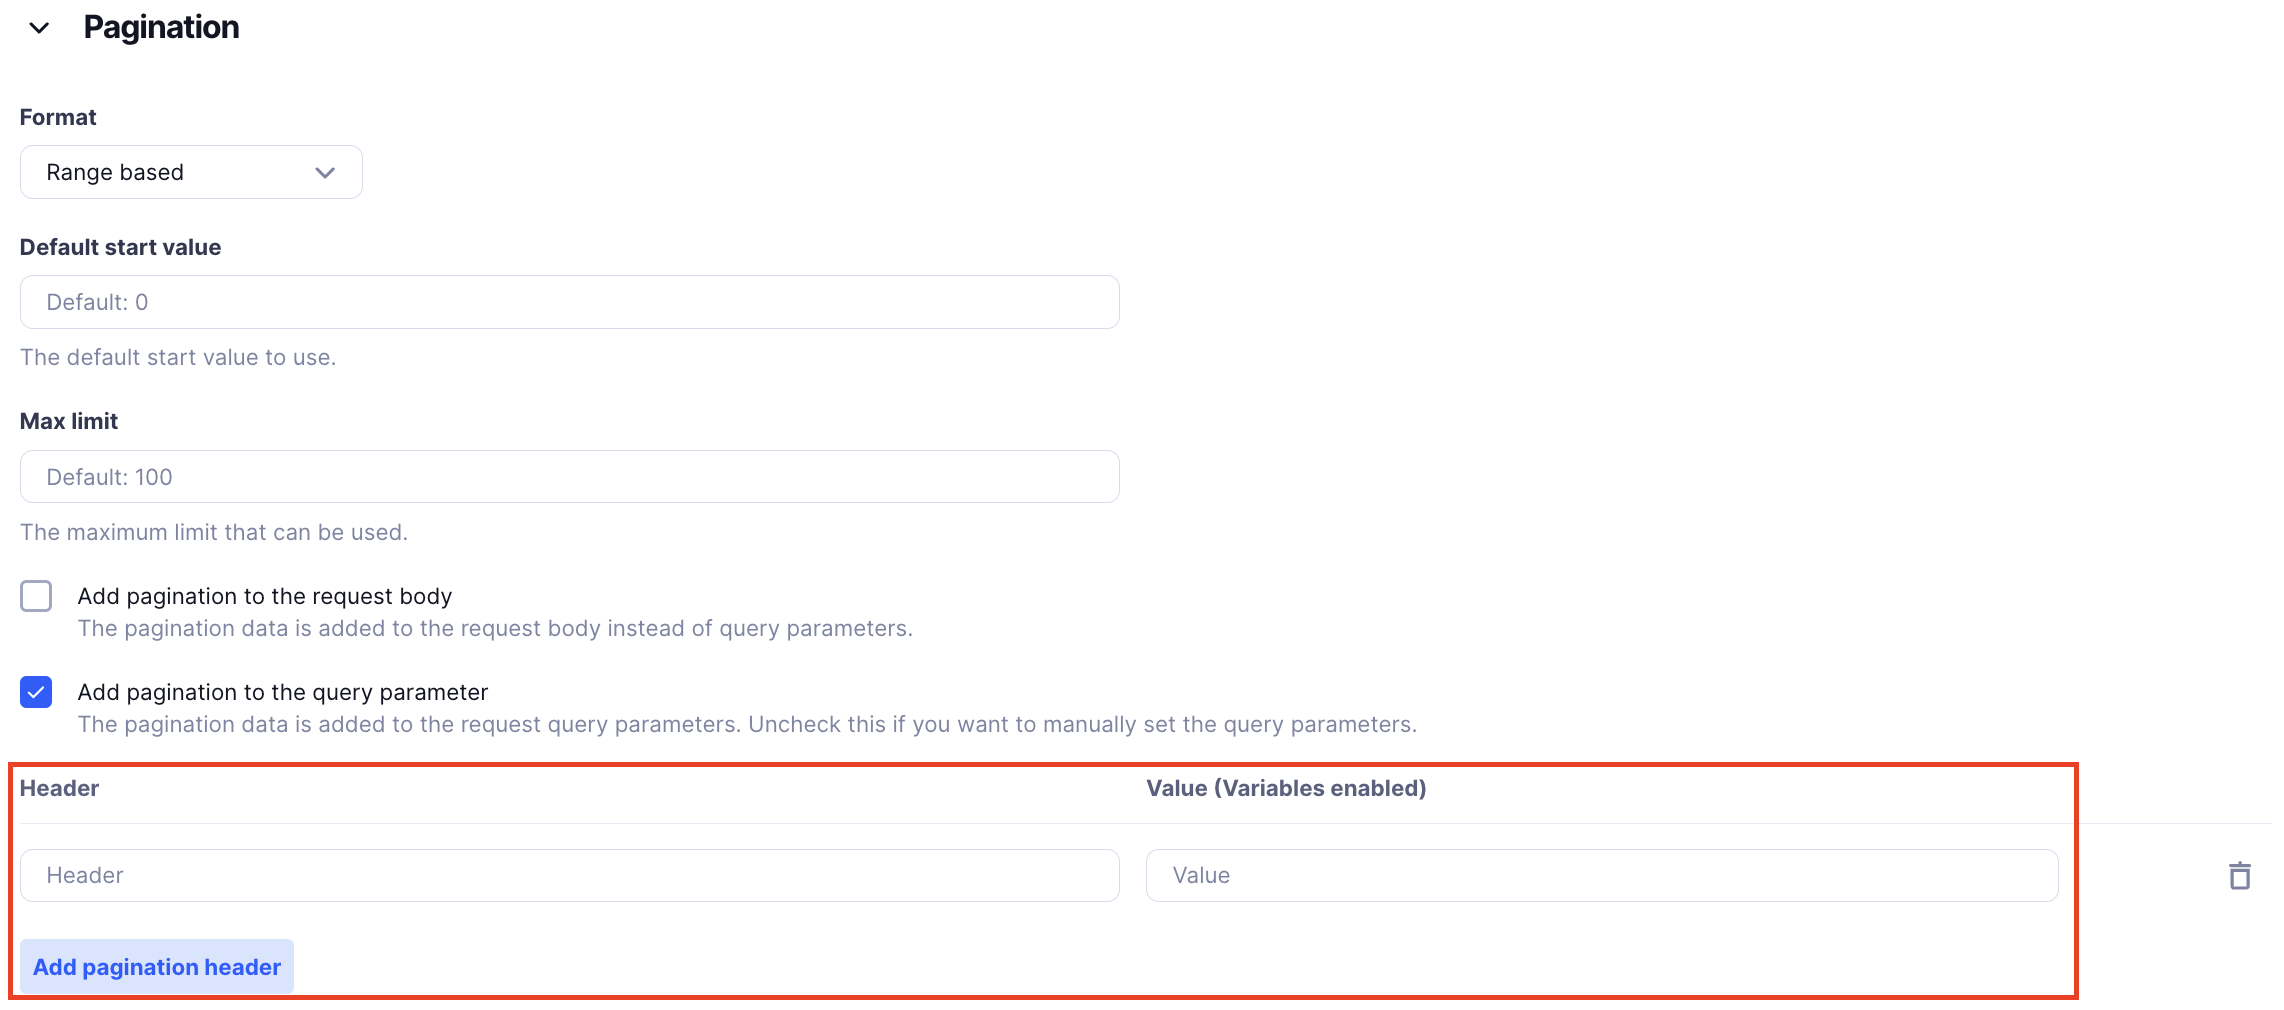
Range-Based Pagination
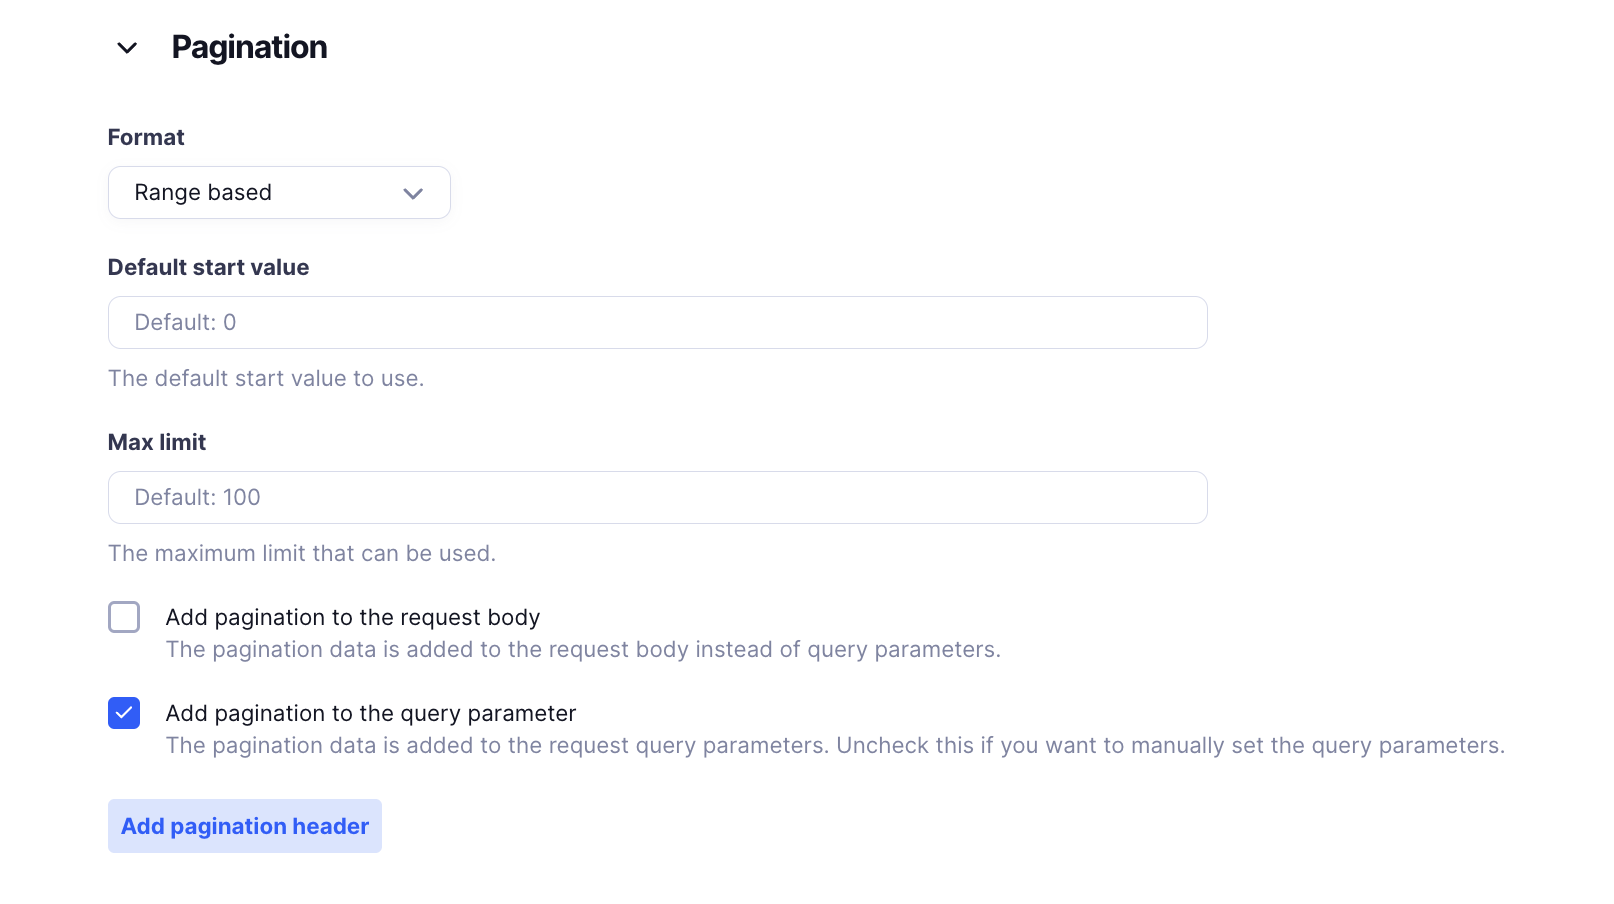
Range-Based Pagination is useful when you specify a range of records instead of pages or cursors.
Fields and Settings:
Format: Range Based
Default Start Value:
- Default:
0 - What It Is: Starting point for data retrieval.
- Default:
Max Limit:
- Default:
100
- Default:
Add Pagination to Request Body or Query Parameter:
- Same as Offset-Based.
Example Use Case for Range-Based Pagination:
Used when APIs need a specific range or starting point and the number of records to fetch.
Link Header-Based Pagination
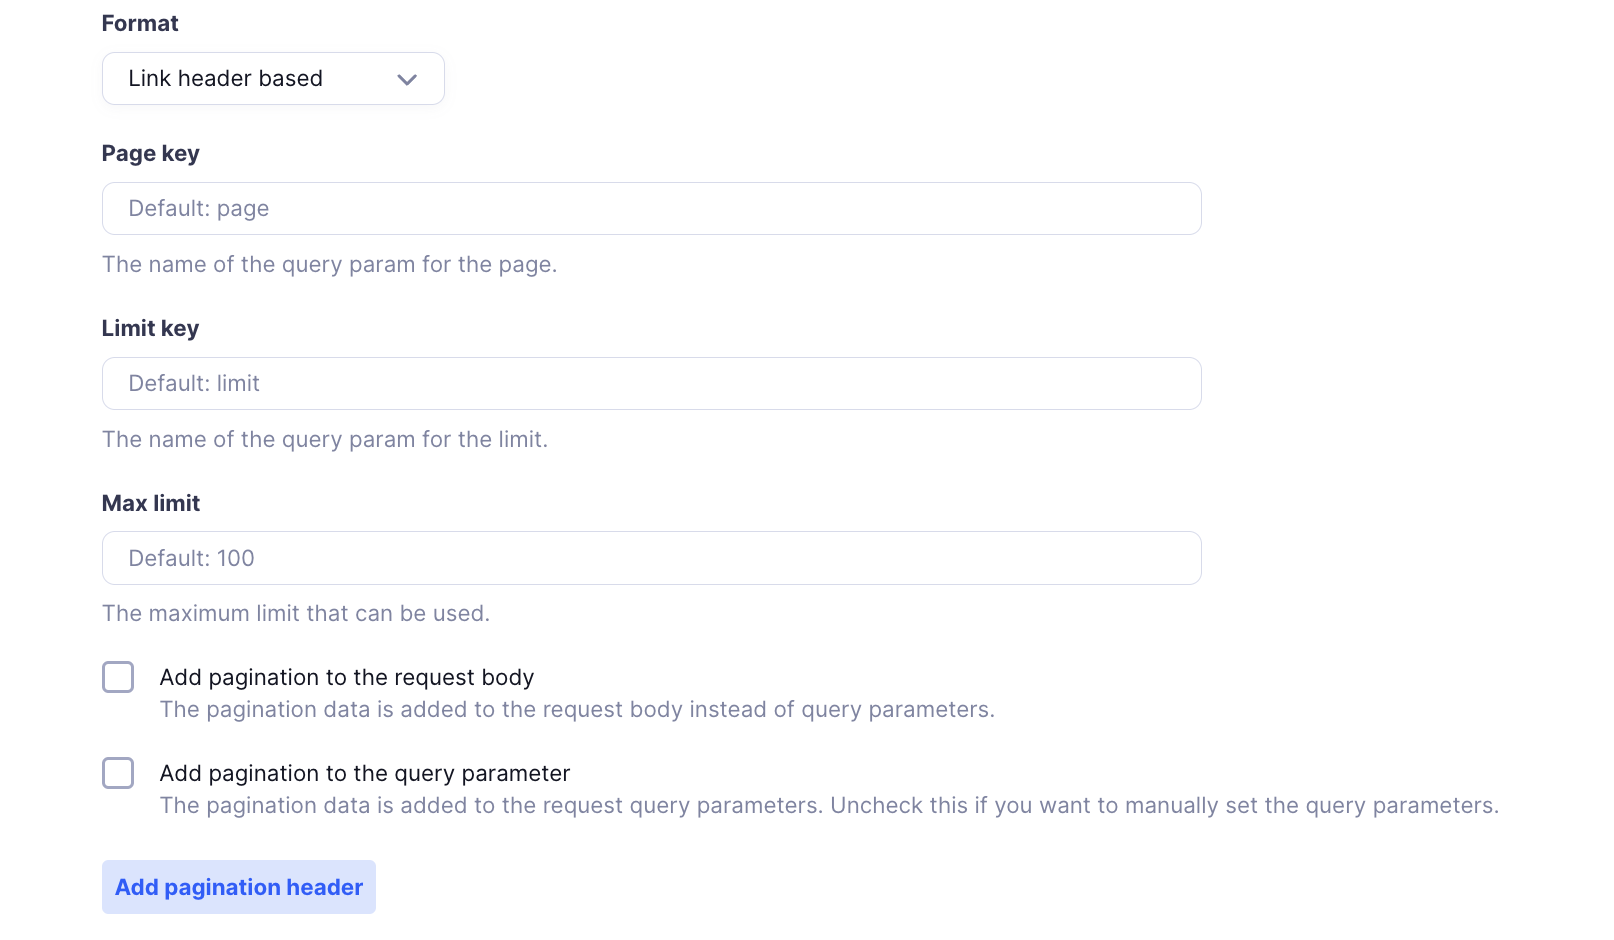
Link Header-Based Pagination uses links in the response headers to access the next pages.
Fields and Settings:
Format: Link Header Based
Page Key:
- Default:
page - What It Is: Current page indicator.
- Default:
Limit Key:
- Default:
limit - What It Is: Number of items per page.
- Default:
Max Limit:
- Default:
100
- Default:
Add Pagination to Request Body or Query Parameter:
- Same as Offset-Based.
Example Use Case for Link Header-Based Pagination:
Common in APIs that include next, previous, or last page links in the response headers (e.g., Link: <https://api.example.com/items?page=2>; rel="next").
Adding Pagination Headers
For most pagination methods, you can also add specific headers related to pagination:
- Add Pagination Header:
- Header Name: Name of the pagination-related header.
- Value: The value for the header.
- Variables Enabled: Use variables for dynamic values.
Rate Limiting
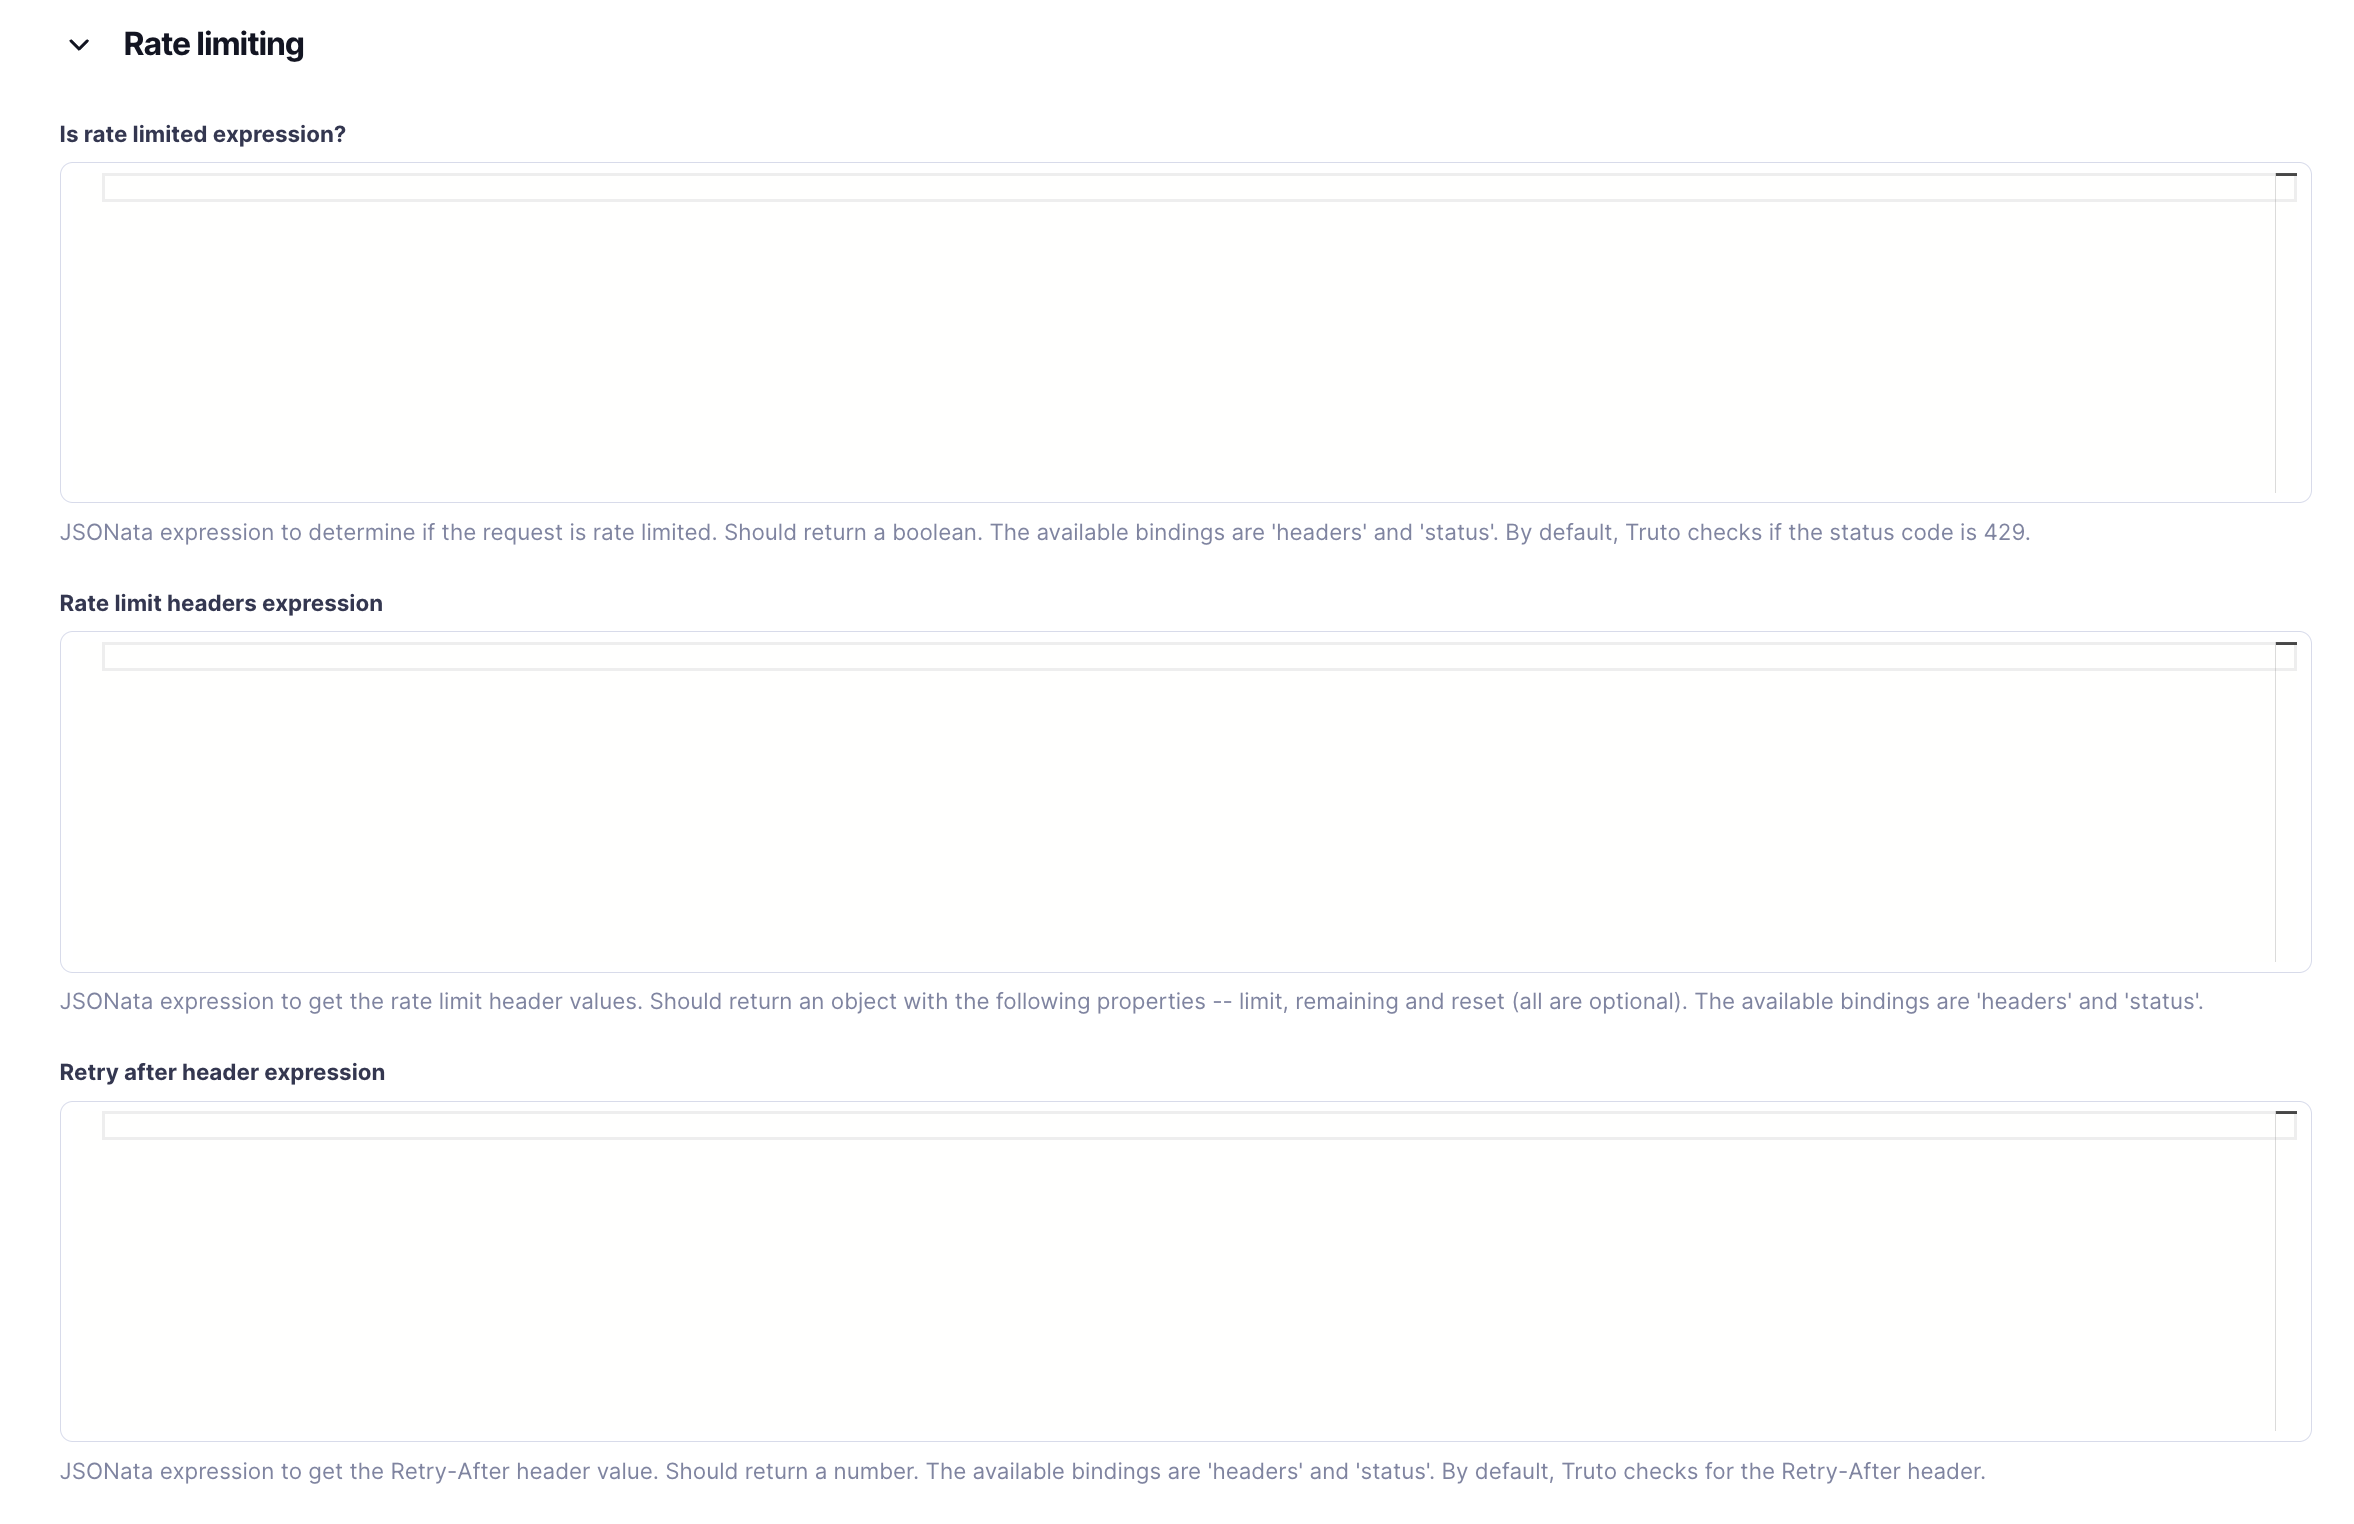
The Rate Limiting section helps Truto manage how many API requests your integration makes. This prevents you from exceeding the limits set by the external API, which could cause your integration to stop working temporarily.
Why Rate Limiting Matters
External APIs often limit how many requests you can make in a certain time period (like per minute or hour). If you go over these limits, your integration might get blocked. Rate limiting helps avoid these problems by controlling how often your integration makes requests.
How to Set Up Rate Limiting
In Truto, you use JSONata expressions to set up how rate limiting works. These expressions look at the API’s response to decide if you’ve hit the limit and how to handle it.
Rate Limiting Fields and Settings
Is Rate Limited Expression?
- What It Is: A JSONata expression that checks if your request was rate-limited.
- Should Return:
trueorfalse. - Data Available:
headers: API response headers.status: HTTP status code.
- Default: Checks if the status code is
429(rate limit exceeded). - Example Expression:jsonata
status = 429
Rate Limit Headers Expression
- What It Is: A JSONata expression to get rate limit details from the response headers.
- Should Return: An object with
limit,remaining, andreset. - Data Available:
headers: API response headers.status: HTTP status code.
- Example Expression:jsonata
{
  "limit": headers["X-RateLimit-Limit"],
  "remaining": headers["X-RateLimit-Remaining"],
  "reset": headers["X-RateLimit-Reset"]
}
Retry After Header Expression
- What It Is: A JSONata expression to get how long to wait before retrying.
- Should Return: A number of seconds to wait.
- Data Available:
headers: API response headers.status: HTTP status code.
- Default: Looks for the
Retry-Afterheader. - Example Expression:jsonata
$number(headers["Retry-After"])
Default Rate Limiting in Truto
By default, Truto:
- Checks if the status code is
429. - Looks for a
Retry-Afterheader to know how long to wait before trying again.
This setup works well for most APIs, but you can customize it with your own JSONata expressions if needed.
Error Expressions
The Error Expressions section helps you handle errors from external APIs, especially when those APIs don’t use standard error codes.
What Are Error Expressions?
Error Expressions are JSONata expressions that convert API error responses into standard HTTP status codes and messages. This makes it easier to manage errors consistently, even if the external API has unusual error formats.
Error Expression Fields and Settings
- Error Expression (JSONata)
- What It Is: A JSONata expression that turns API errors into standard error codes and messages.
- Data Available:
response: The entire API response.status: The HTTP status code.headers: Response headers.data: The response body (usually JSON).
- Should Return: An object with:
status(number): HTTP status code for the error.message(string): A clear error message.metadata(optional): Extra info about the error.headers(optional): Any related headers.
- When to Use: If there’s an error, define how to handle it. If no error, return undefined.
- Example Expression:jsonata
{ "status": data.errorCode = "INVALID_TOKEN" ? 401 : status, "message": data.message ? data.message : "Unknown error occurred", "metadata": data, "headers": headers } - Explanation:
- If
data.errorCodeis"INVALID_TOKEN", setstatusto 401 (Unauthorized). - Use
data.messageif available; otherwise, use a generic message. - Include
metadataandheadersfor more details.
- If
Example Use Case: Salesforce Integration Error Handling
Suppose Salesforce sometimes returns custom errors like this:
{
  "errorCode": "INSUFFICIENT_ACCESS",
  "message": "You do not have permission to perform this action"
}
You can handle it with this Error Expression:
{
  "status": data.errorCode = "INSUFFICIENT_ACCESS" ? 403 : status,
  "message": data.message ? data.message : "Unknown error occurred",
  "metadata": data
}- Status:
"INSUFFICIENT_ACCESS"becomes 403 (Forbidden). - Message: Uses the message from Salesforce.
- Metadata: Includes the whole error response for more info.
Benefits of Using Error Expressions
- Consistency: Handle errors the same way, making it easier to manage.
- Customization: Tailor error handling to fit the API’s specific needs.
- Better User Experience: Provide clear and understandable error messages.
Resources
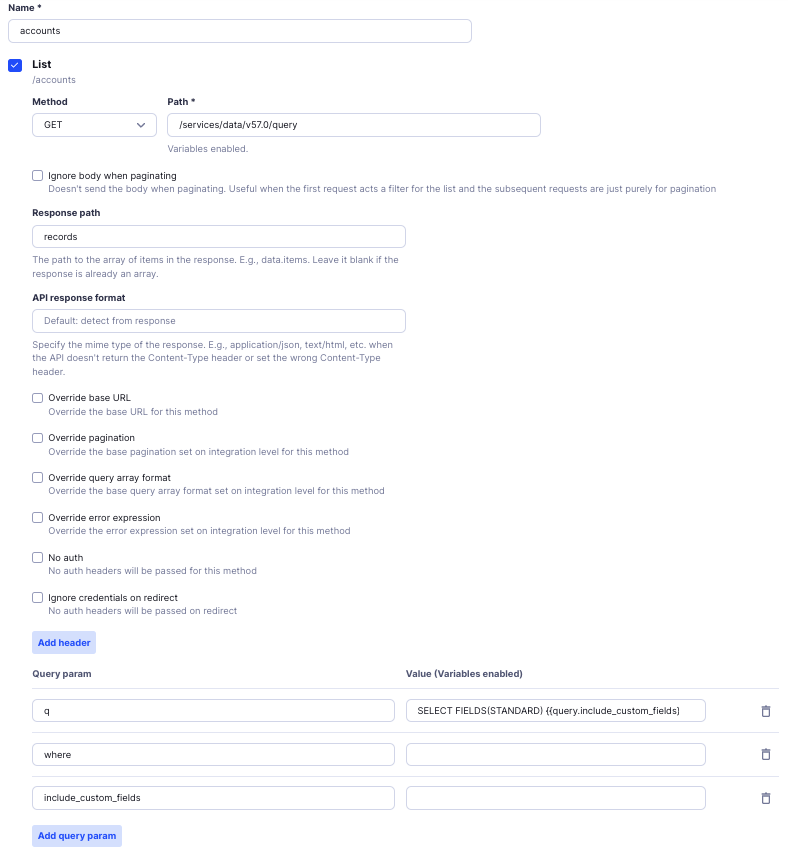
The Resources section is where you define what data your integration will work with and what actions you can perform on that data. It helps you organize the main functions of your integration.
Truto's CRUD Model
Truto uses the CRUD model (Create, Read, Update, Delete) to define resources. For each type of data, you set up different actions you can do with it. This makes your integration easy to use and complete.
Here are the main parts of Resources:
- Resource Name: The type of data, like accounts, contacts, invoices, etc.
- Operations (Methods): The actions you can perform on the data, following CRUD:
- List: Get all items (
GET). - Retrieve: Get one item by ID (
GET). - Create: Add a new item (
POST). - Update: Change an existing item (
PATCHorPUT). - Delete: Remove an item (
DELETE).
- List: Get all items (
Key Elements of Resources Configuration
Resource Name:
- What It Is: A name that identifies the type of data.
- Example:
accounts,contacts,orders. - Use Case: In Salesforce, a resource could be named
accounts.
Operations (Methods): Each Resource can have several methods that define what actions you can take:
List:
- Path: The endpoint to get all records.
- Method:
GET - Example:
/services/data/v57.0/query- Gets a list of accounts. - Response Path: Where the data array is in the response.
- Example: In Salesforce, data might be under
records. - Use Case: Helps Truto find the list of items in the response.
- Example: In Salesforce, data might be under
Retrieve:
- Path: The endpoint to get a specific record.
- Method:
GET - Example:
/services/data/v57.0/sobjects/Account/{{id}}- Gets a specific account by
id.
- Gets a specific account by
- Variables Enabled: Use placeholders like
to get specific records.
Create:
- Path: The endpoint to add new records.
- Method:
POST - Body Format: Usually JSON.
- Example:
/services/data/v57.0/sobjects/Account- Adds a new account. - Body: The default data sent when creating a new record.
Update:
- Path: The endpoint to change existing records.
- Method:
PATCHorPUT - Example:
/services/data/v57.0/sobjects/Account/{{id}}- Updates an existing account by
id.
- Updates an existing account by
- Body Format: Usually JSON.
- Body: The data you want to update.
Delete:
- Path: The endpoint to delete a record.
- Method:
DELETE - Example:
/services/data/v57.0/sobjects/Account/{{id}}- Deletes a specific account by
id.
- Deletes a specific account by
Response Path and API Response Format
Response Path:
- What It Is: The location in the API response where the actual data is found.
- Example: In Salesforce, account records might be under
records. - Use Case: Helps Truto find the list or specific item in the API’s response.
API Response Format:
- Default: Detect from response
- What It Is: The expected format of the API response.
- Example:
application/jsonortext/html. - Note: Change it if the API doesn’t set the Content-Type correctly.
Query Parameters
Query Parameters let you filter or refine the data you’re retrieving. These can be dynamic, using placeholders that get replaced when the integration runs.
Headers and Authentication Options
Headers:
- Each operation can have its own headers.
- Example: The Authorization header is usually needed to make secure requests.
No Auth:
- Allows sending requests without authentication headers.
- Use Only If: The API is public or doesn’t need authentication.
Override Options
Sometimes, specific methods need different settings from the rest of the integration:
Override Base URL:
- Use a different base URL for this method.
Override Pagination:
- Use a different pagination method for this method.
Override Query Array Format:
- Change how query arrays are formatted for this method.
Override Error Expression:
- Use a custom error-handling expression for this method.
Actions
The Actions section lets you set up automated tasks that happen after you connect an account. These tasks can gather information, update settings, make requests, or perform specific operations. Actions help make your integrations work smoothly without manual steps.
Types of Actions
Here’s how actions typically work in Truto:
- Get Context: Collect initial information needed for the integration.
- Transform: Change or enhance the collected information using JSONata.
- Update Context: Save the collected or transformed data for later use.
- Set Context: Update specific values in the integration’s context.
- Request: Make API requests to get or change data in real time.
Types of Actions in Detail
1. Get Context
- What It Is: Collect initial data from the connected account, like subdomains or API keys.
- Example: Getting the user’s Salesforce subdomain when connecting to Salesforce.
2. Transform
- What It Is: Modify or enhance the collected data using a JSONata expression.
- JSONata Example:jsonata
{ "label": $.subdomain }- Explanation: Creates a label from the subdomain to make the account easier to recognize.
3. Update Context
- What It Is: Save the transformed data for future use in the integration.
- Example: Saving the Salesforce label so users can easily see their connected Salesforce account.
4. Set Context
- What It Is: Set or update specific key-value pairs in the integration’s context.
- Use Case: Storing user credentials securely for future API calls.
5. Request
- What It Is: Make specific API calls to fetch or change data.
- Use Case: After connecting to Salesforce, verify account details by fetching additional user information.
- Request Type Fields:
- Proxy API: The endpoint to send the request.
- Resource: The resource to act on, like "accounts" or "contacts."
- Method to Call: The HTTP method (e.g.,
GET,POST,PATCH). - Body: The data sent with the request, especially for
POSTorPATCH. - Query: Add query parameters to refine or filter data.
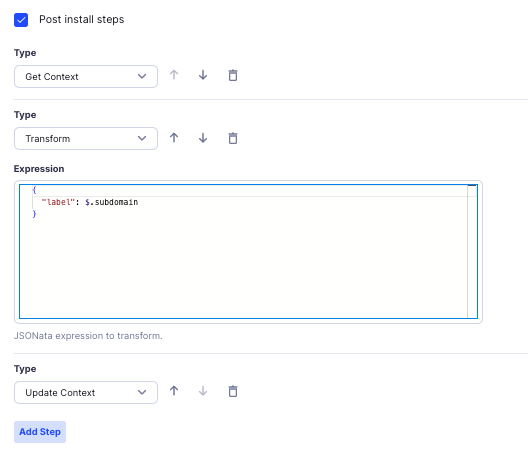
Salesforce Example: Setting Up Actions
Here’s how you might set up actions when connecting a Salesforce account:
Step 1: Get Context:
- Type: Get Context
- Action: Retrieve the Salesforce subdomain provided by the user.
- Use Case: Needed to make API requests to the correct Salesforce instance.
Step 2: Transform:
- Type: Transform
- JSONata Expression:jsonata
{ "label": $.subdomain } - Explanation: Creates a user-friendly label using the subdomain.
Step 3: Update Context:
- Type: Update Context
- Action: Save the label so users can easily identify their Salesforce account.
Webhooks and Event Handling in Actions
Handle Verification: Some webhooks need to be verified before use. Add a Request or Get Context step in Actions to handle this automatically.
Format and Compare: Add steps to check specific fields in the webhook payload to verify data integrity and authenticity.
Example of Salesforce Action Setup
Here’s how the Salesforce integration might look after setting up actions:
After connecting the account, the label appears like this, making it easy to recognize:

Webhooks
Webhooks let you receive real-time notifications from other systems when certain events happen. This section explains how to set up and handle incoming webhook events and any necessary verification.
For more details, check out the Webhooks Documentation.
RapidForm
RapidForm helps you create customizable forms to collect user input during the integration process. You can use it to gather required credentials or other information needed to set up your integration successfully. Learn more in the RapidForm Documentation.

